User Guide
About ToothTracker
ToothTracker is a Dental Clinic Administrative Management System designed for dental clinic administration assistants. From adding new patient and dentist profiles to seamlessly creating appointment schedules, ToothTracker is engineered to simplify every aspect of your dental clinic administrative responsibilities.
Why ToothTracker? Because Your Time Matters.
In your bustling dental clinic, time is the rarest commodity. That is why we designed ToothTracker to match the speed of the services that you provide, enabling you to manage patient and dentist records efficiently, schedule appointments without any overlaps and ensure that your clinic operates like a well-oiled machine — all through a versatile Command Line Interface (CLI) that responds to your speedy typing, along with a Graphical User Interface (GUI) that includes a user-friendly calendar.
ToothTracker’s Core Features Designed with You in Mind
- Digital Record Keeping: Say goodbye to cumbersome physical files — store and manage patients, dentists and appointments digitally.
-
Effortless Retrieval: Use intuitive
searchandfiltercommands to access and retrieve patient and dentist records. - Tagging System: Add tags to each patient and dentist to highlight key information about them.
- Smart Scheduling: Eliminate double-bookings and optimize your clinic’s operations with appointment management.
- Custom Treatments: Customize ToothTracker to reflect the treatments that are provided by your clinic.
- Visual Calendar: Get a clear overview of your day-to-day operations with our comprehensive calendar view.
Head over to How to use ToothTracker’s User Guide to start tracking your dental clinic records!
Table of Contents
- About ToothTracker
- Table of Contents
- How to use ToothTracker’s User Guide
- Get Started with ToothTracker
- Features
- Troubleshooting
- FAQ
- Known issues
- Fields summary
- Command summary
- Acknowledgements
How to use ToothTracker’s User Guide
Thank you for choosing ToothTracker! We are delighted to have you as a user! This user guide provides a comprehensive documentation on the various commands supported by ToothTracker.
First-Time Setup
If you are new to ToothTracker, let’s begin by setting up the application. Visit the Installation section for a straightforward guide to get ToothTracker up and running smoothly on your system.
Basic Operations
Already installed ToothTracker? Great! Let’s head over to the Familiarising with ToothTracker’s Interface section which covers the basics of using ToothTracker.
Quick Reference
Experienced users can refer to the Command Summary, a concise reference guide that encapsulates all ToothTracker commands for quick reference.
Support and Troubleshooting
If you come across an issue or have a question, our Troubleshooting and FAQ sections are here to swiftly assist you in troubleshooting common problems and providing answers.
Conventions used in this guide
Formatting conventions
| Formatting | Description |
|---|---|
code_snippets |
Code snippets are used to show ToothTracker commands or inputs. |
| bold | Text in bold are important details you should look out for or headers to distinguish from the rest of the text. |
| blue hyperlink | Text in blue are hyperlinks that will direct you to the relevant section of the page or to other websites. |
Call-out text box conventions
Throughout this guide, you’ll encounter various call-out text boxes. These contain helpful tips and cautionary advice that you should keep in mind to ensure a smooth experience using ToothTracker.
Note Box
Tip Box
Caution Box
Get Started with ToothTracker
Welcome to ToothTracker! We’re thrilled to assist you in streamlining your dental practice effortlessly. This quick start guide will guide you through the setup and basic operations of ToothTracker, enabling you to start optimizing your clinic’s workflow immediately.
Installing ToothTracker
If you haven’t installed ToothTracker yet, follow our easy step-by-step guide below to have ToothTracker up and running in no time. Our software is compatible with Windows, macOS, and Linux to ensure optimal performance on your machine.
- ToothTracker requires Java 11 or above installed in your Computer to run.
- If you don’t have Java installed, no worries — it’s completely free! Find detailed installation instructions here.
 Tip: Unsure about your Java version? Our troubleshooting section has you covered with a quick guide.
-
Grab the latest version of ToothTracker by downloading the
toothtracker.jarfile from our releases page. -
Create an empty folder in your computer where you would like to use as the home folder for ToothTracker.
- Place the downloaded ToothTracker file (
toothtracker.jar) into the folder.
Installation complete! You’re now ready to launch ToothTracker.
Launching ToothTracker
Great! Now that you have downloaded ToothTracker (if not, refer to the Installation Instructions), let’s get it up and running.
- Open a command terminal.
- Enter
cdand change your working directory into the folder you put thetoothtracker.jarfile in. - Enter the
java -jar toothtracker.jarcommand to run the application.
A user-friendly GUI will pop up shortly, preloaded with some sample data to get you started.

Familiarising with ToothTracker’s Interface
Now that you have ToothTracker up and running, let’s get you familiarized with ToothTracker’s user interface!
ToothTracker has two windows: a Main Window and a Calendar Window. Let’s take a closer look at each window individually.
Main Window
Upon launching ToothTracker for the first time, the Main Window will open by default. It’s designed to give you a comprehensive overview of all your patient, dentist, and appointment-related information at a glance. Let’s learn what each of these components does!
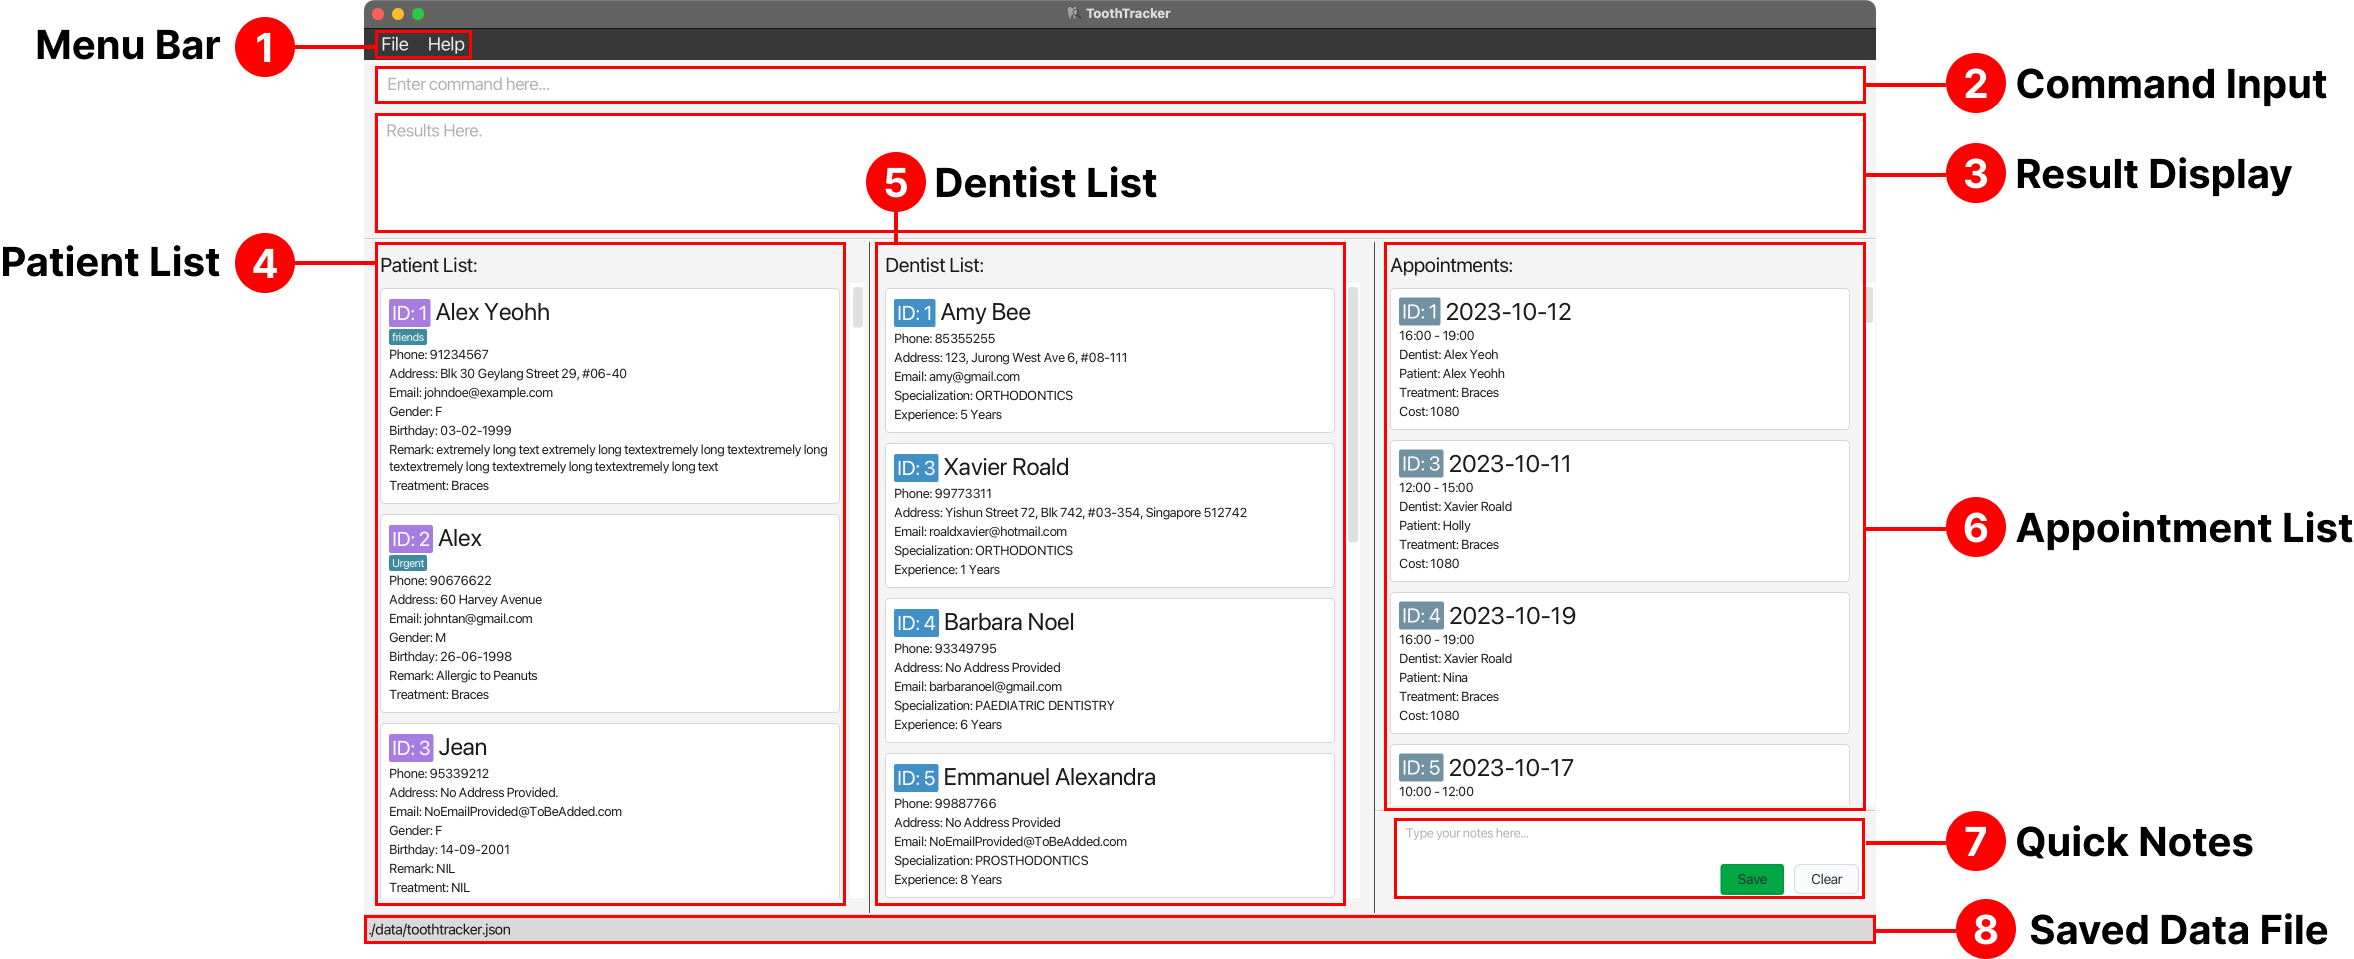
| Component | Description | |
|---|---|---|
| 1 | Menu Bar | The menu bar contains menu options to exit ToothTracker and access help resources. |
| 2 | Command Input | The command input is where you can enter your commands to instruct ToothTracker on the tasks that you want to get done. To learn more about ToothTracker’s CLI, refer to the next section. |
| 3 | Result Display | The result display area shows you the outcomes or feedback from your entered commands. |
| 4 | Patient List | This panel lists all patients currently registered in your clinic. It includes vital information such as names, contact details, and other fields. |
| 5 | Dentist List | Here, you’ll find a roster of dentists associated with your clinic, complete with their specializations and contact information. |
| 6 | Appointment List | Displays the schedule, status, and details of all clinic appointments. |
| 7 | Quick Notes | A dedicated section at the bottom right corner of the Main Window for on-the-fly notes, reminders, or observations that you need to keep handy. |
| 8 | Saved Data File | For advanced users, the file path displayed here is where ToothTracker stores your saved data (which you can edit). |
Quick Notes
Quick Notes is designed to enhance your efficiency by providing a space for immediate note-taking within the application. Use this notes section that we created to help you capture important reminders or information swiftly without having to navigate away from the main window.
How to use Quick Notes
1. Adding Notes:
Click into the Quick Notes Box and type your notes.
Remember to hit the Save button to keep your notes for future reference.
Unsaved notes will be lost when the main window is closed.
The Quick Notes box will turn green upon saving latest changes.

2. Editing Notes: Click into the Quick Notes Box and make your changes. You can select text to copy, cut, or delete as needed.
3. Clearing Notes:
To clear the contents of your Quick Notes and start from a clean slate, simply click the Clear button.
This will remove all text until you decide to save new notes.
Calendar Window
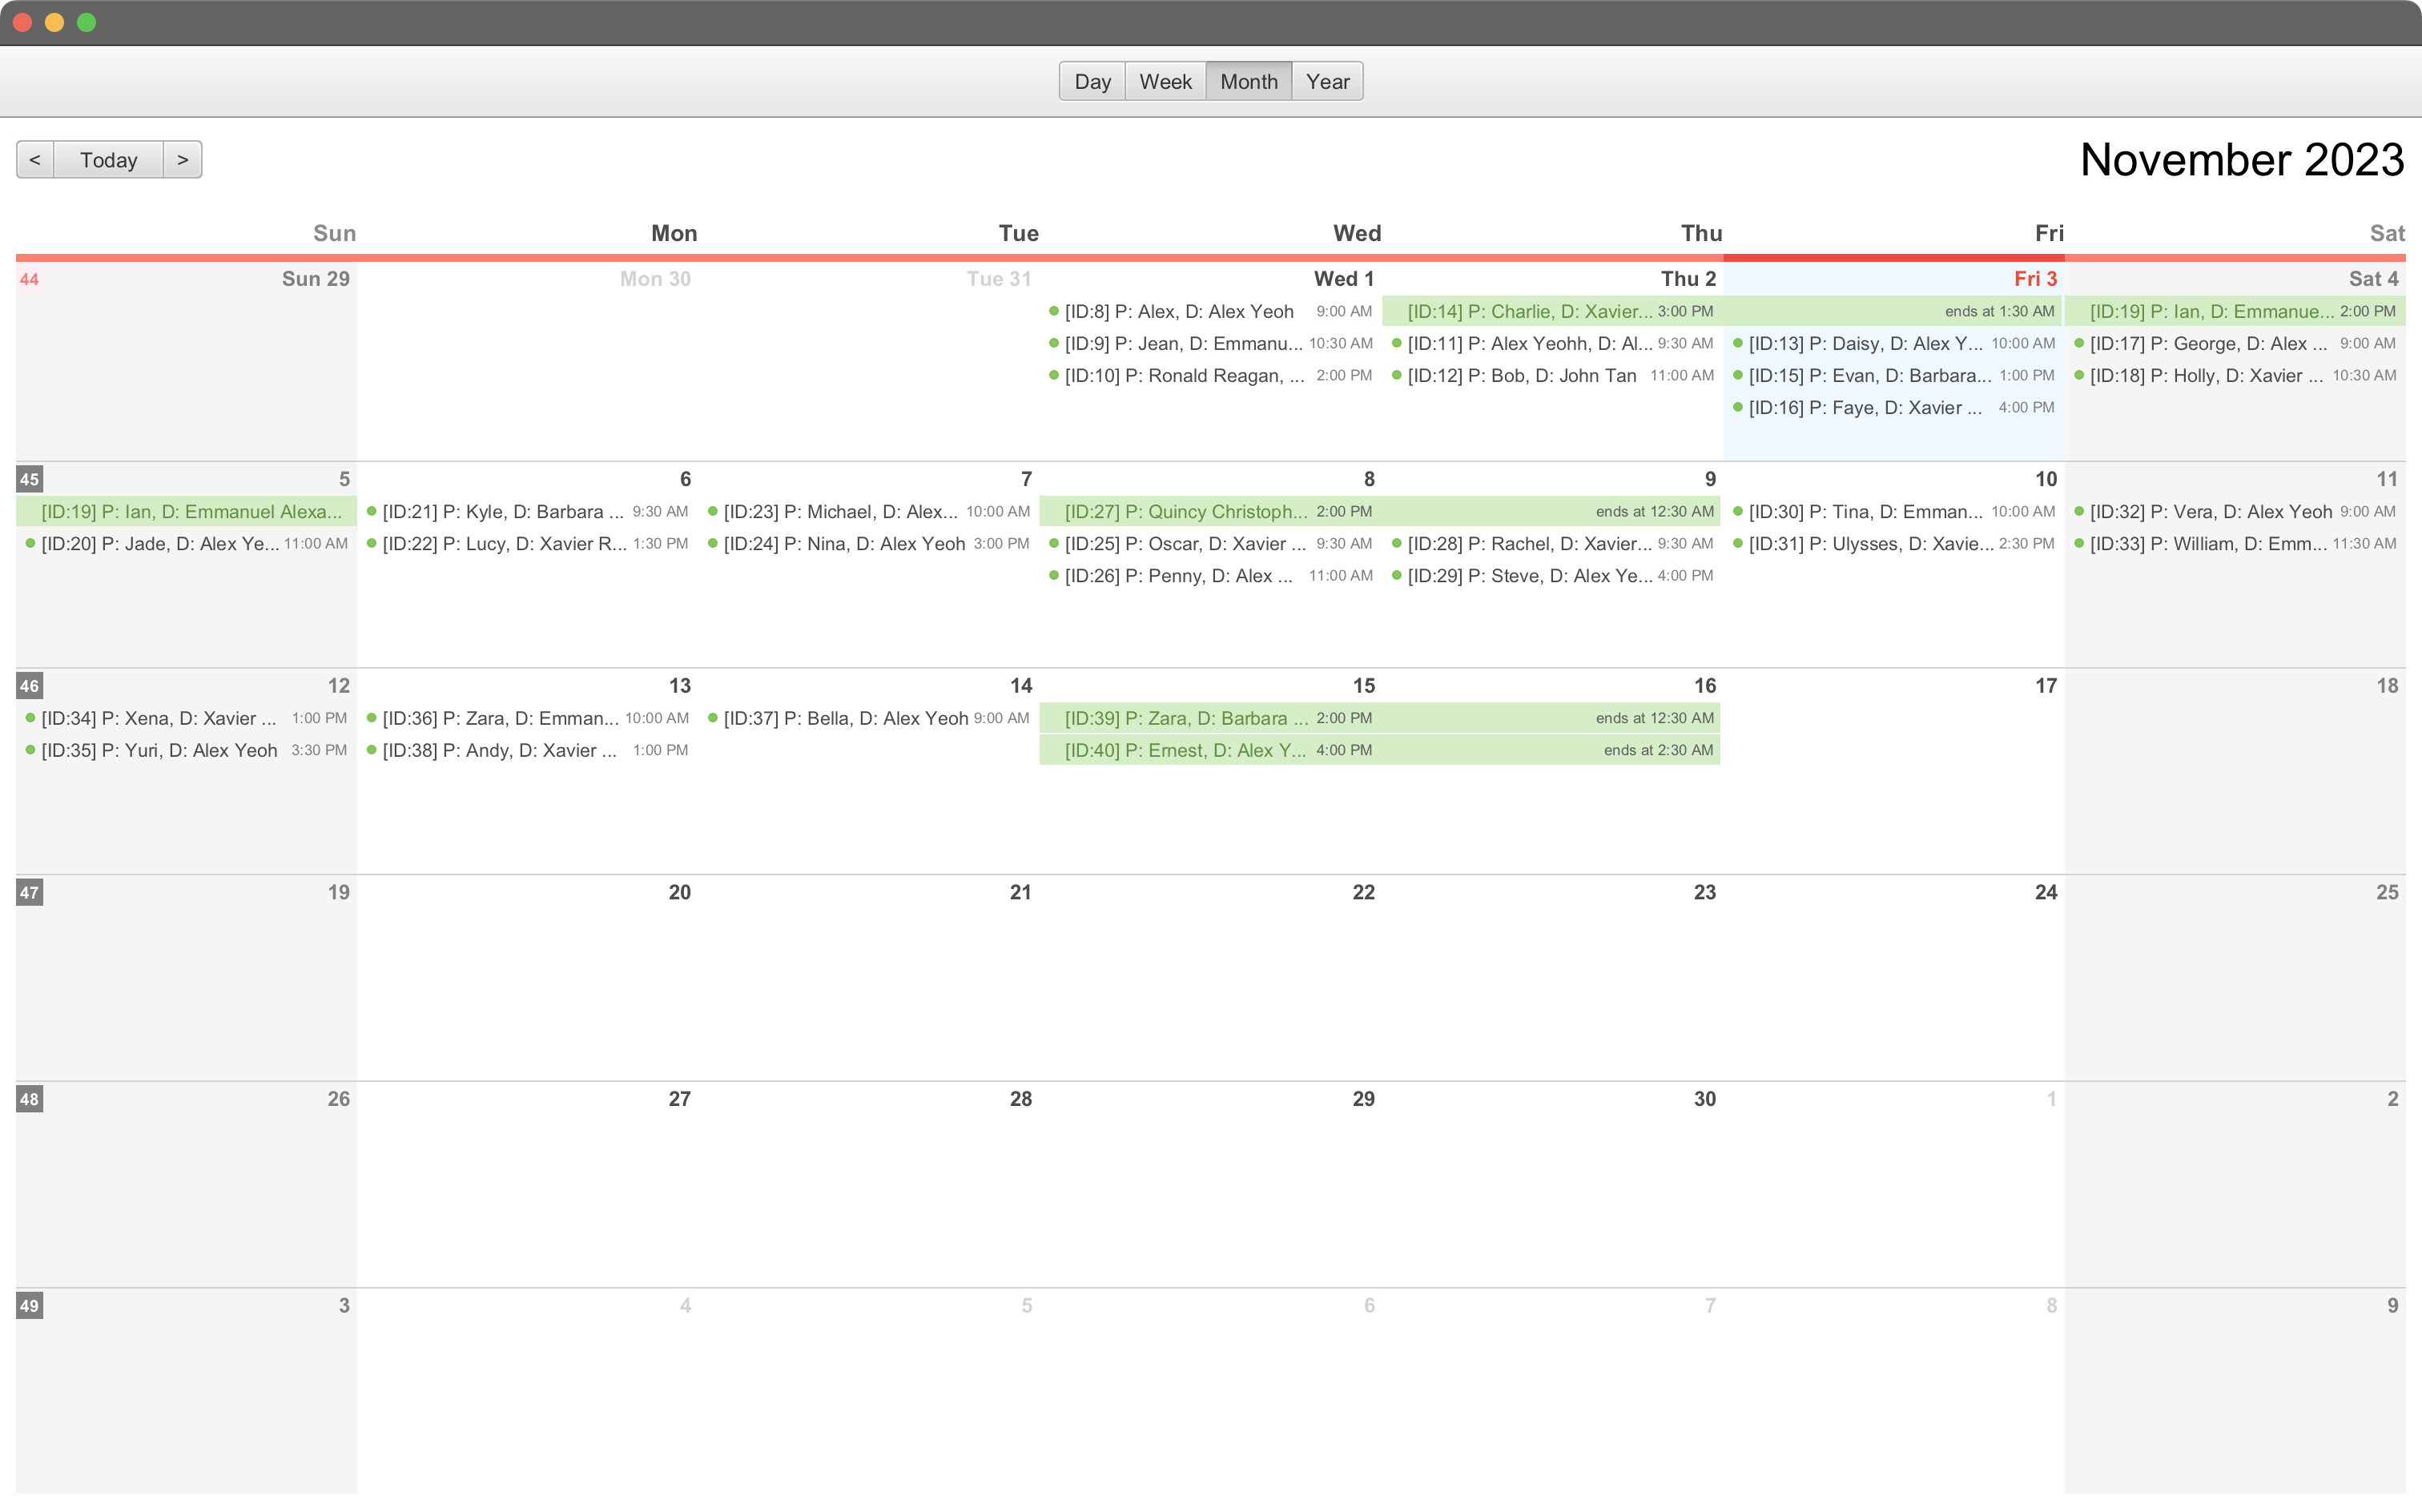
ToothTracker’s Calendar Window provides a visual representation of your clinic’s schedule. This view becomes available after executing a Calendar Command. It allows you to easily understand your clinic’s appointments and availability at a glance.
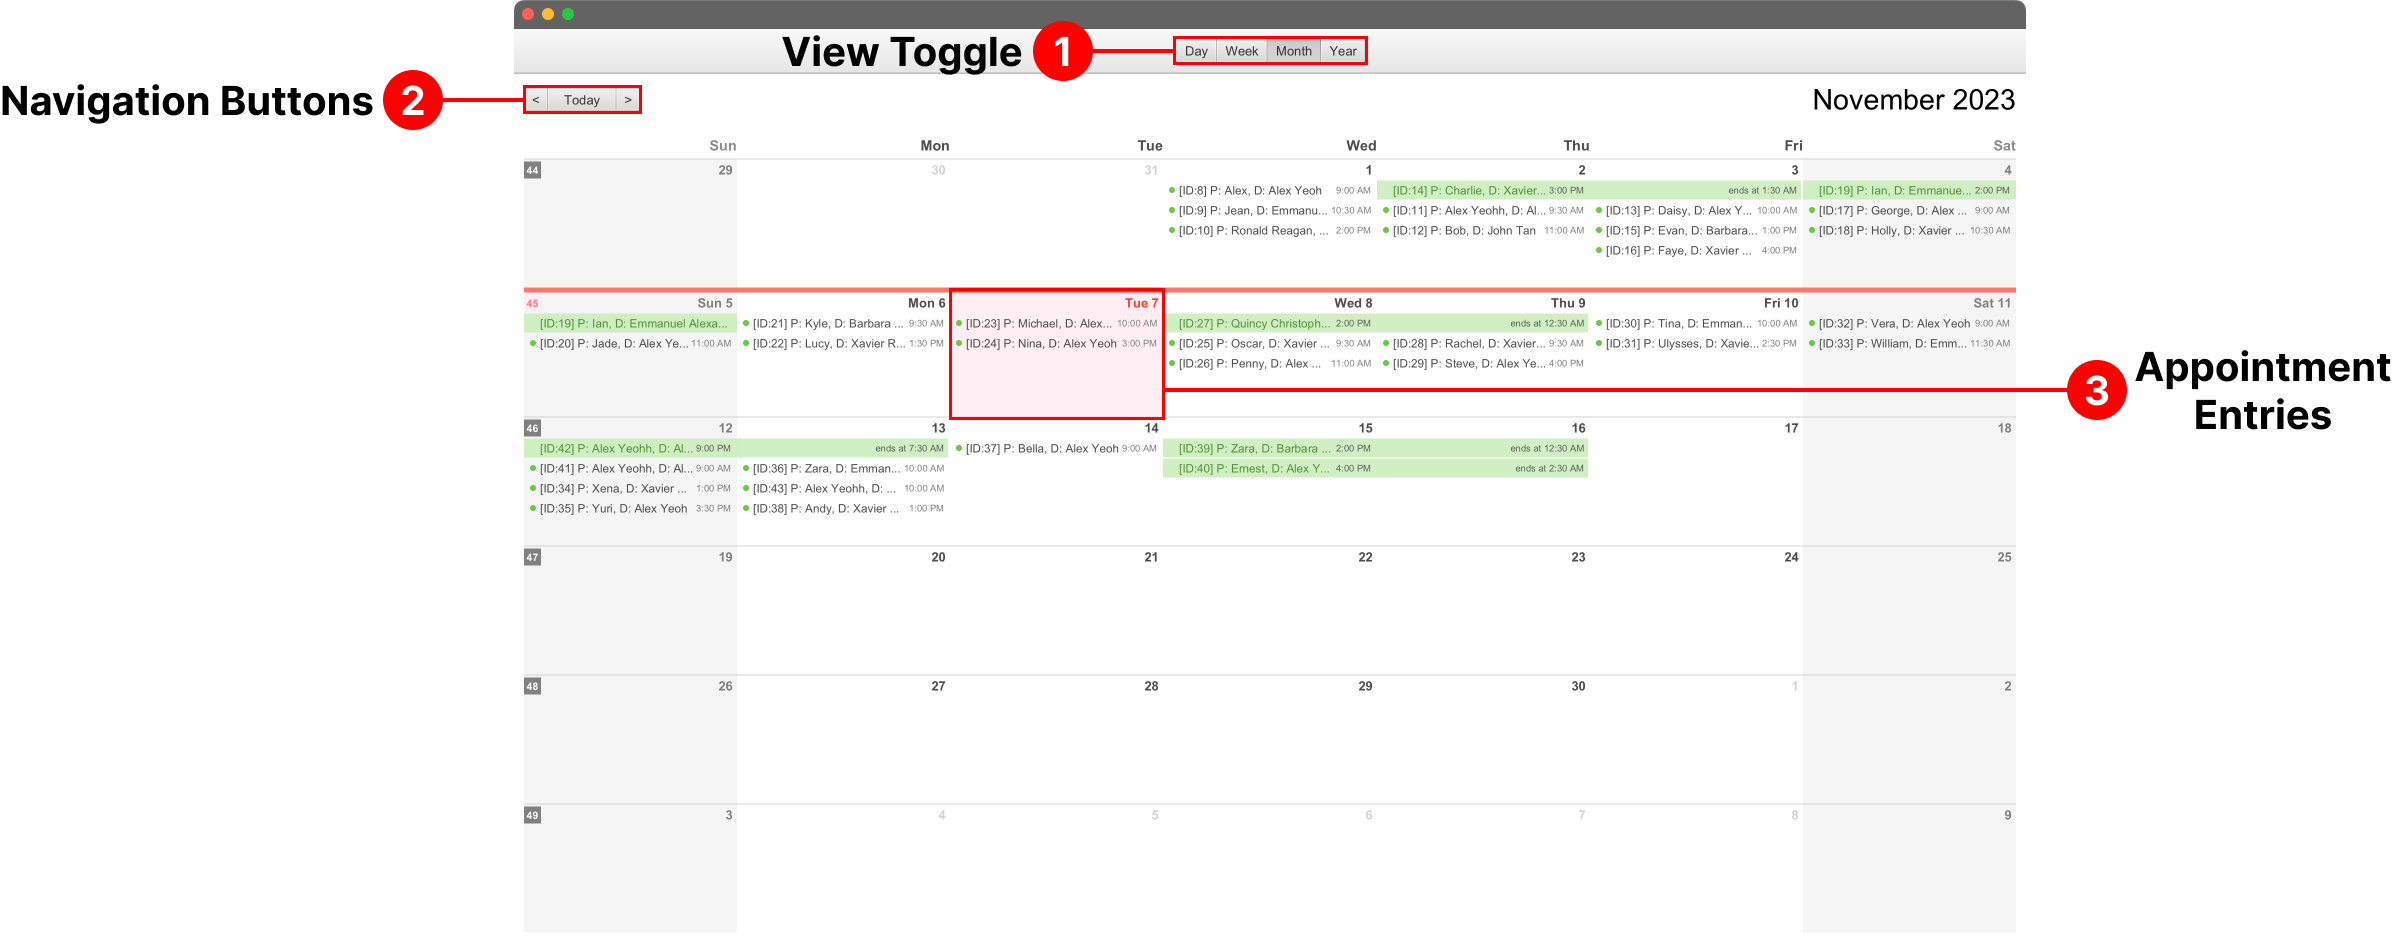
| Component | Description | |
|---|---|---|
| 1 | View Toggle | The View Toggle allows you to switch between different calendar views: Day, Week, Month, or Year to get a more precise or broader overview of appointments. |
| 2 | Navigation Buttons | The navigation arrows enable you to move to the previous or next time periods, depending on the currently selected view (day, week, month, or year). |
| 3 | Appointment Entries | This section displays the specifics of each appointment, including the Appointment ID, patient name, dentist name and appointment time. |
Using ToothTracker’s CLI
ToothTracker is optimized for use via a CLI, allowing you to accomplish tasks using text inputs, otherwise known as commands.
Currently, ToothTracker recognizes specific commands (the complete list is available in the Features section), and these commands must be formatted in a specific way. Let’s delve into how you can effectively communicate your needs to ToothTracker!
How to Input Commands
Think of the Command Input as ToothTracker’s ‘ears’ — always ready to listen to your instructions.
- Click on the Command Input box.
- Type in your command.
- Press ‘Enter’ on your keyboard (or ‘return’ if you’re using a Mac).
That’s it! ToothTracker has just executed your command. Yes, it’s as simple as that!
Understanding Command Format
Every command you input follows a simple structure to help ToothTracker understand your needs:
- Command Word: This is the first word of your command. It serves as a unique keyword that tells ToothTracker precisely the command that you want to execute.
- Index: The index is a numerical identifier assigned to each patient, dentist, or appointment, serving to uniquely distinguish them. When issuing a command related to a specific patient, dentist, or appointment, you’ll need to use the corresponding index.
- Flags: These serve as markers to differentiate between inputs. Typically, a flag is followed by a placeholder.
-
Placeholders: These are temporary labels that you’ll replace with actual data. For instance, replace ‘TREATMENT’ in
tr/TREATMENTwith the actual name of a treatment, liketr/Braces.
Trying out your first commands
Can’t wait to get started with ToothTracker? Let’s go through some straightforward commands for you to get a feel on how easy managing your clinic’s data can be.
Let’s start with adding and managing your clinic’s dental team:
Welcoming a new dentist:
Suppose Dr. Jonathan Goh is the latest addition to your dental team. Let’s add him into ToothTracker.
Type add-dentist n/Jonathan Goh p/92095568 e/jonathan.goh@gmail.com y/3 s/Paediatric Dentistry and press Enter.
- Just like that, Dr. Jonathan Goh is part of your digital roster!
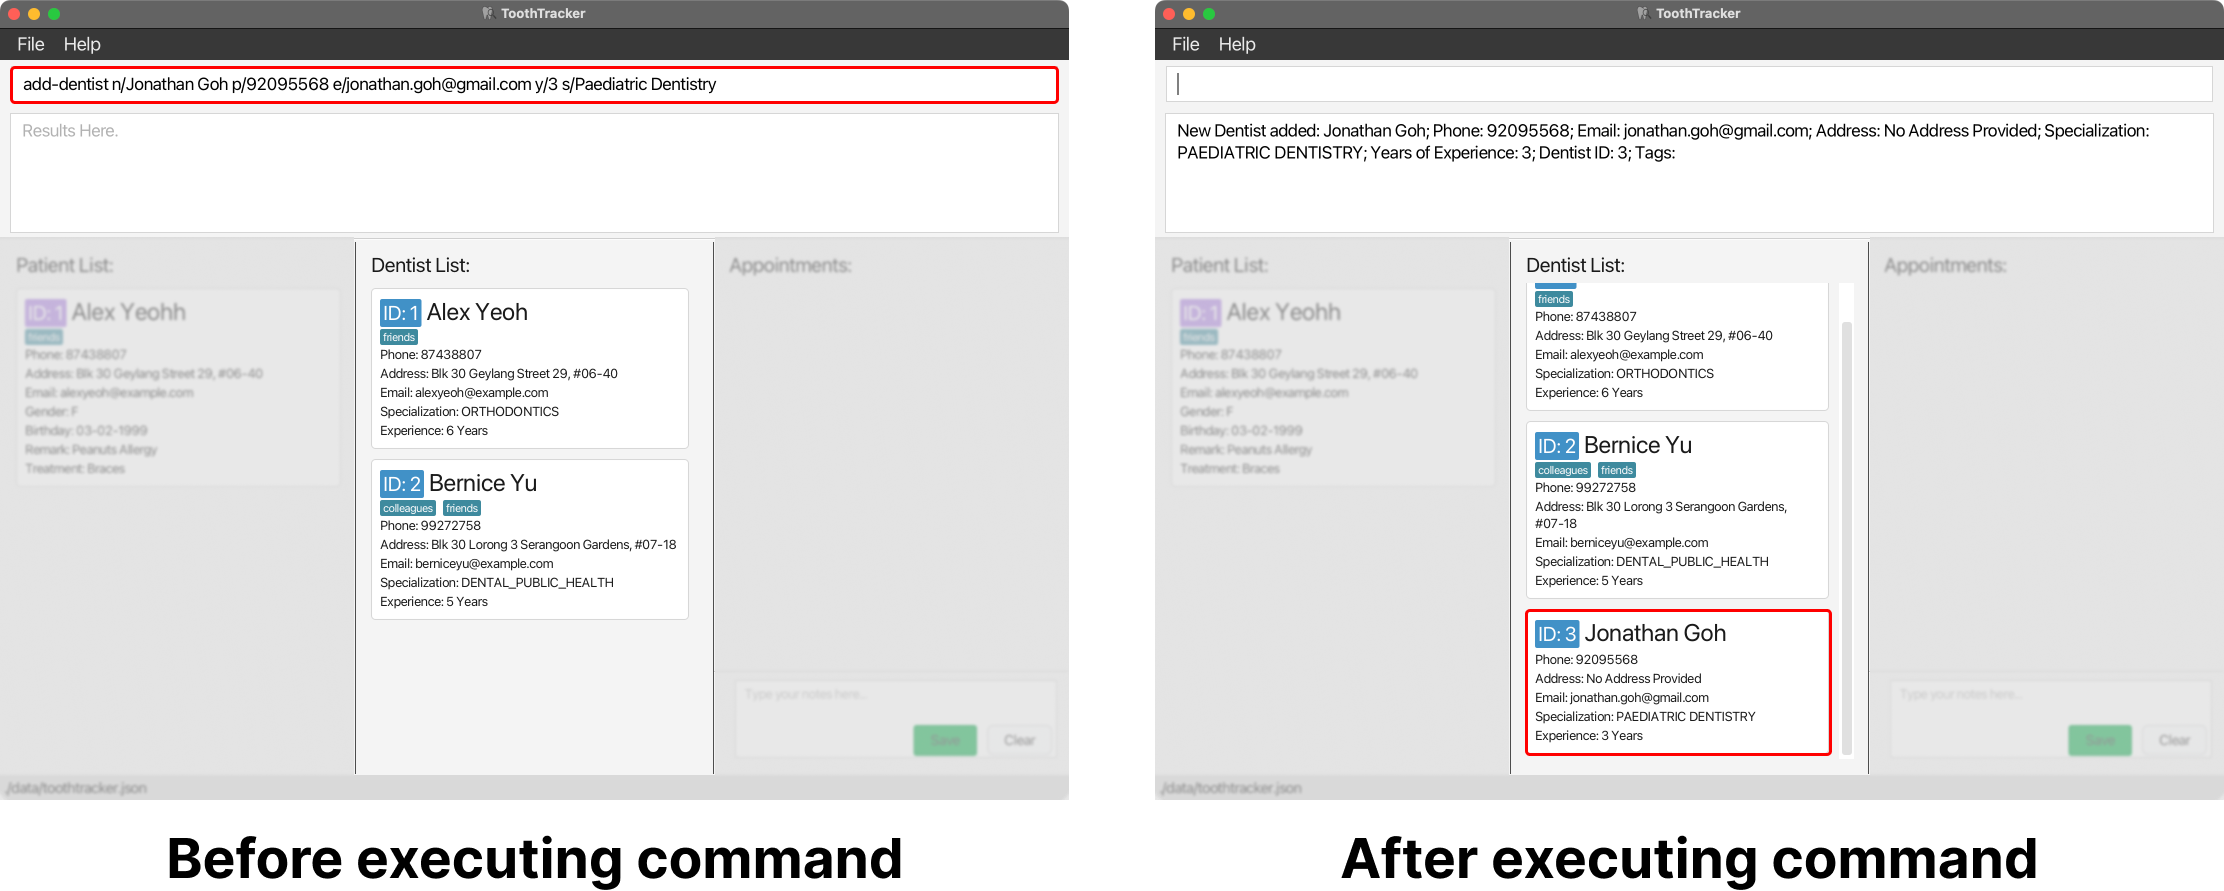
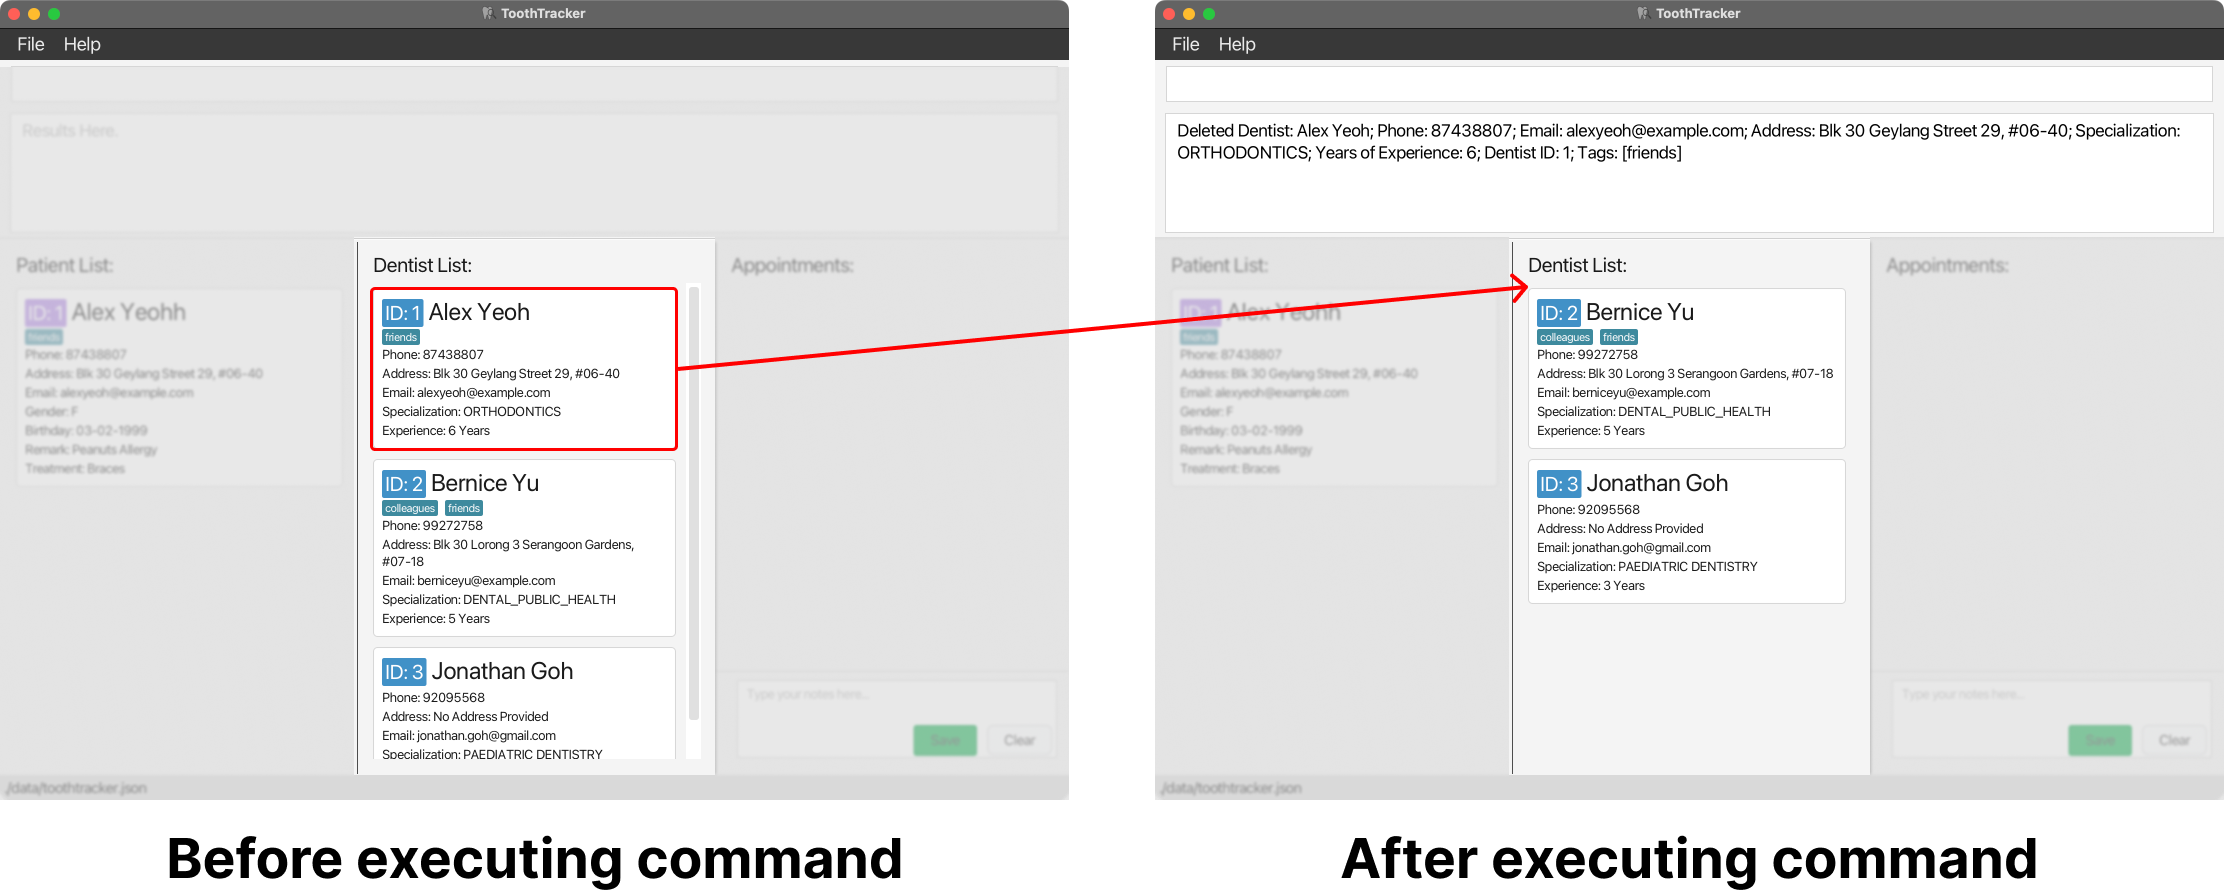
Saying farewell: If Dr. Alex Yeoh is leaving your clinic, you can keep your records up-to-date by removing his details.
Simply run delete-dentist 1.
- After executing the command, Dr. Alex Yeoh’s information is now deleted from ToothTracker.
DENTIST_ID matches the identifier on the dentist’s card within ToothTracker.
Now let’s see how easy it is to manage patient information.
Registering a new patient: Suppose you have a new patient, named Jean, onboarding your clinic.
Enter add-patient n/Jean p/95339212 b/14-09-2001 g/F and press enter.
- Notice that you’ve created a new patient, Jean!
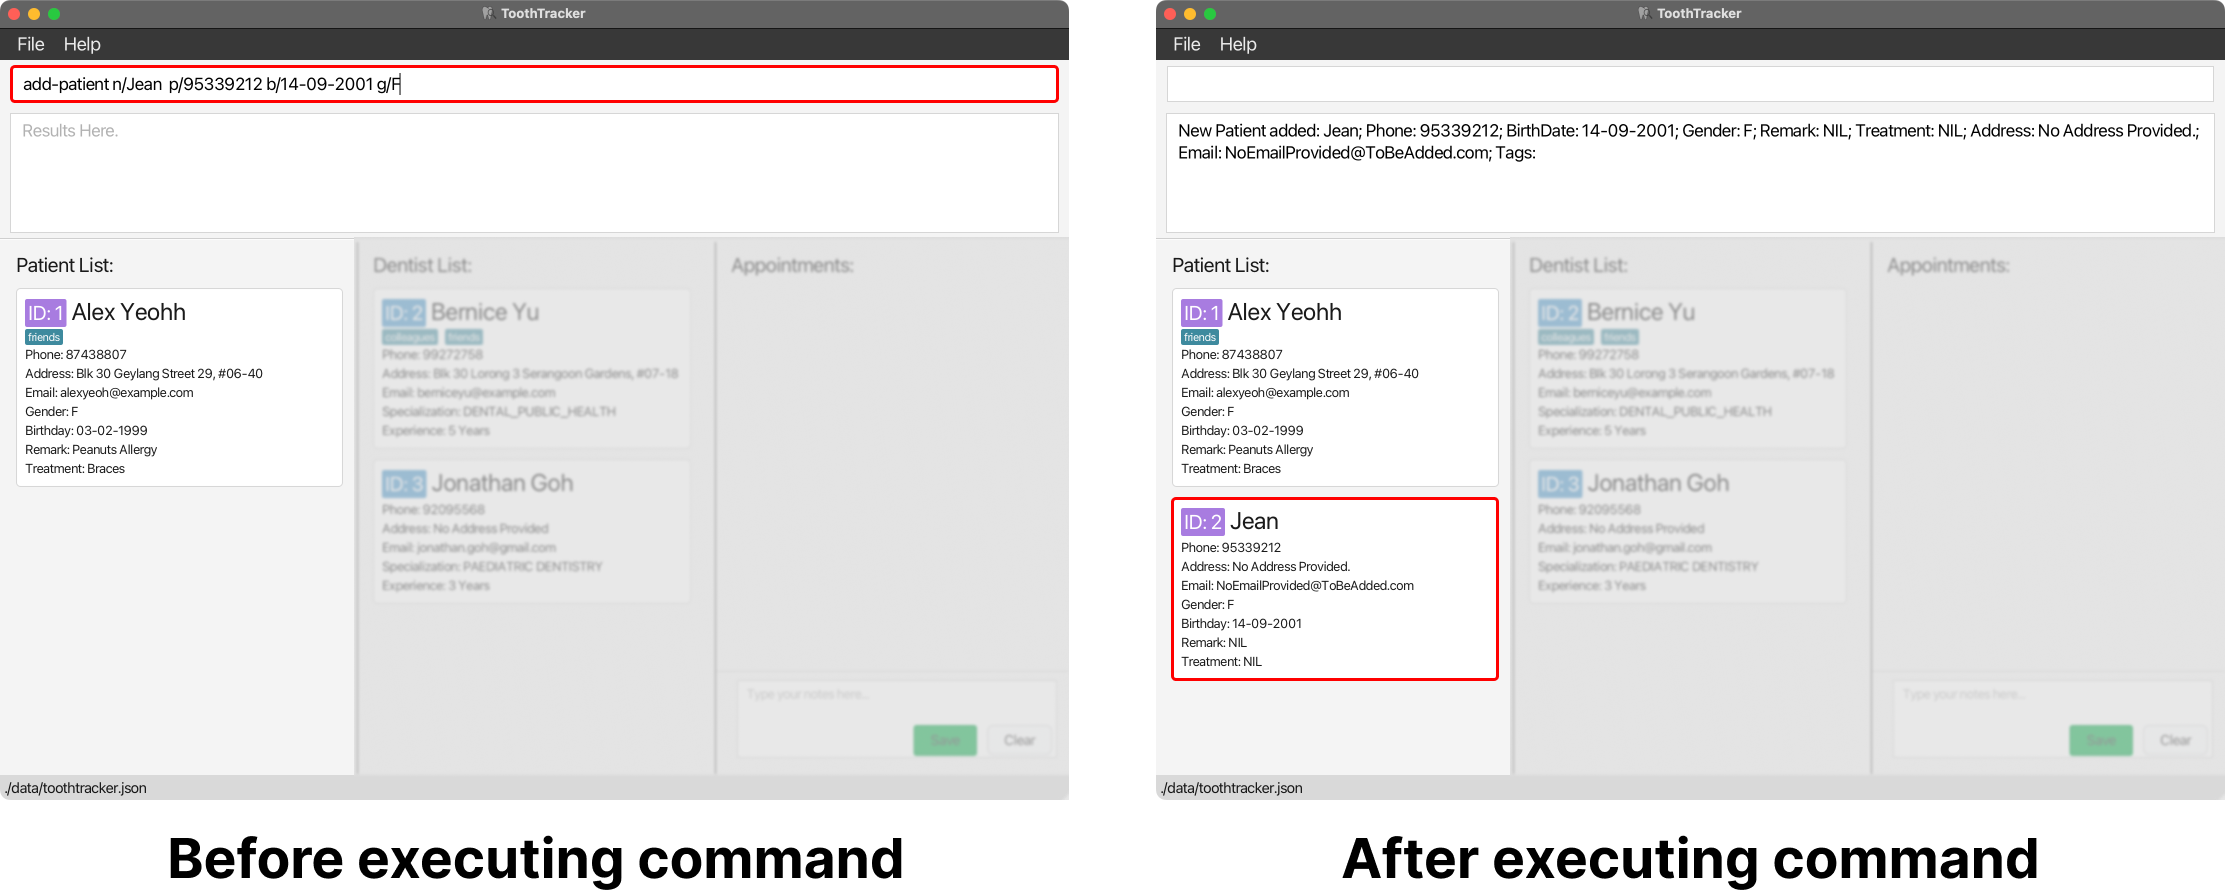
Updating patient info: Now, suppose that Alex wants to update his phone number. Easy! Just type in edit-patient 1 p/82019452.
- Done! Alex’s phone number has been updated!
PATIENT_ID matches the identifier on the patient’s card within ToothTracker.
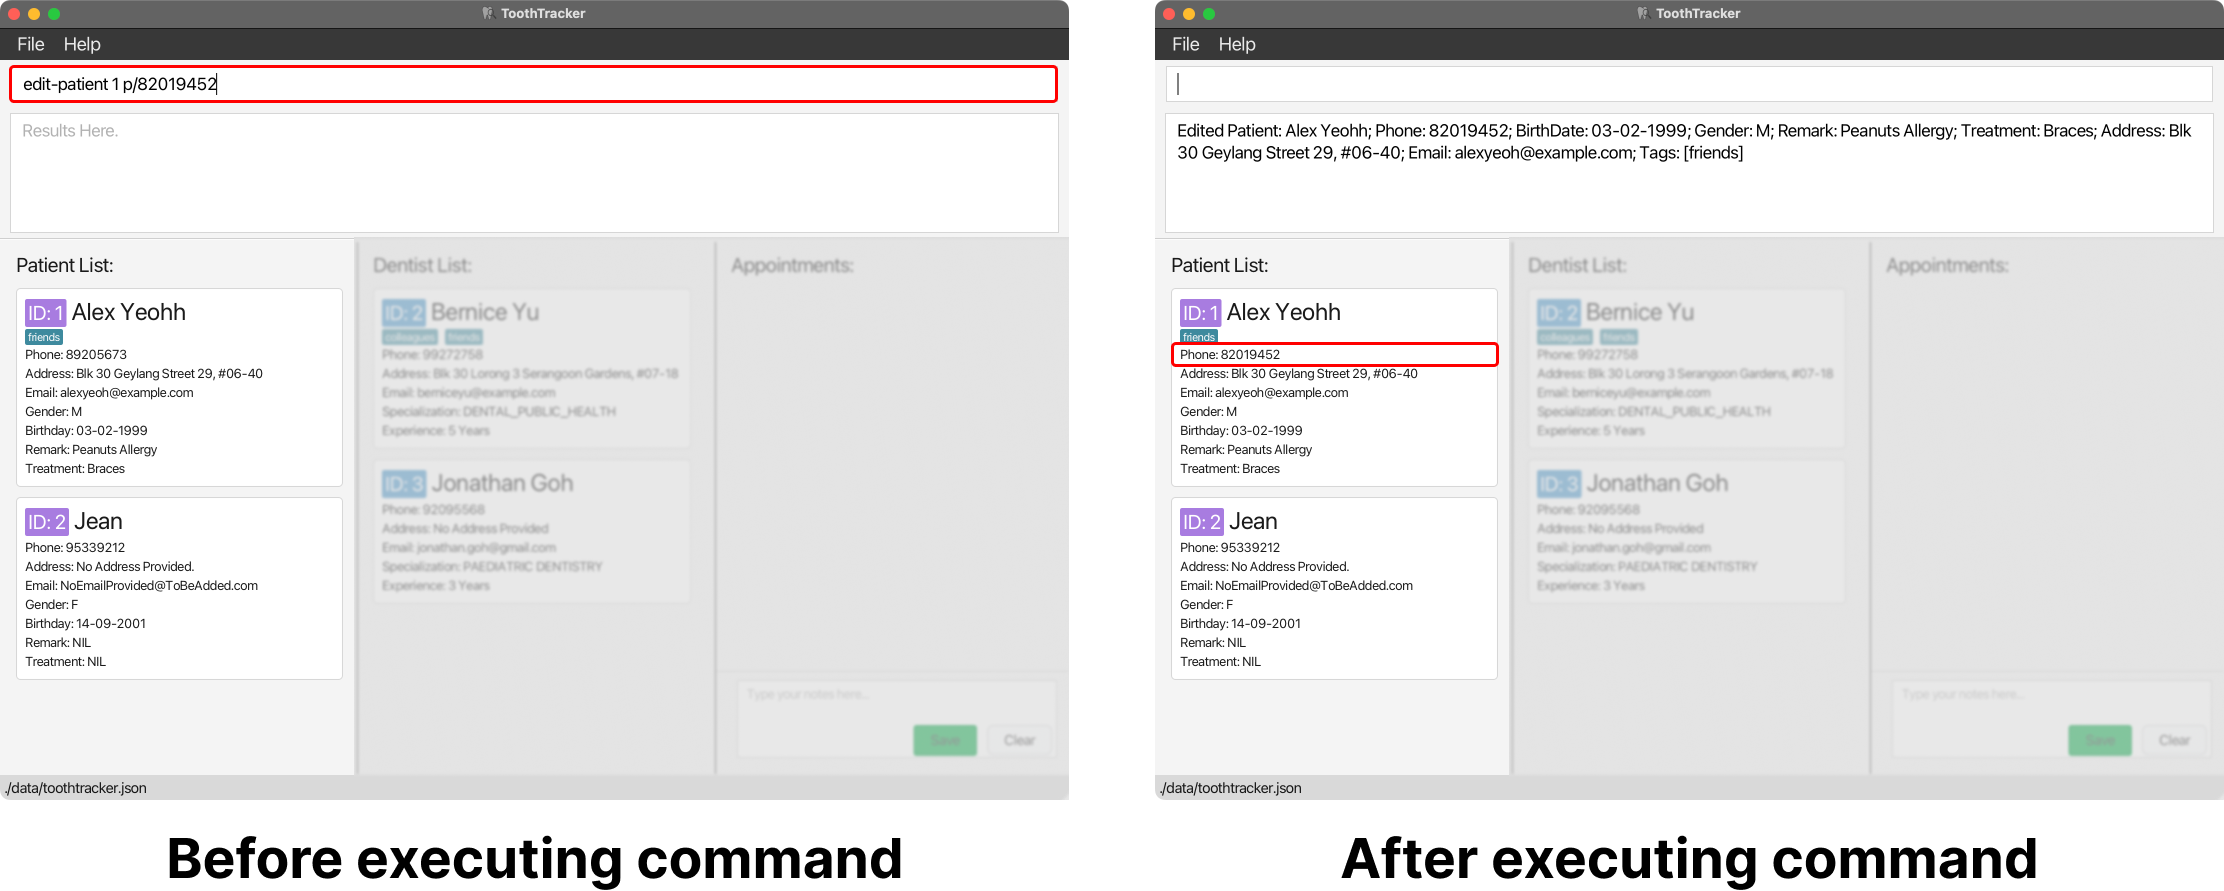
Awesome! Now that you’ve gotten familiar with ToothTracker’s commands, feel free to explore more features in the Features section to fully leverage on ToothTracker’s capabilities.
Features
This section shares with you more about how to use each feature in detail.
Similar features are grouped into the individual subsections:
- Dentist-related commands
- Patient-related commands
- Appointment-related commands
- Treatment-related commands
- Calendar-related command
- General commands
![]() Notes about the command format:
Notes about the command format:
-
Words in
UPPER_CASEare input parameters that you need to provide.
e.g. inadd-dentist n/NAME,NAMEis an input parameter which can be used asadd-dentist n/John Doe. -
Items in square brackets are optional.
e.gn/NAME [t/TAG]can be used asn/John Doe t/Professionalorn/John Doe. -
Items with
… after them can be used multiple times including zero times.
e.g.[t/TAG]…can be used ast/friend,t/friend t/familyetc. -
Input parameters can be in any order.
e.g. if the command specifiesn/NAME p/PHONE s/SPECIALIZATION,p/PHONE s/SPECIALIZATION n/NAMEis also acceptable. -
Extraneous input parameters for commands that do not take in input parameters (such as
help,list-patient,exitandclear) will be ignored.
e.g. if the command specifieshelp 123, it will be interpreted ashelp. -
If you are using a PDF version of this document, be careful when copying and pasting commands that span multiple lines as space characters surrounding line-breaks may be omitted when copied over to the application.
Dentist Features
Adding a dentist : add-dentist
Adds a dentist to the list of dentists in ToothTracker. This is useful when:
- You are using ToothTracker for the first time and have to add your dentists’ particulars.
- You are adding a new dentist who has joined your dental clinic.
Format: add-dentist n/NAME p/PHONE s/SPECIALIZATION y/YOE [e/EMAIL] [h/ADDRESS] [t/TAG]…
TAGs (including zero tags).
EMAIL and ADDRESS are optional to include. You may use the edit-dentist command to update them in future.
![]() Notes about Specializations:
Notes about Specializations:
By default, ToothTracker only accepts a predefined set of recognized dental specializations. They are:
- Endodontics
- Dental Public Health
- Oral and Maxillofacial Surgery
- Orthodontics
- Paediatric Dentistry
- Periodontics
- Prosthodontics
This is in accordance to the List of Recognised Specializations from The Ministry of Health. Please consult the developers if you need to change the dental specializations!
![]() Notes about adding a dentist without email and address:
Notes about adding a dentist without email and address:
ToothTracker will set the EMAIL as “NoEmailProvided@ToBeAdded.com”
and the ADDRESS as “No Address Provided.” by default.
If you wish to update them at a later time, you can use the edit-dentist command to make changes.
![]() Notes about adding dentists with the same name:
Notes about adding dentists with the same name:
Each dentist must have a unique name. ToothTracker does not allow multiple dentists with identical names.
We recommend that if multiple dentists have the same name, add a unique suffix to their name to differentiate them (e.g., last 3 digits of their NRIC) — John Tan 789H.
![]() Notes about dentist ID value:
Notes about dentist ID value:
The dentist ID value is auto-generated by ToothTracker and would always increase by 1 for each new dentist added.
Examples:
-
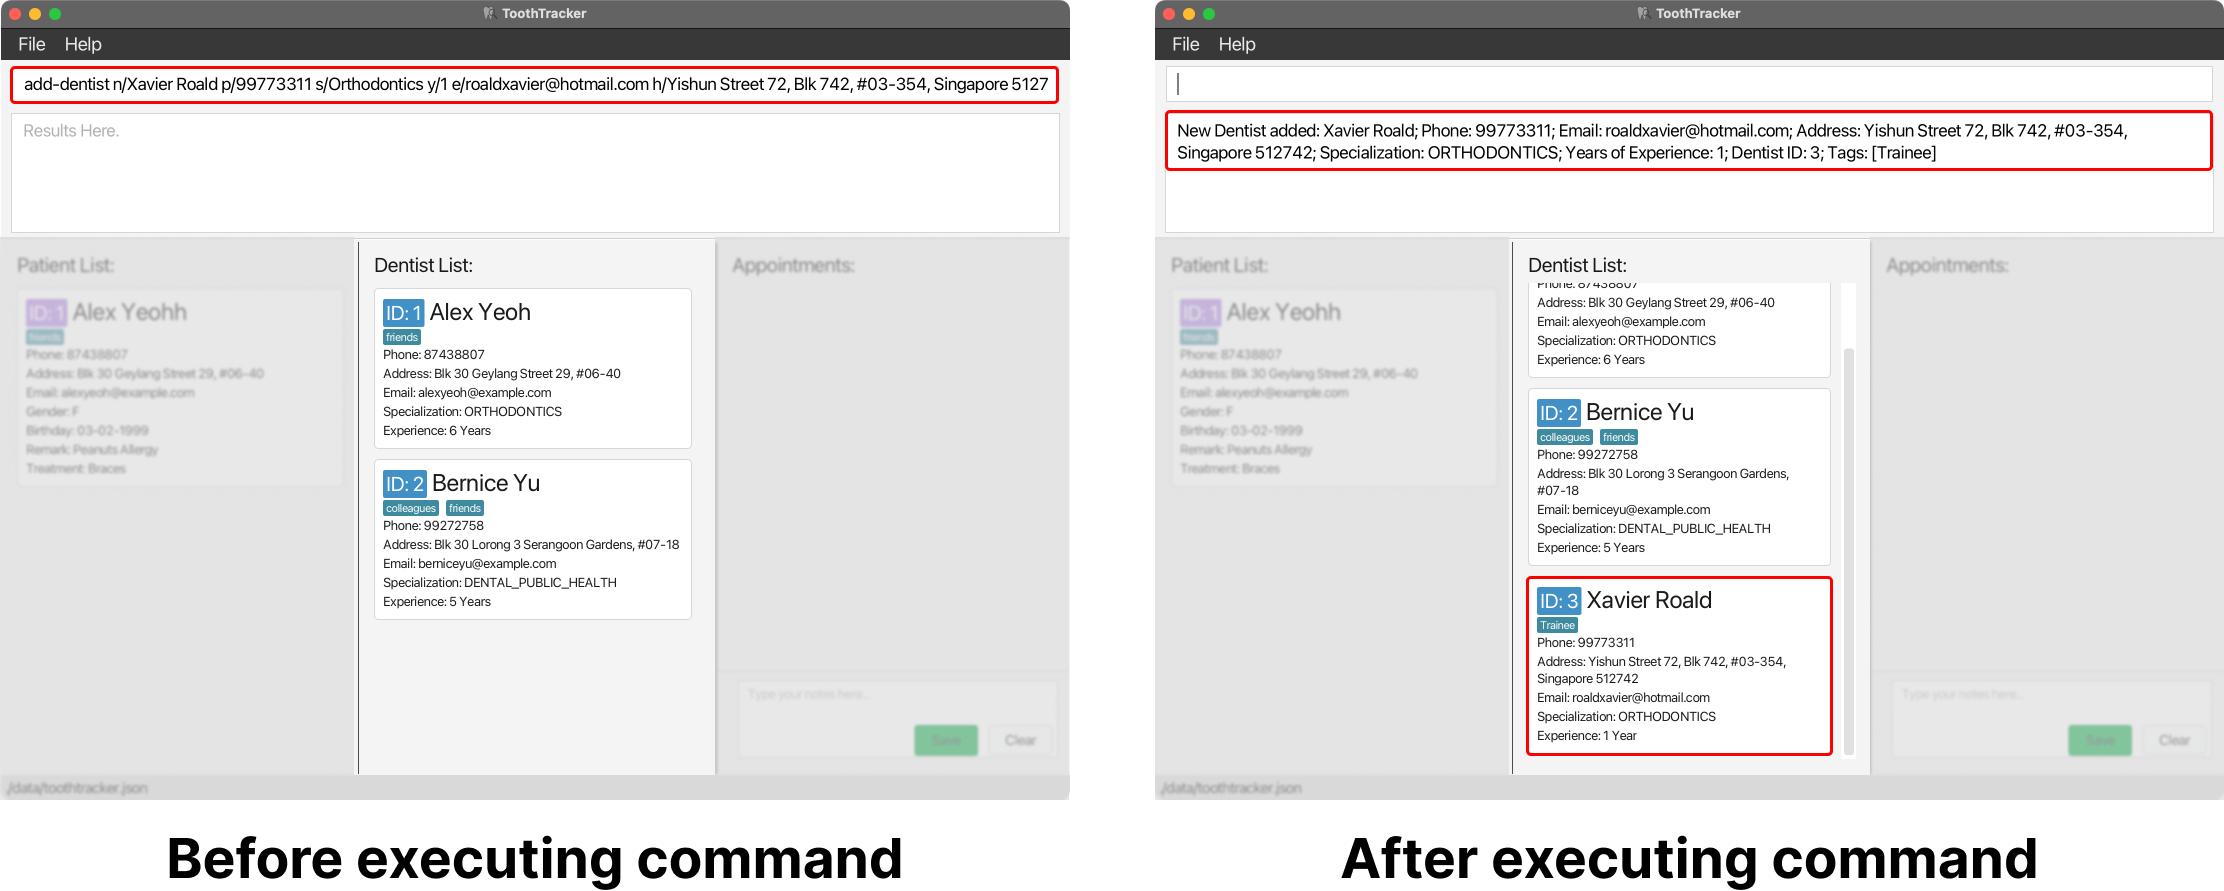
add-dentist n/Xavier Roald p/99773311 s/Orthodontics y/1 e/roaldxavier@hotmail.com
h/Yishun Street 72, Blk 742, #03-354, Singapore 512742 t/Trainee
This adds a dentist named ‘Xavier Roald’ with the phone number ‘99773311’, specialising in ‘Orthodontics’ with ‘1 year of experience’, email ‘roaldxavier@hotmail.com’, address ‘Yishun Street 72, Blk 742, #03-354, Singapore 512742’, who is a ‘Trainee’ into the list of dentists in ToothTracker.
-
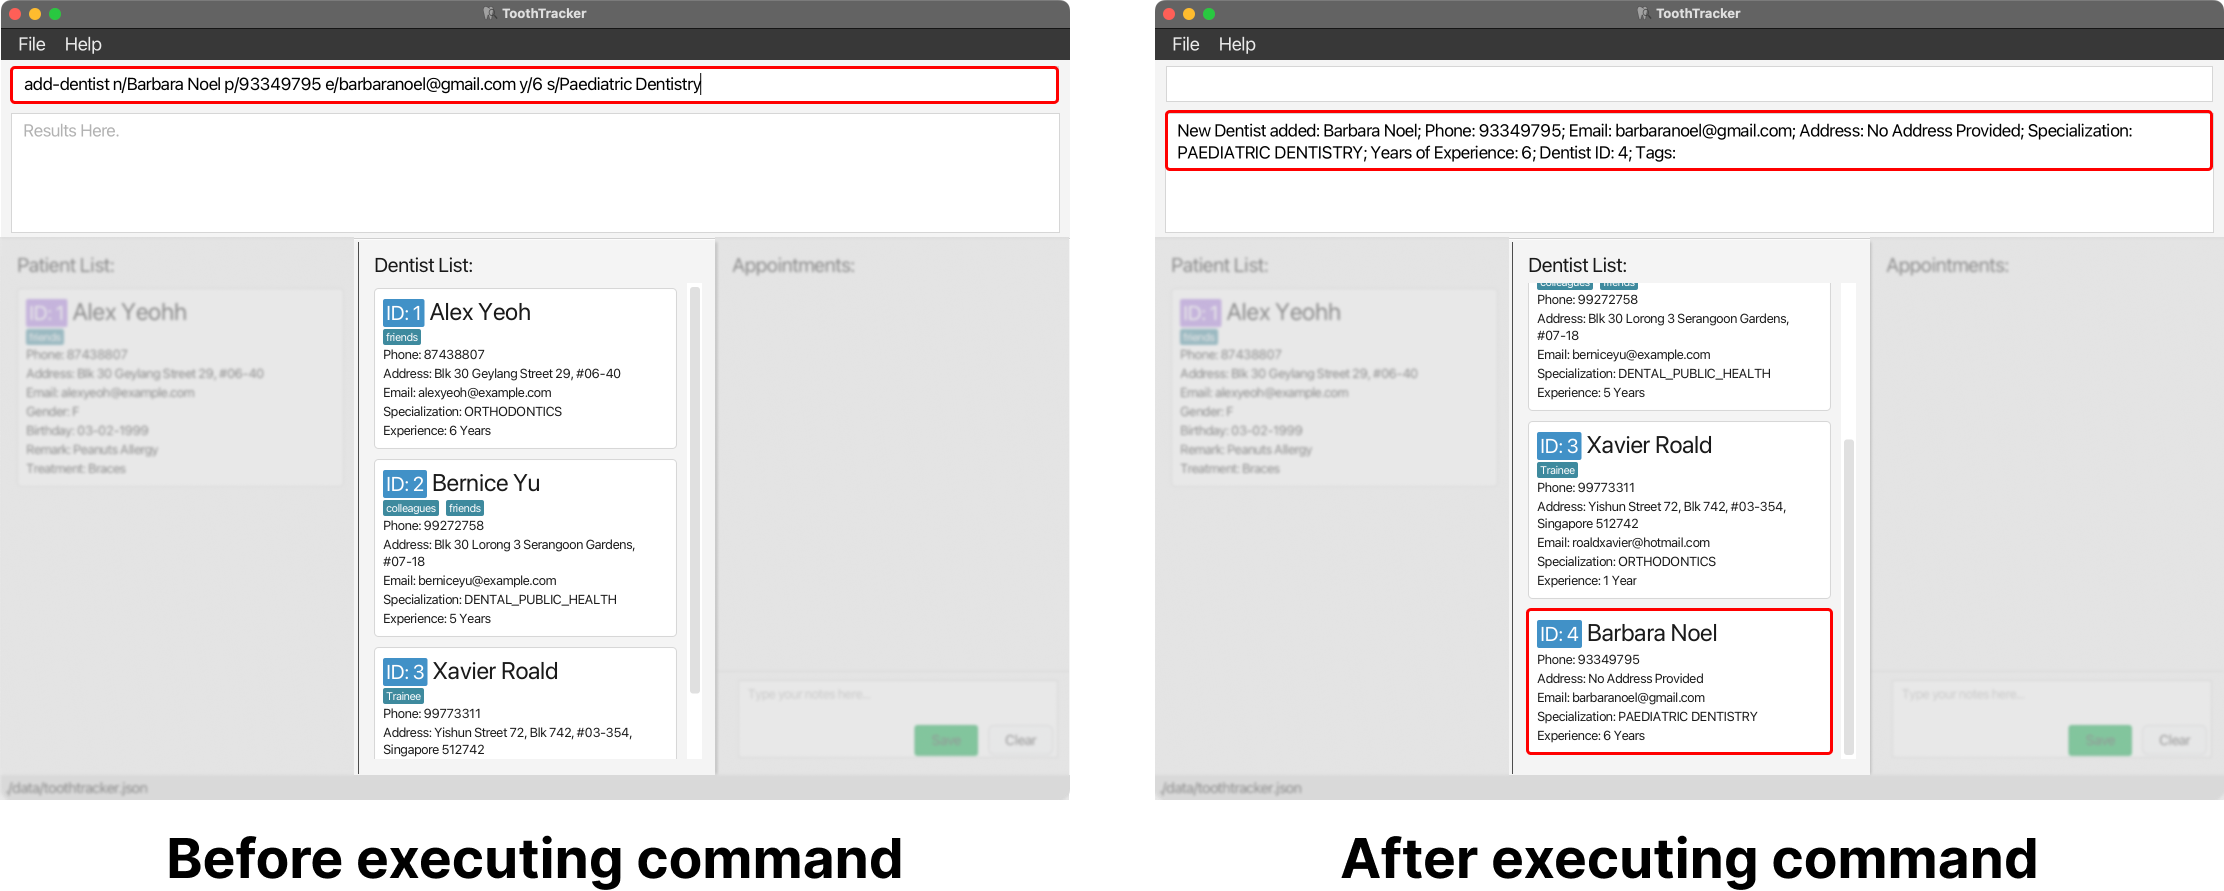
add-dentist n/Barbara Noel p/93349795 e/barbaranoel@gmail.com y/6 s/Paediatric Dentistry
This adds a dentist named ‘Barbara Noel’ with the phone number ‘93349795’ and email ‘barbaranoel@gmail.com’, who has ‘6 years of experience’ and specializing in ‘Paediatric Dentistry’ into the list of dentists in ToothTracker.
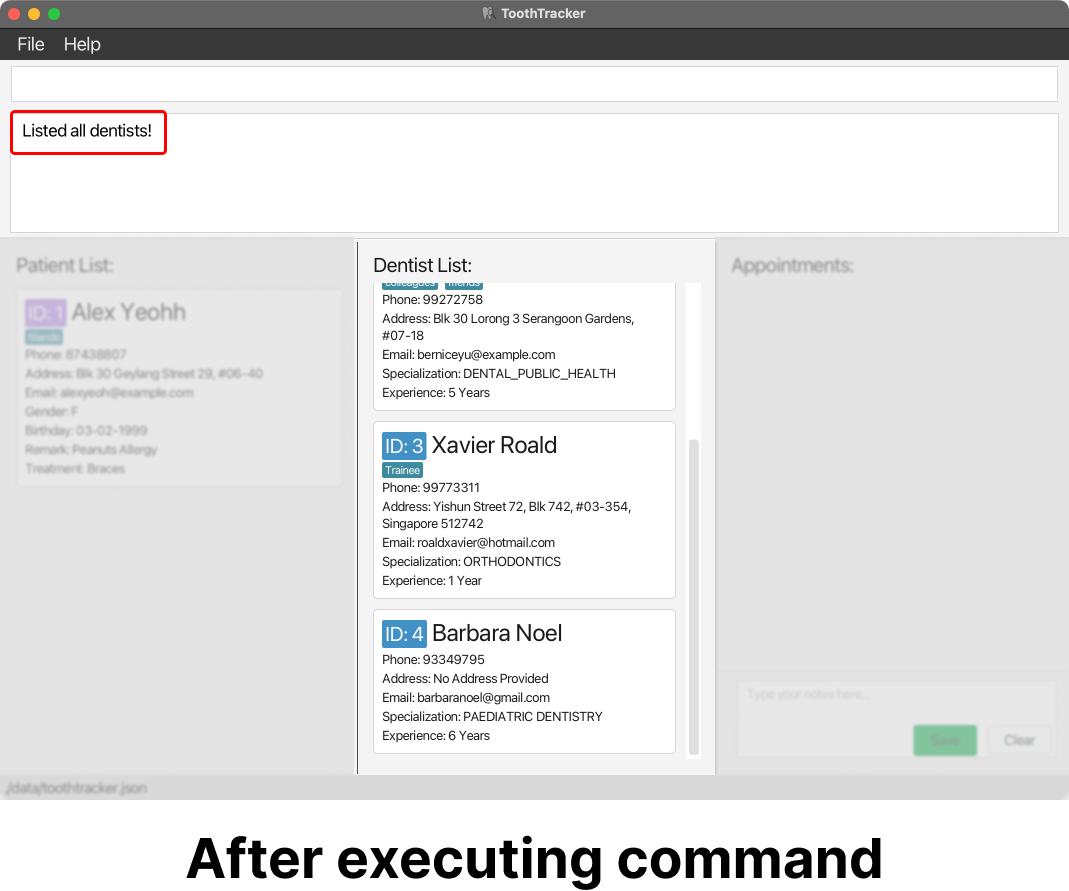
Listing all dentists : list-dentist
Shows a list of all dentists in ToothTracker. This is useful when:
- You want to retrieve the information of all dentists.
- You want to verify that a dentist has been added successfully in ToothTracker.
- You want to verify that a dentist has been updated successfully in ToothTracker.
Format: list-dentist (No extra parameters required)
Deleting a dentist : delete-dentist
Deletes the dentist with the specified DENTIST_ID from ToothTracker.
Format: delete-dentist DENTIST_ID
DENTIST_ID of a dentist, you can simply enter the command list-dentist.
Example:
-
delete-dentist 2
This deletes the dentist with theDENTIST_ID2.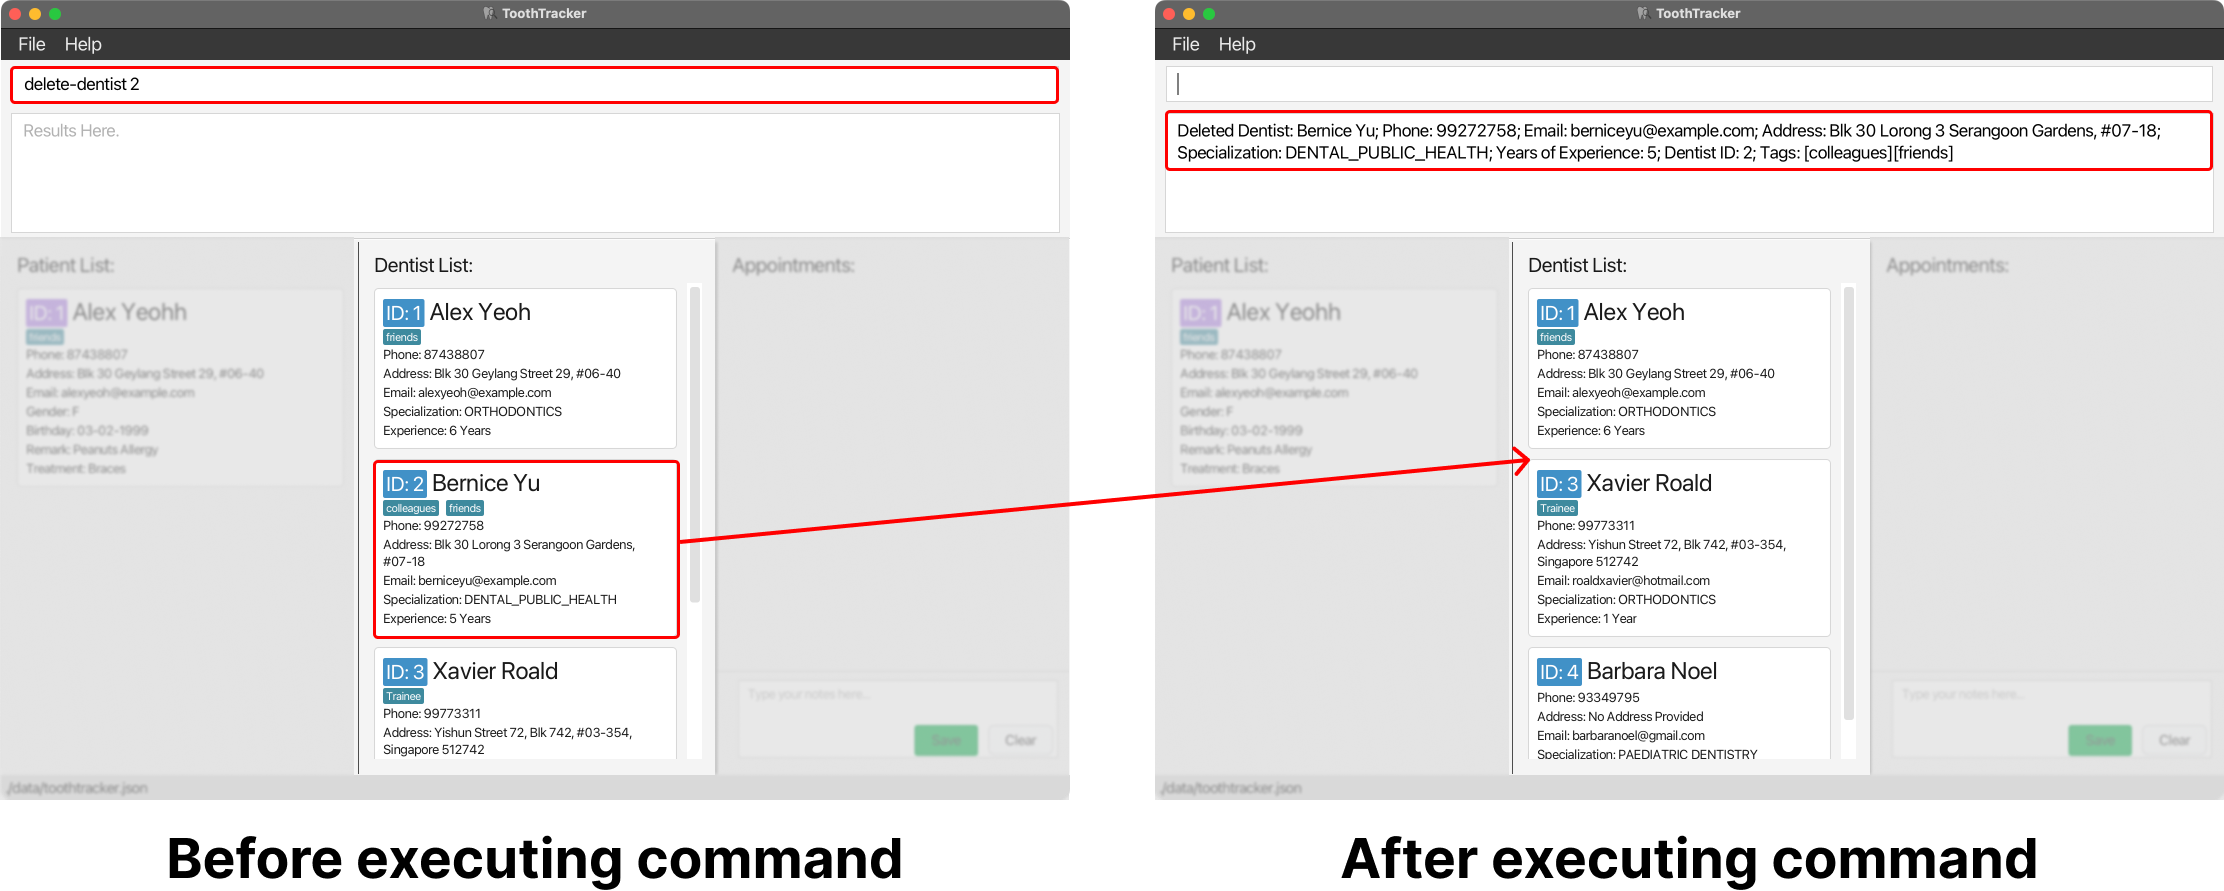
Searching for dentists by DENTIST_ID : search-dentist
Searches for a dentist by their DENTIST_ID in ToothTracker.
This command helps you find a unique dentist based on the provided DENTIST_ID. This is useful when:
- You want to confirm the identity of a specific dentist before using further commands.
- You need quick access to specific details about a dentist.
Format: search-dentist DENTIST_ID
DENTIST_ID refers to the ID shown in the displayed list of dentists. To check the
DENTIST_ID of a dentist, you can simply enter the command list-dentist.
Example:
-
search-dentist 5
This searches for the dentist withDENTIST_ID5.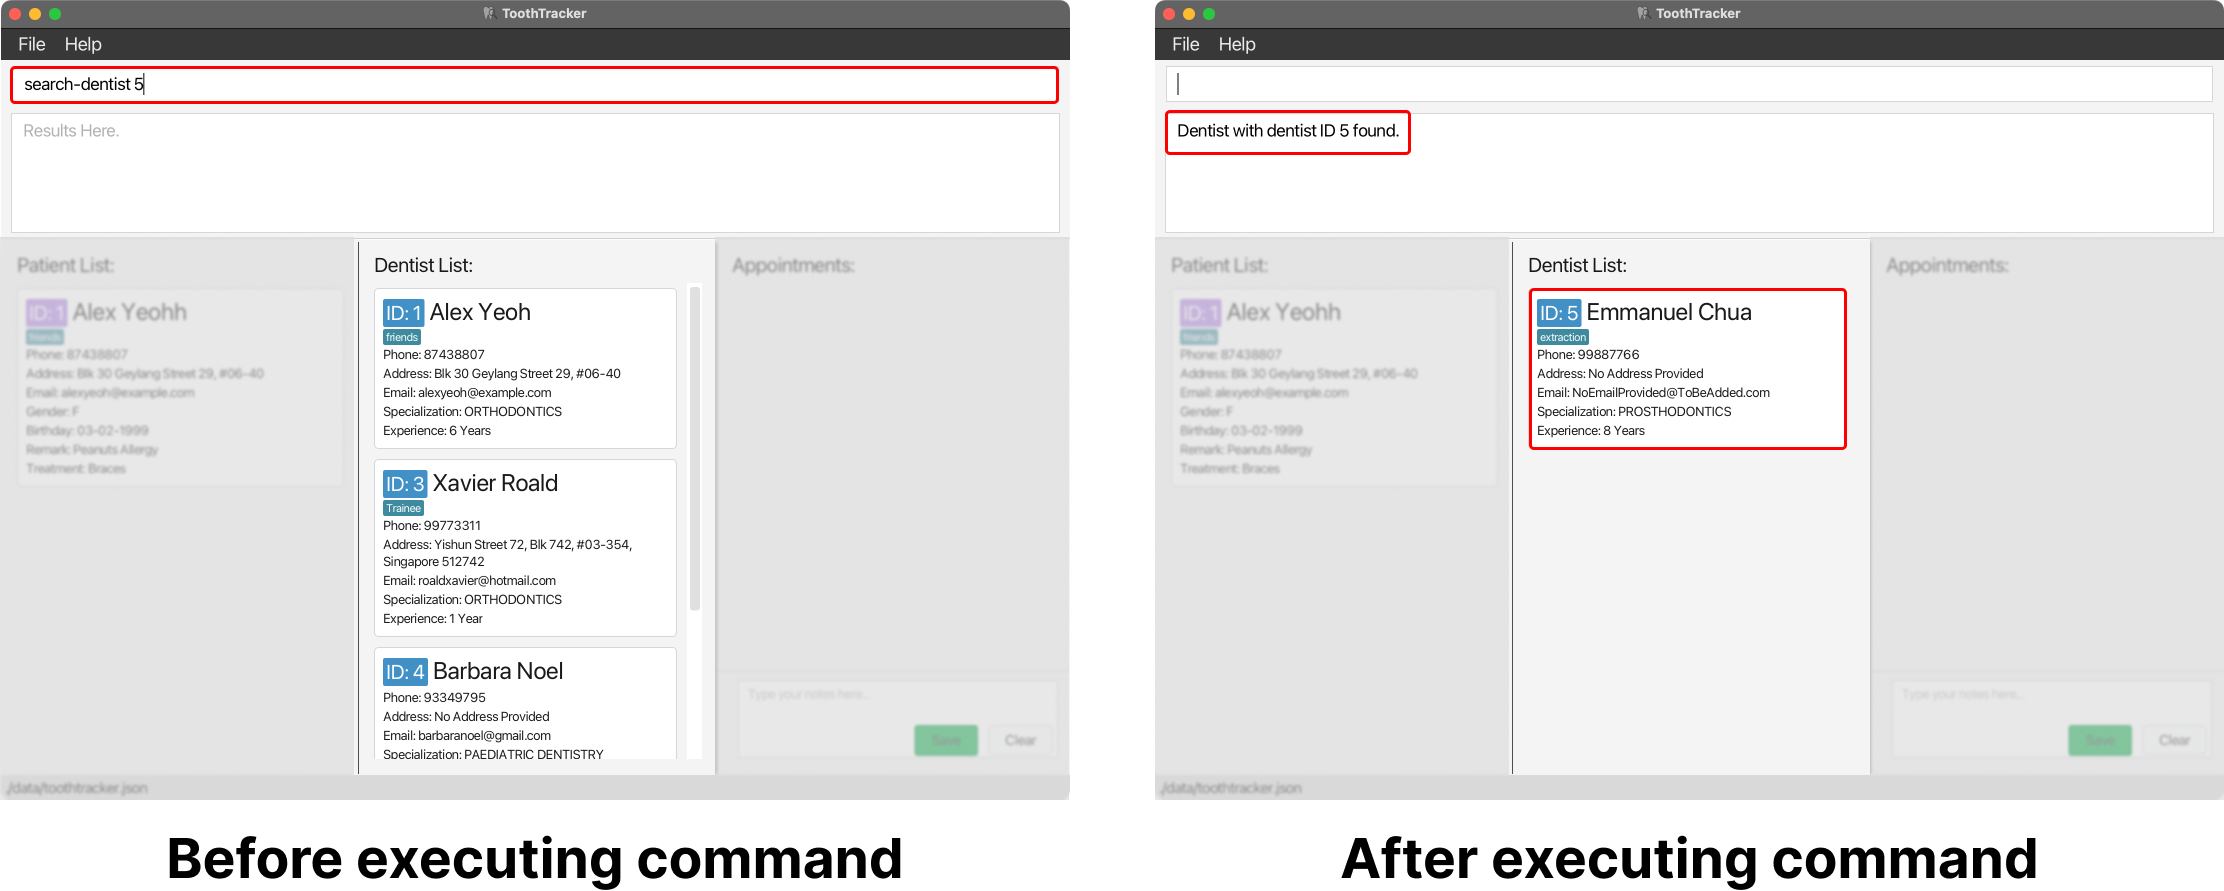
Searching for dentists by keywords : search-dentist
Searches for dentists by matching names with a keyword. This command helps you find dentists that match your search criteria. This is useful when:
- You need to find dentists whose names match your search criteria.
- You forgot the
DENTIST_IDof a dentist and want to search using the dentist’s name instead.
Format: search-dentist KEYWORD
![]() Notes about searching dentist by keywords:
Notes about searching dentist by keywords:
- The search is performed only on the dentist's name.
- The search is case-insensitive, meaning that it will match both uppercase and lowercase characters. For example, searching for `James` will match both `James` and `james`.
- The order of the keywords in the name does not matter. For instance, searching for `Mike Lim` will match `Lim Mike` as well.
- Sub-strings will be matched. For example, if you search for `Fred`, it will match `Frederick`.
- More than one dentist result might be returned when searching by keywords, especially if multiple dentists match your search criteria.
Example:
-
search-dentist John
This searches for dentists with names containing the keywordJohn.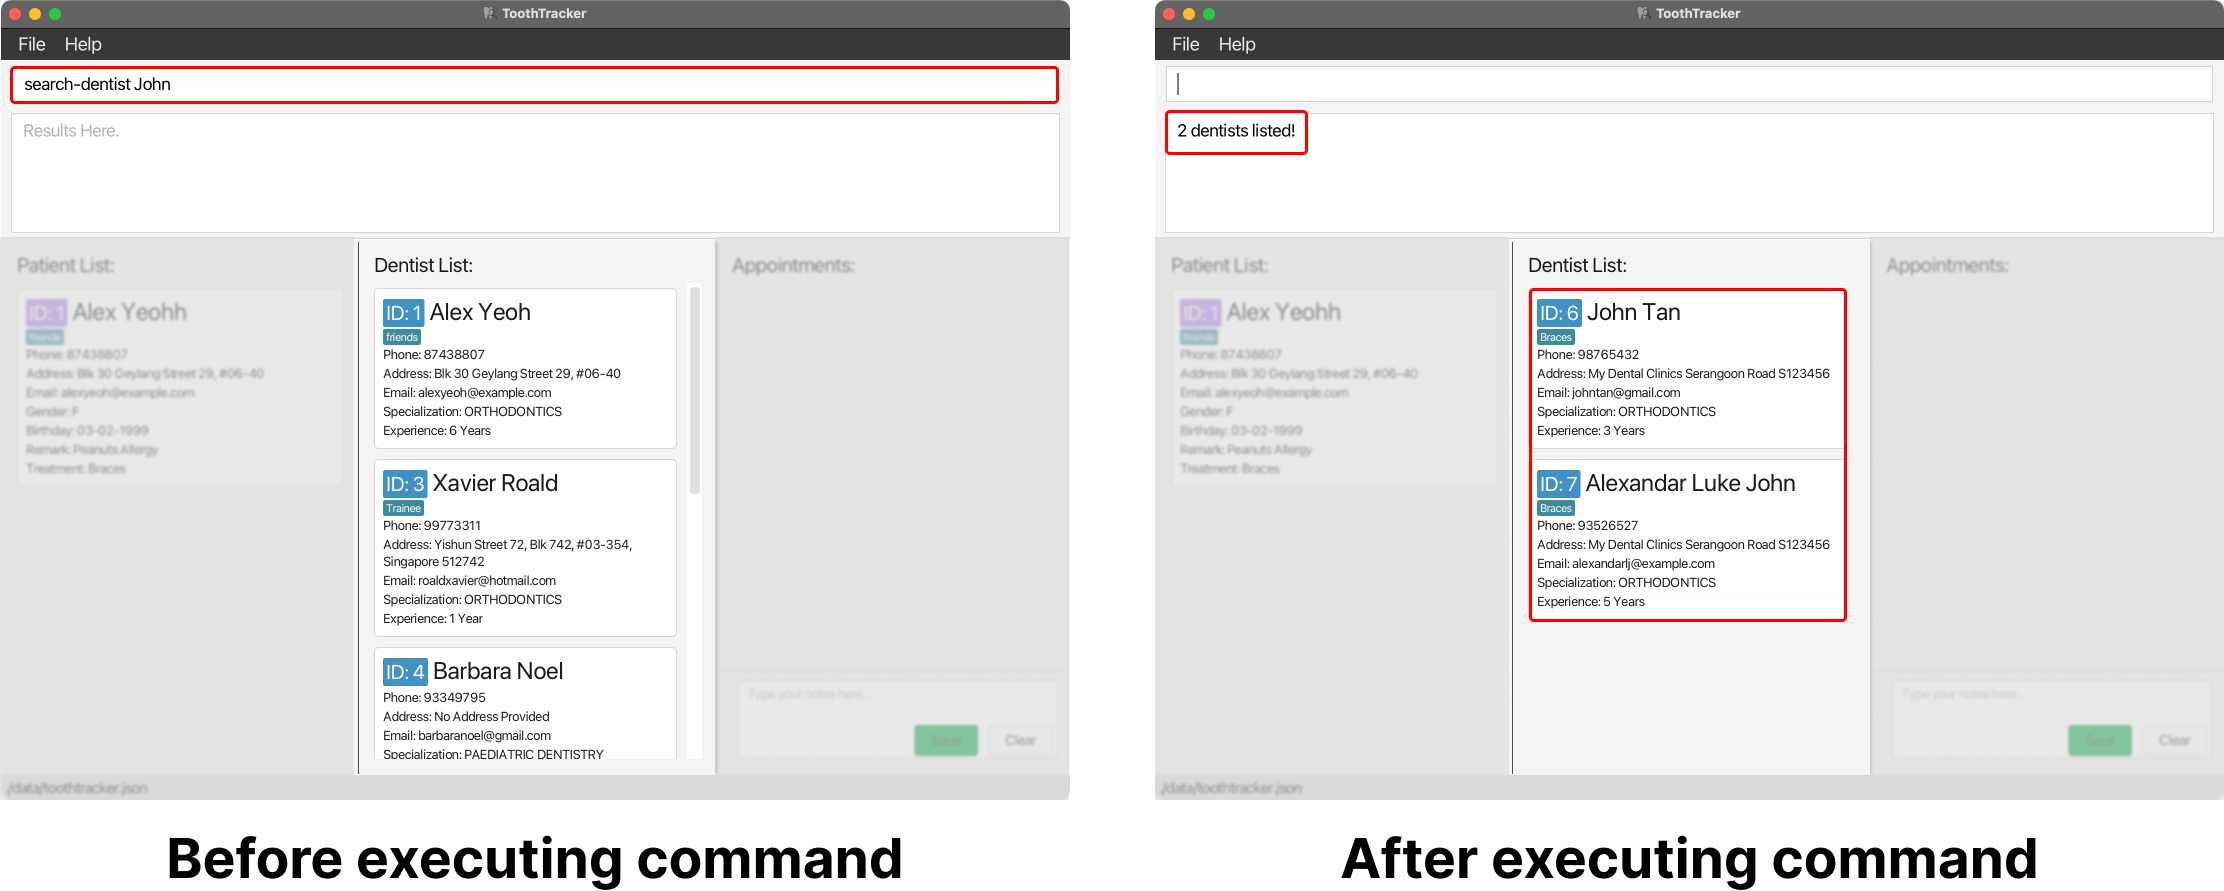
Filtering dentists : filter-dentist
Narrows down your search for dentists based on a specified attribute. When this command is used, there might be more than one result that matches your search criteria. This is useful when:
- You want to find dentists with specific attributes.
- You want to confirm the identity of a dentist before using further commands.
Format: filter-dentist a/ATTRIBUTE k/KEYWORDS
The
filter-dentist command only accepts filtering using 1 attribute and 1 set of keywords. For example,
filter-dentist a/Address k/Serangoon k/Bishan will not work.
list-dentist to
view the attributes which will be displayed in the Dentist card.
Alternatively, a message will be shown in the text box regarding the attributes that you can filter by if you entered an invalid attribute. We have set the attributes that can be filtered to be:
name, phone, specialization, experience, email, address, tags.
Examples:
-
filter-dentist a/phone k/93526527
This filters dentists with the phone number 93526527.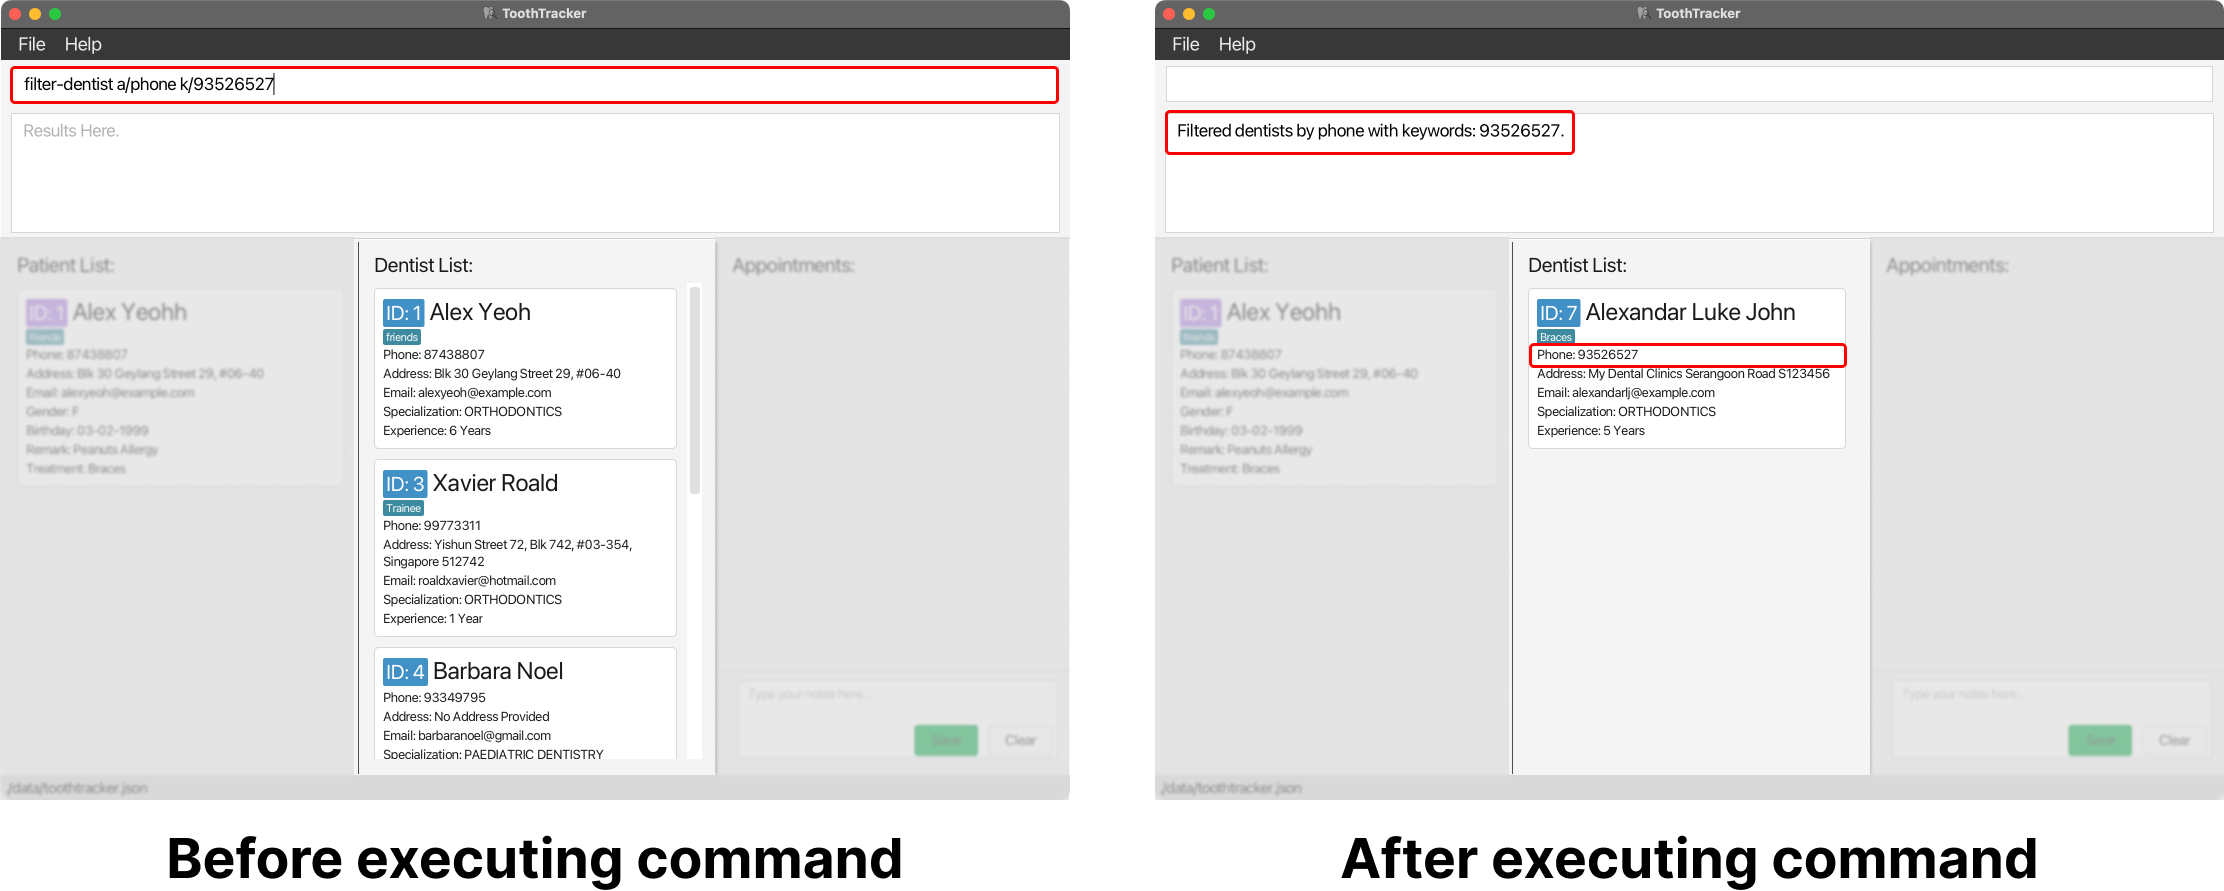
-
filter-dentist a/specialization k/Orthodontics
This filters dentists with the specialization Orthodontics.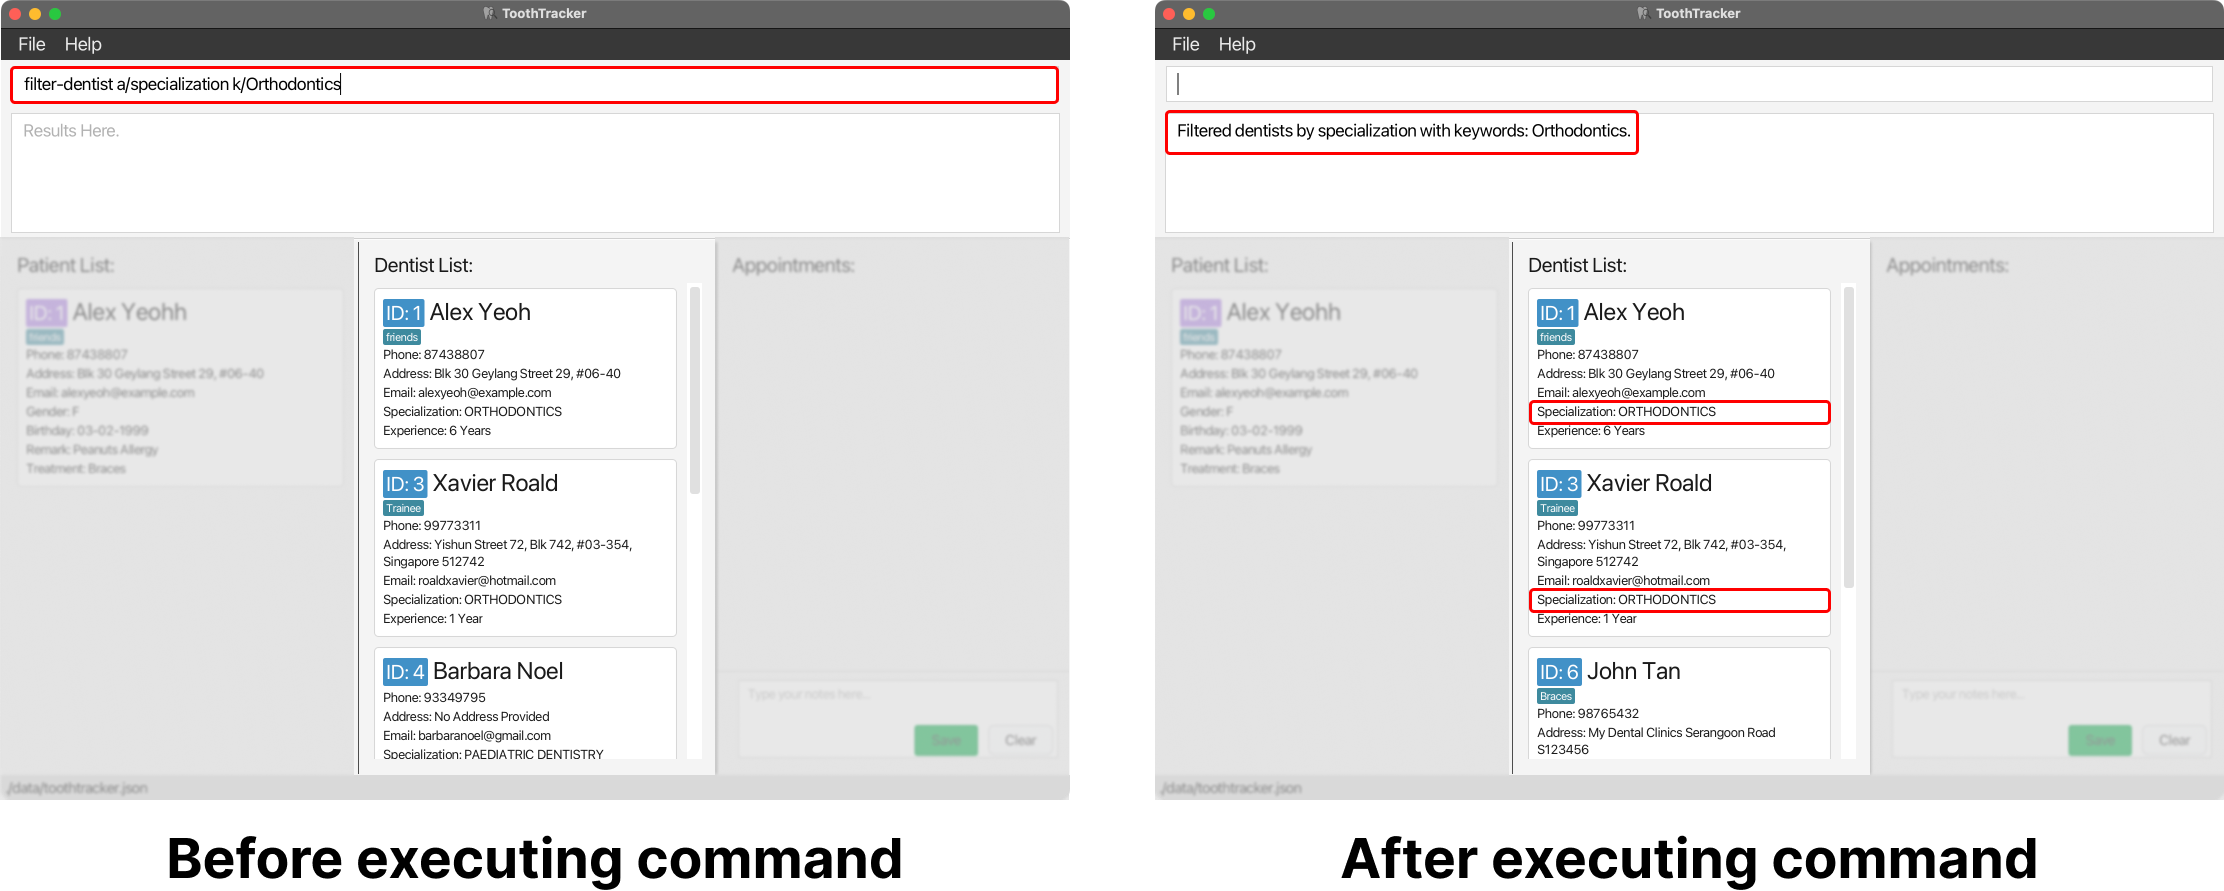
Editing a dentist : edit-dentist
Edits one or more attributes of the dentist with the specified DENTIST_ID. This is useful when:
- The particulars of a dentist need to be updated.
- Optional dentist particulars were not provided previously.
- You accidentally entered incorrect information about a dentist into ToothTracker.
Format: edit-dentist DENTIST_ID [n/NAME] [p/PHONE] [e/EMAIL] [a/ADDRESS] [s/SPECIALIZATION] [y/YOE] [t/TAG]…
edit-dentist command.
DENTIST_ID of a dentist, you can simply enter the command list-dentist.
![]() Notes about editing tags:
Notes about editing tags:
When editing tags for a dentist, ensure to include all existing tags to avoid their removal. For instance, if a dentist has 2 tags, use the edit-dentist command with 2 tags (e.g., t/TAG1 t/TAG2).
Replace TAG1 and TAG2 with the desired tags. Note that tags cannot contain spaces. To remove all tags, use t/ in the edit-dentist command.
Examples:
-
edit-dentist 1 p/98987676 e/bobjuly@gmail.com
This modifies the phone number and email of the dentist withDENTIST_ID1 to ‘98987676’ and ‘bobjuly@gmail.com’ respectively.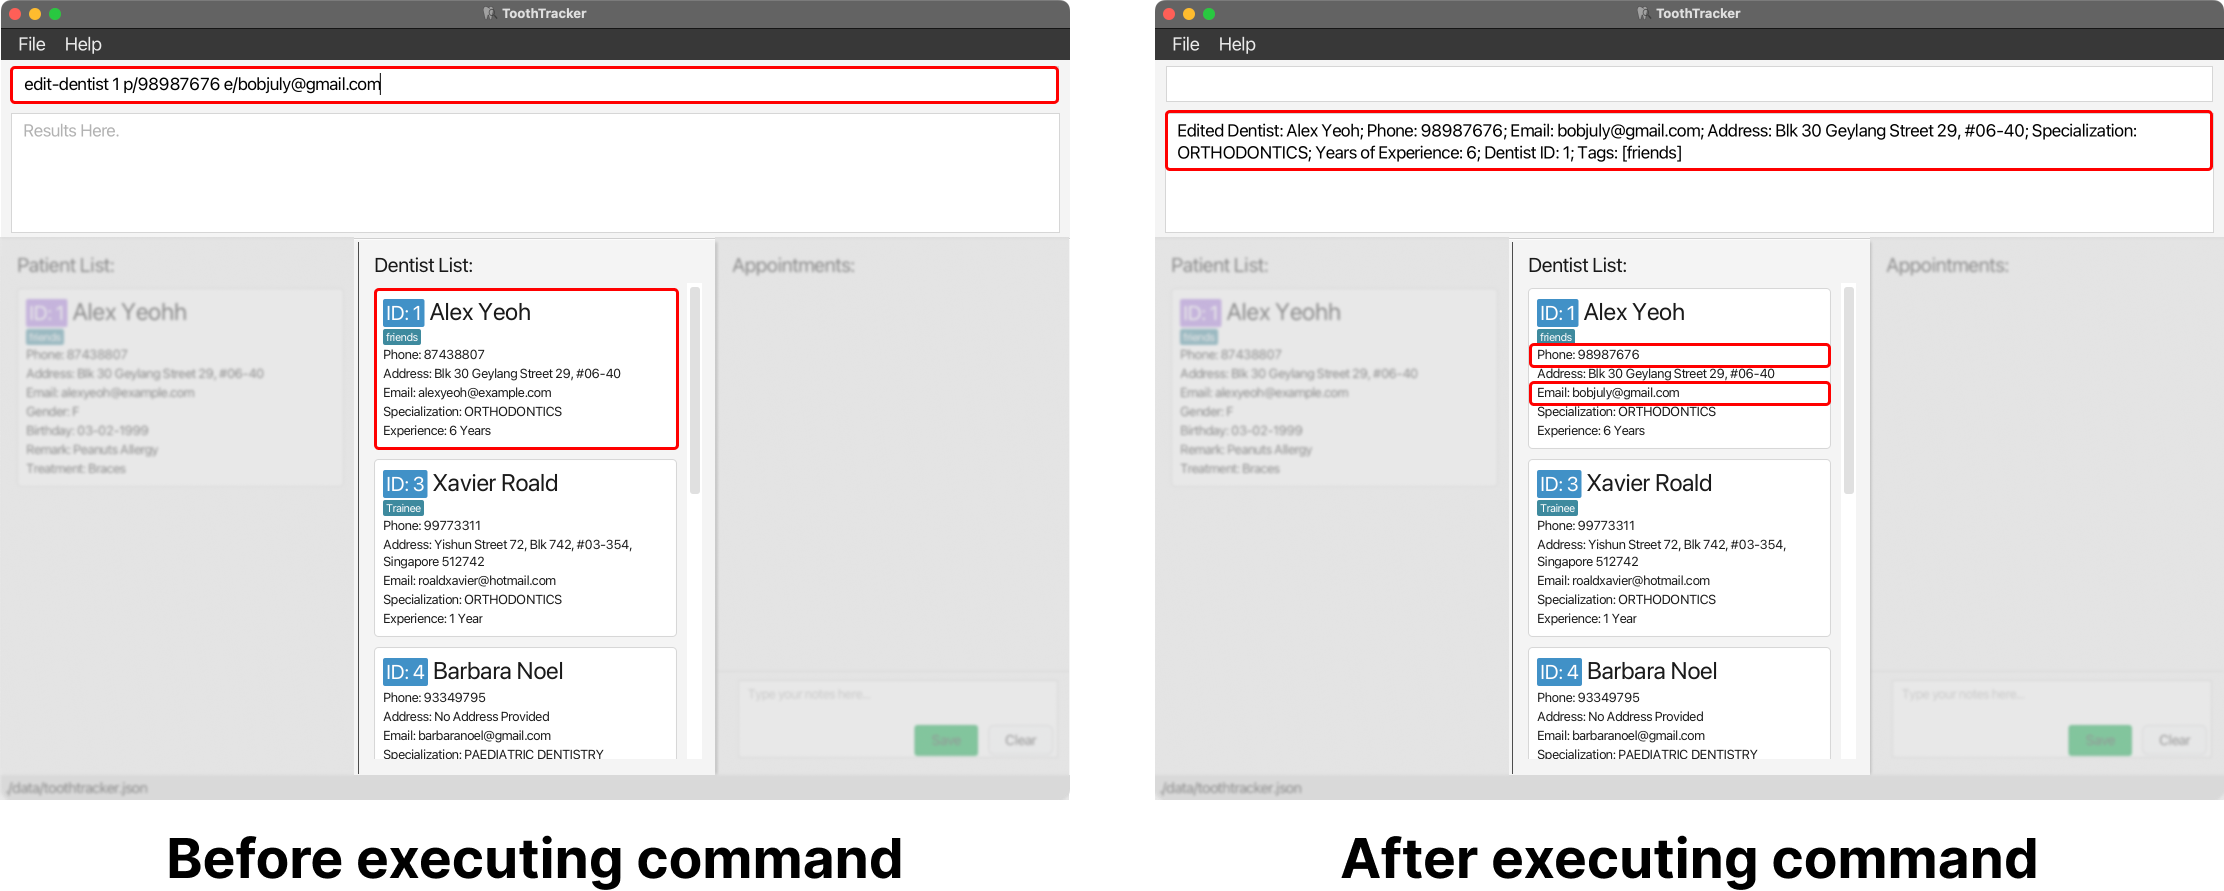
-
edit-dentist 5 n/Emmanuel Alexandra t/
This modifies the name of the dentist withDENTIST_ID5 to ‘Emmanuel Alexandra’ and removes all tags associated with the dentist.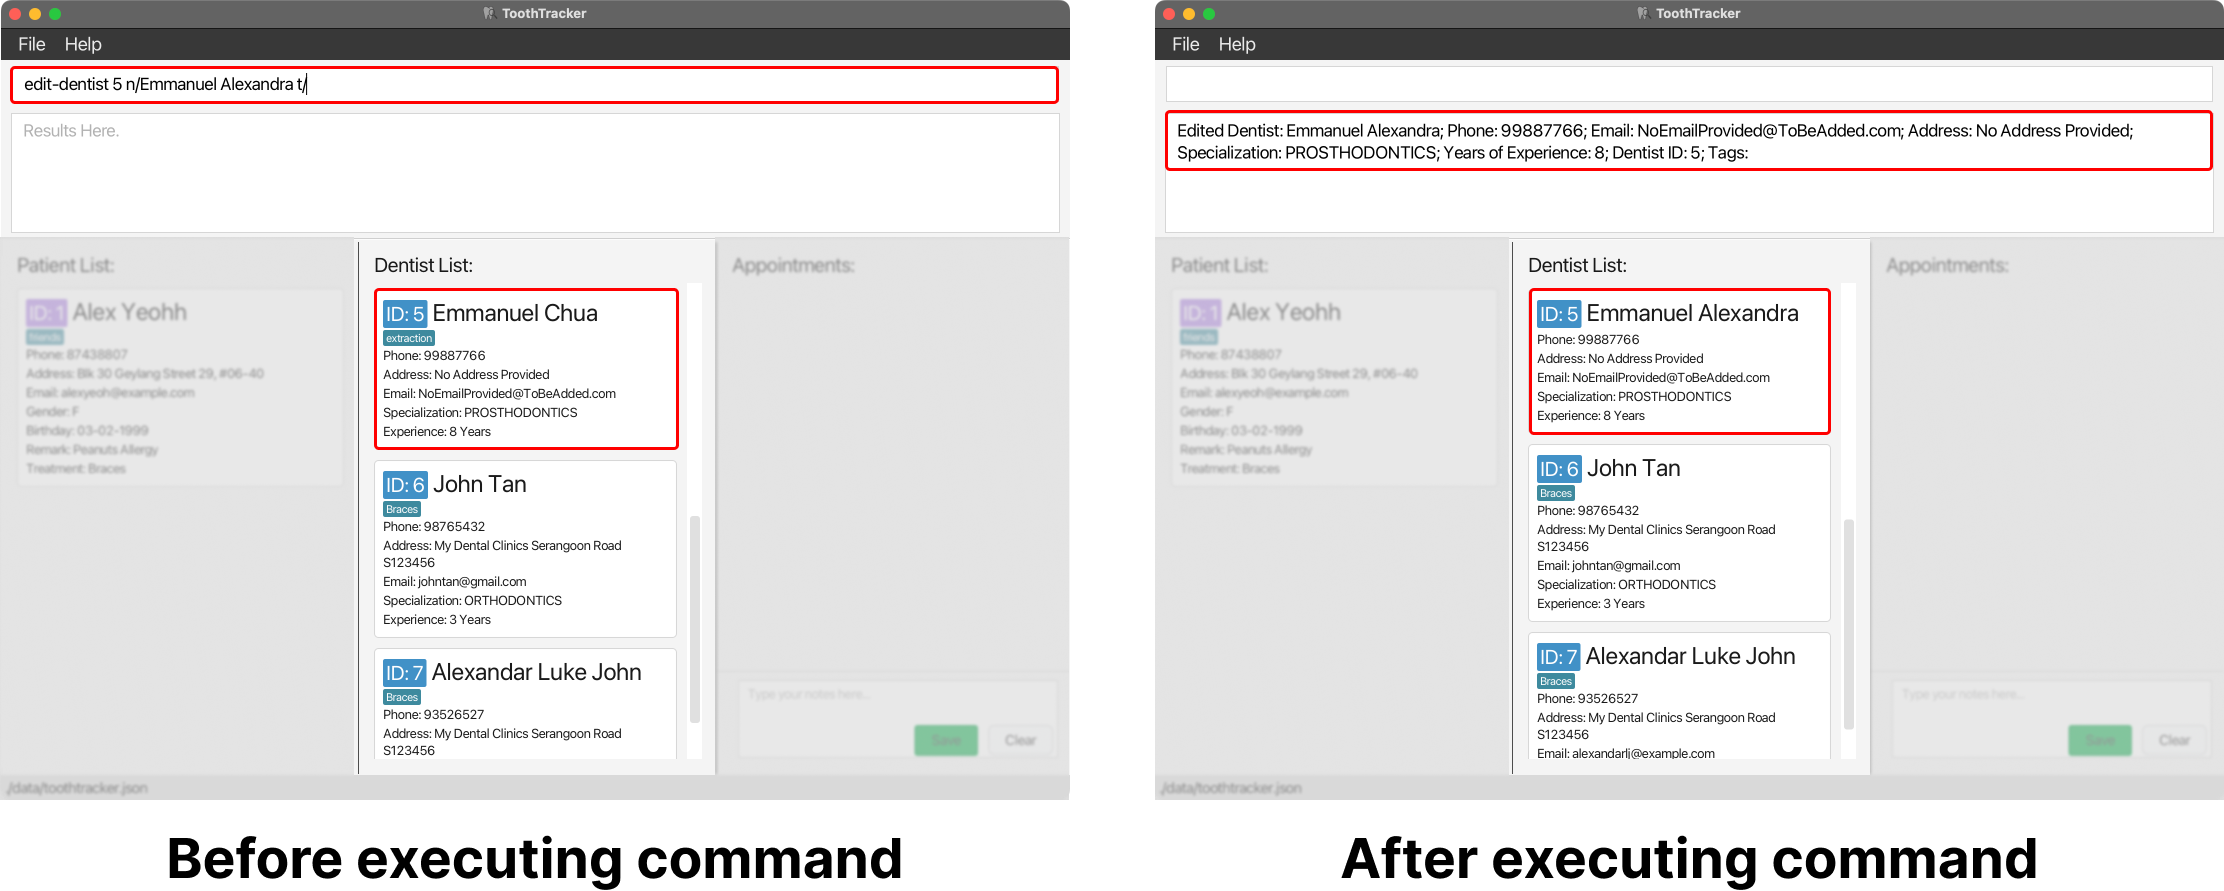
Patient Features
Adding a patient : add-patient
Adds a patient to the list of patients in ToothTracker. This is useful when:
- You are using ToothTracker for the first time and have to add your patients’ particulars.
- A new patient has joined your clinic.
Format: add-patient n/NAME p/PHONE b/BIRTHDATE g/GENDER [r/REMARK] [tr/TREATMENT] [e/EMAIL] [h/ADDRESS] [t/TAG]…
TAGs (including zero tags).
EMAIL, ADDRESS, REMARK and TREATMENT are optional to be put. You may use the edit-patient command to update them in the future.
ToothTracker will set the
REMARK and TREATMENT as NIL by default. If you wish to update them at a later time, you can use
edit-patient to edit them.
ToothTracker will set the
EMAIL as “NoEmailProvided@ToBeAdded.com”
and ADDRESS as “No Address Provided.” by default. If you wish to update them at a later time, you can use
edit-patient to edit them.
The treatment associated with a patient must be a valid treatment in ToothTracker. To add a new treatment for your clinic, use the command
add-treatment.
To view the list of treatments, you can use the command list-treatment.
Each patient must have a unique name. ToothTracker does not allow multiple patients with identical names. We recommend that if multiple patients have the same name, add a unique suffix to their name to differentiate them (e.g., last 3 digits of their NRIC) — Mike Lim 976B.
The patient ID value is auto-generated by ToothTracker and would always increase by 1 for each new patient added.
Examples:
-
add-patient n/John p/90676622 b/26-06-1998 g/M r/Allergic to Peanuts tr/Braces e/johntan@gmail.com h/60 Harvey Avenue t/Urgent
This adds a new patient named ‘John’, with the phone number ‘90676622’, birthdate of ‘26 June 1998’, gender ‘M’ (Male), remark that he is ‘allergic to peanuts’, requesting for ‘Braces’ treatment, email of ‘johntan@gmail.com’, with an address at ‘60 Harvey Avenue’, and a tag ‘Urgent’.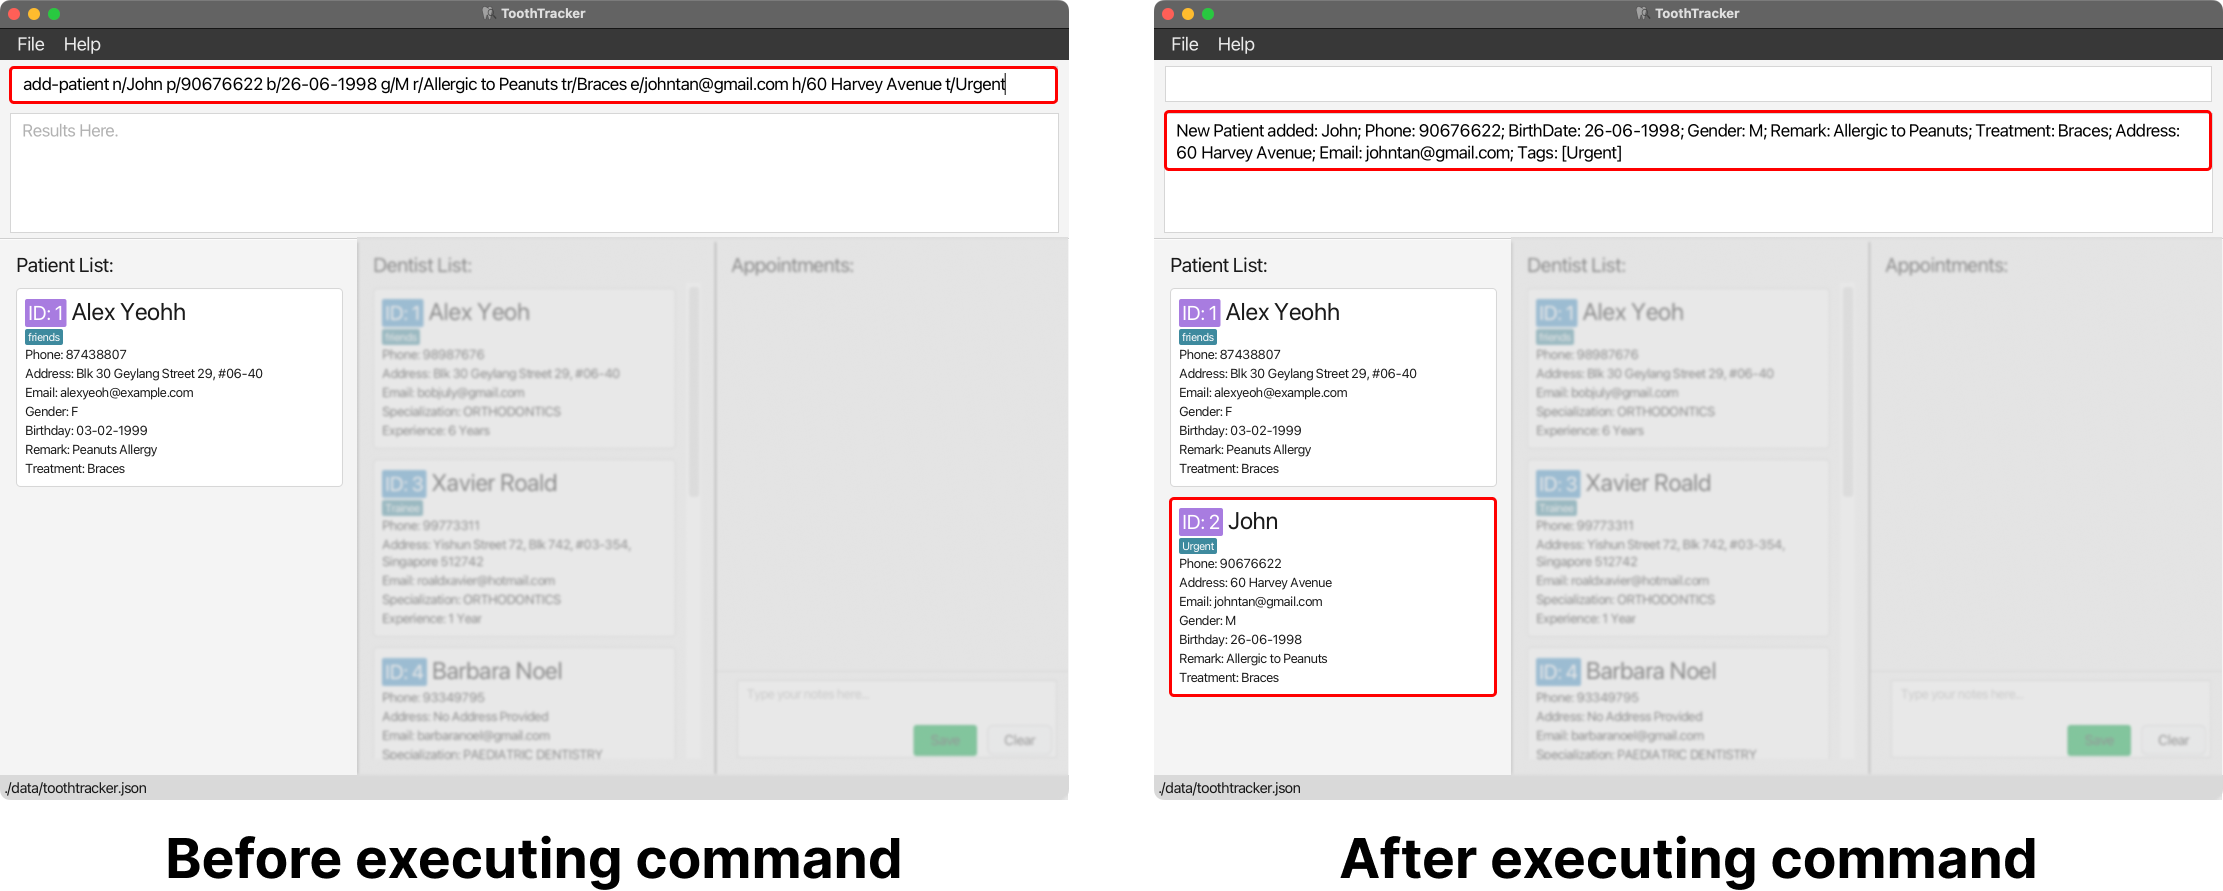
-
add-patient n/Jean p/95339212 b/14-09-2001 g/F
This adds a new patient named ‘Jean’, with the phone number ‘95339212’, birthdate of ‘14 September 2001’, gender ‘F’ (Female).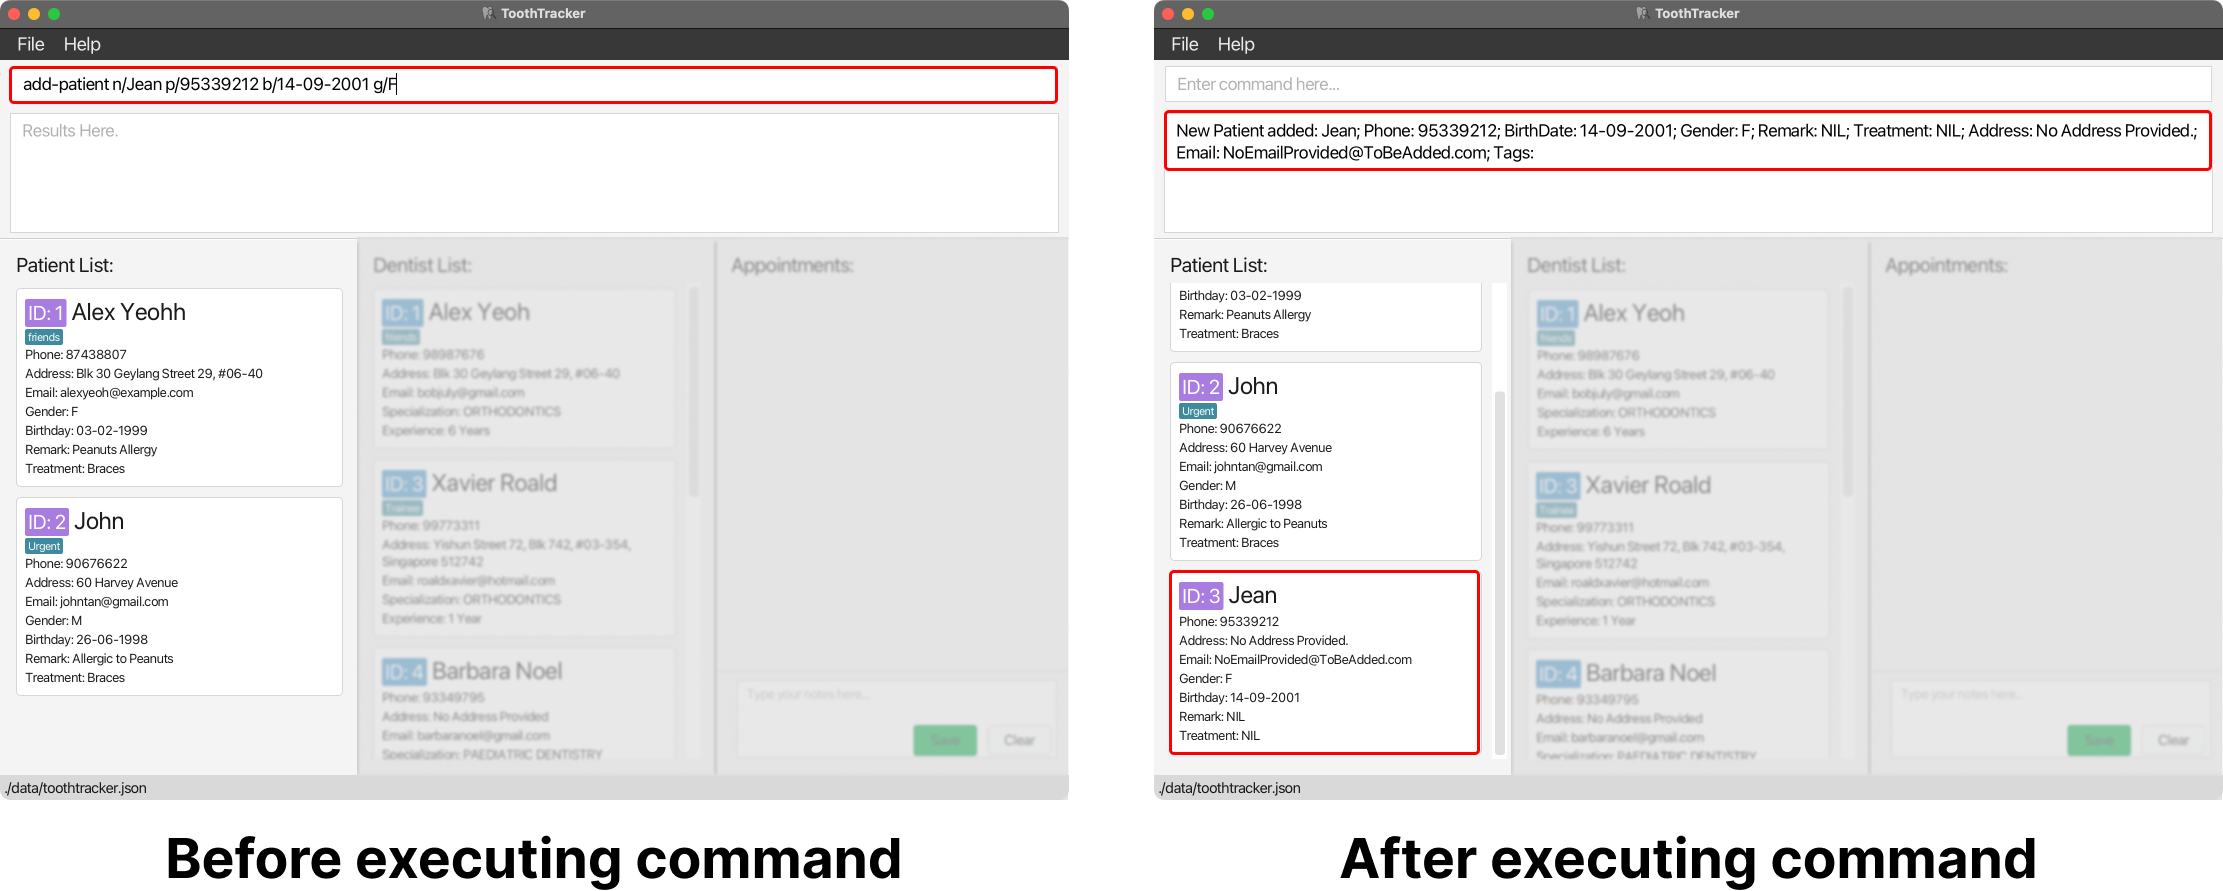
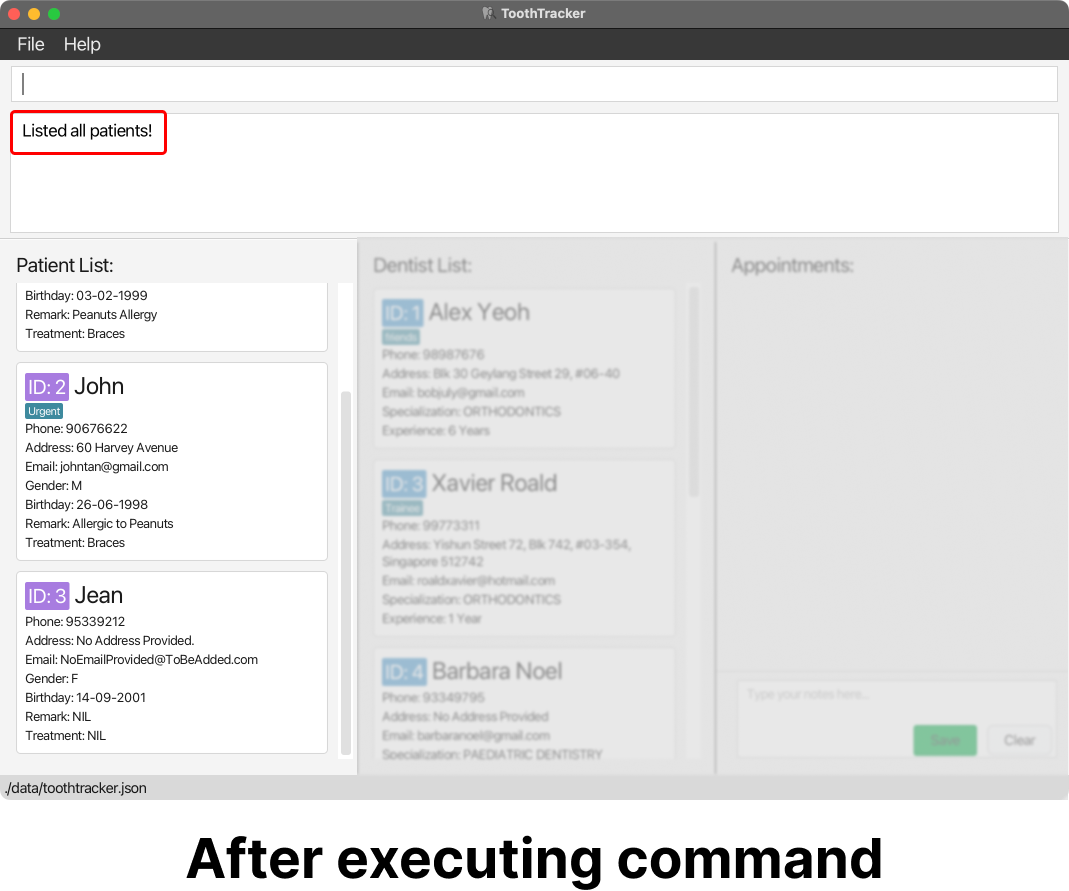
Listing all patients : list-patient
Shows a list of all patients in ToothTracker. This is useful when:
- You want to retrieve the information of all patients.
- You want to verify that a patient has been added successfully in ToothTracker.
- You want to verify that a patient has been updated successfully in ToothTracker.
Format: list-patient (No extra parameters required)
Deleting a patient : delete-patient
Deletes the patient with the specified PATIENT_ID from ToothTracker.
Format: delete-patient PATIENT_ID
PATIENT_ID of a patient, you can simply enter the command list-patient.
Example:
-
delete-patient 5
This deletes the patient with thePATIENT_ID5.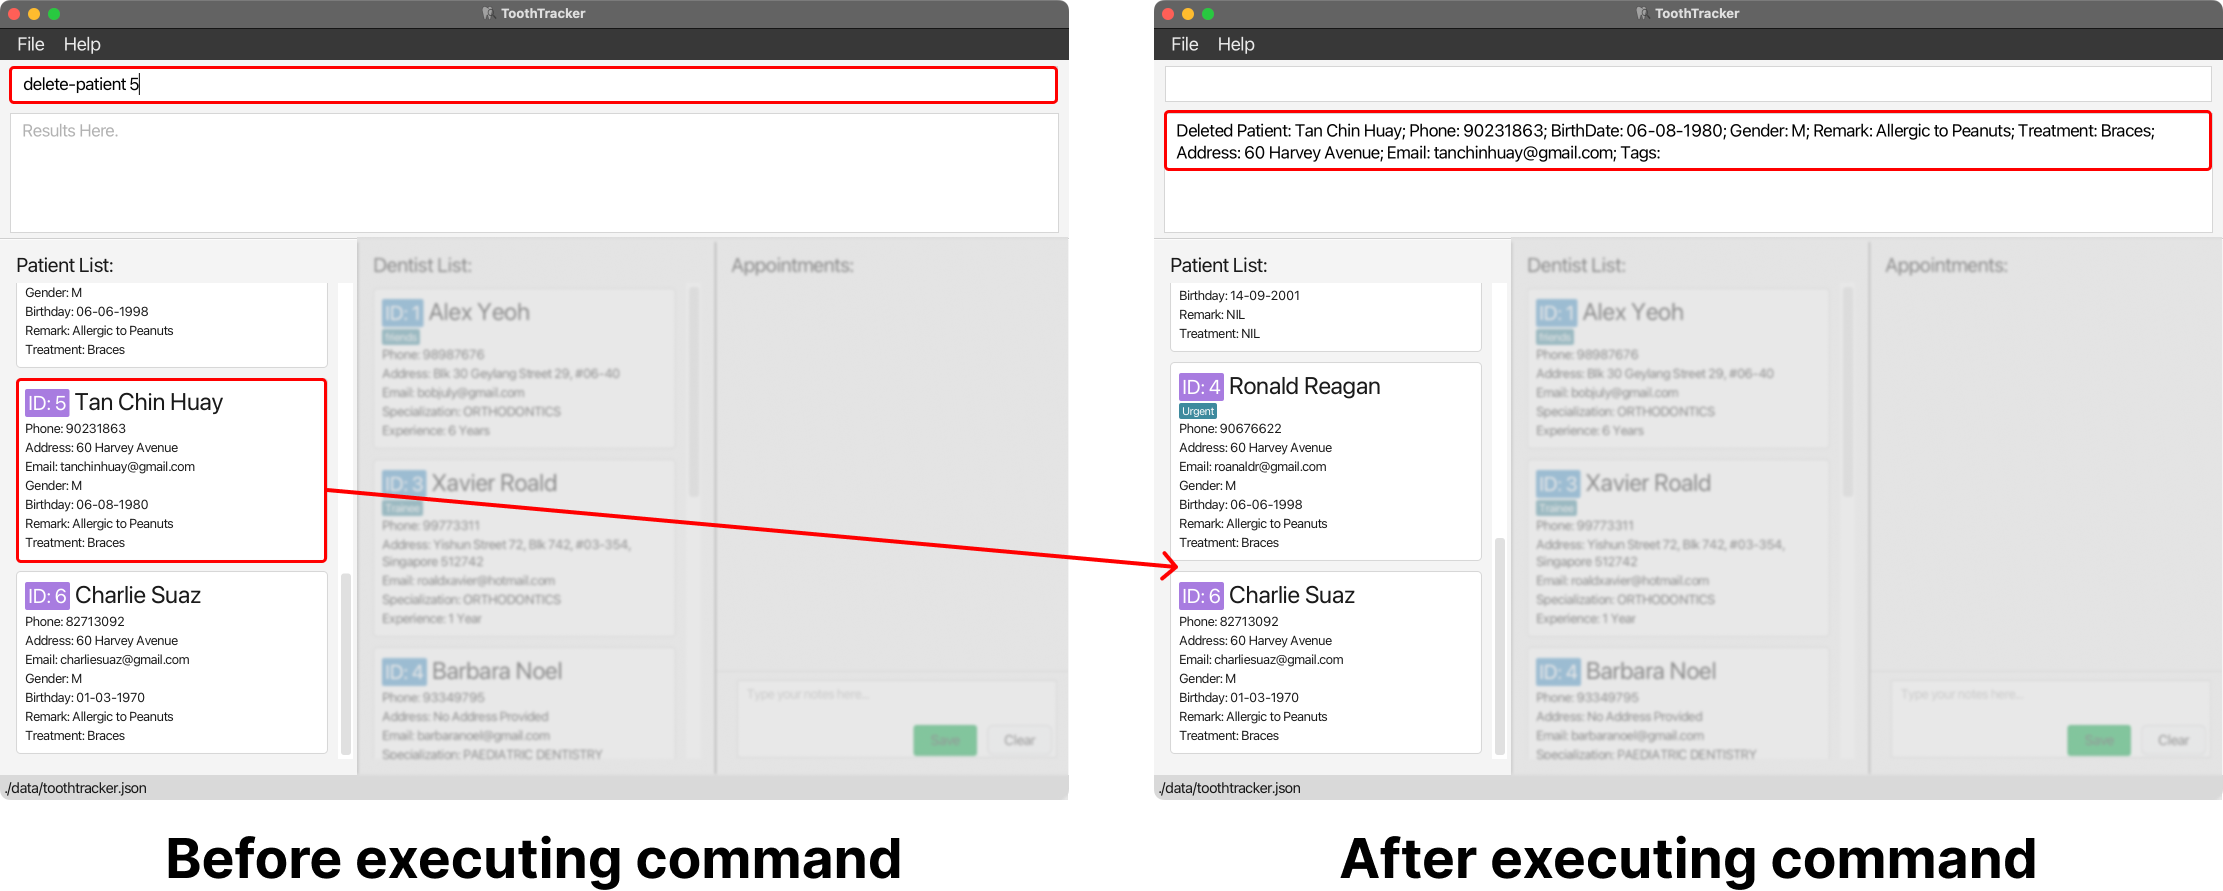
Searching for patients by PATIENT_ID : search-patient
Searches for a patient by their PATIENT_ID in ToothTracker.
This command helps you find a unique patient based on the provided PATIENT_ID. This is useful when:
- You want to confirm the identity of a specific patient before using further commands.
- You need quick access to a specific patient’s particulars.
Format: search-patient PATIENT_ID
PATIENT_ID refers to the ID shown in the displayed list of patients. To check the
PATIENT_ID of a patient, you can simply enter the command list-patient.
Example:
-
search-patient 6
This searches for the patient withPATIENT_ID6.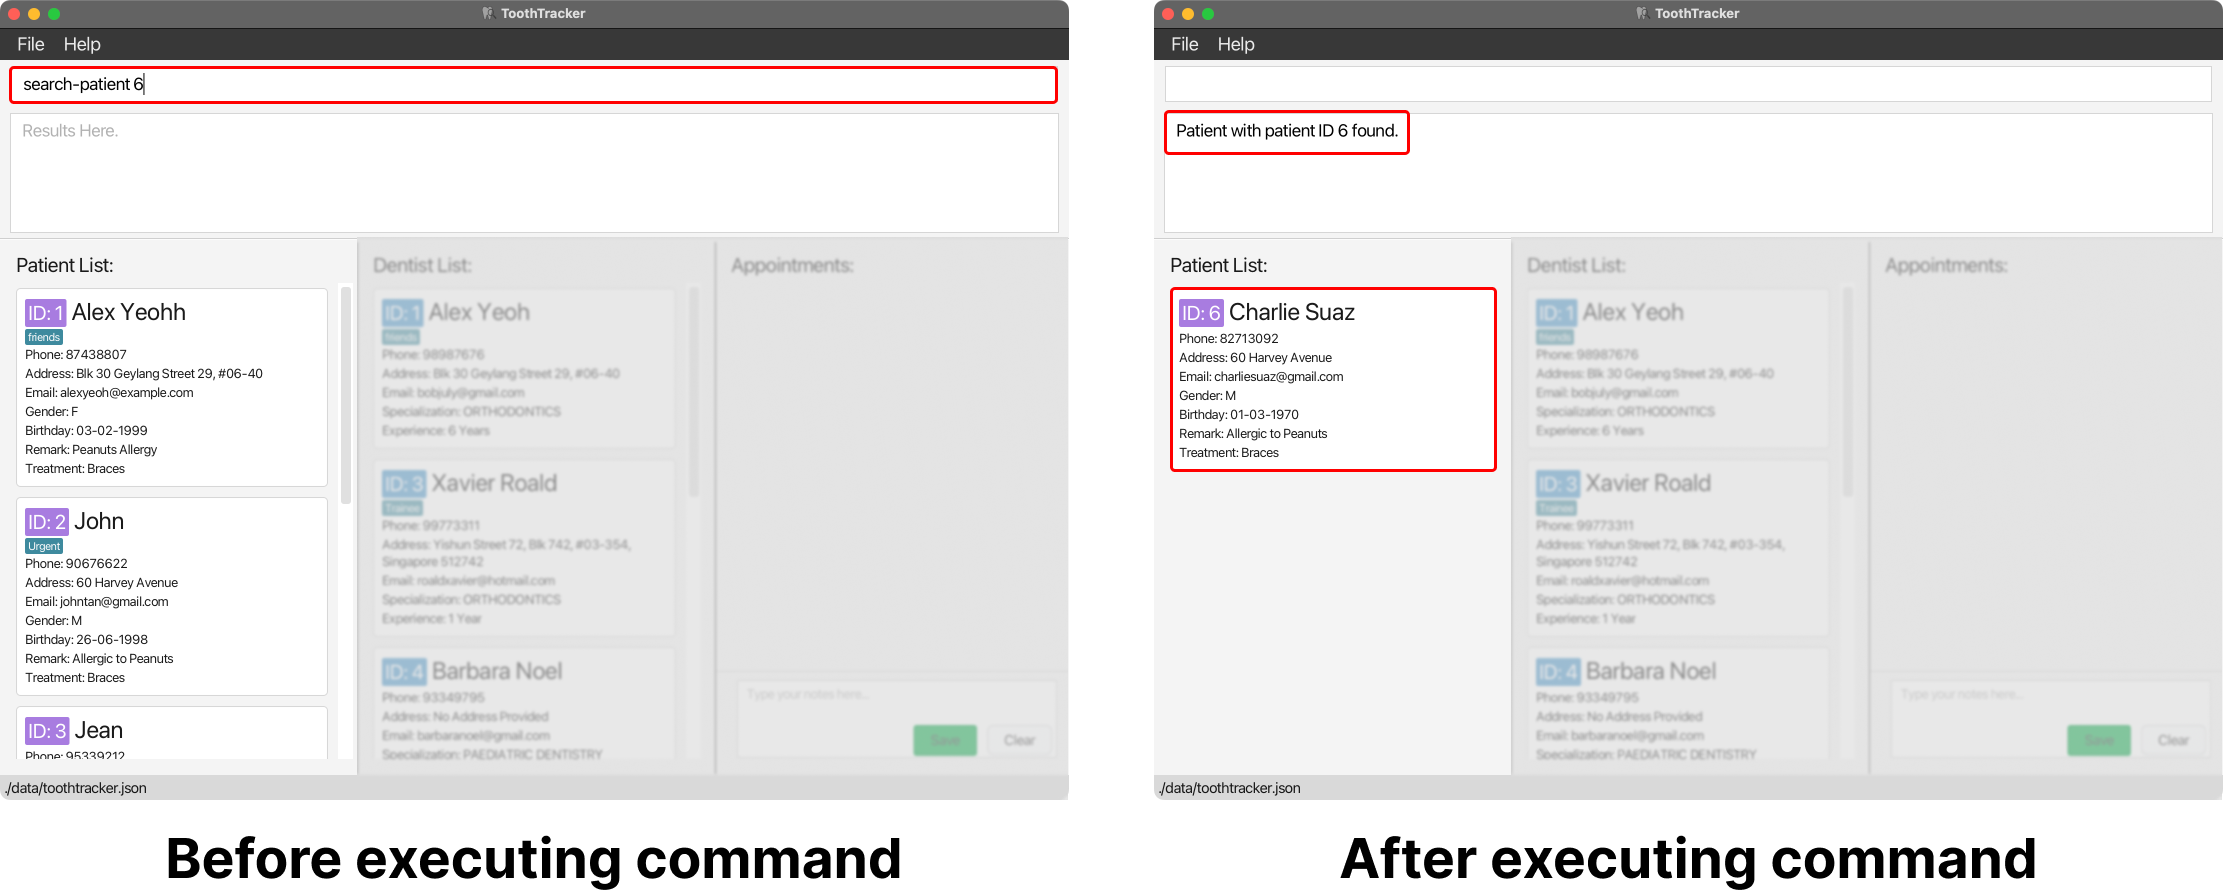
Searching for patients by keywords : search-patient
Searches for patients by matching names with a keyword. This command helps you find patients that match your search criteria. This is useful when:
- You need to find patients whose names match your search criteria.
- You forgot the
PATIENT_IDof a dentist and want to search using the patient’s name instead.
Format: search-patient KEYWORD
![]() Notes about searching patient by keywords:
Notes about searching patient by keywords:
- The search is performed only on the patient's name.
- The search is case-insensitive, meaning that it will match both uppercase and lowercase characters. For example, searching for `James` will match both `James` and `james`.
- The order of the keywords in the name does not matter. For instance, searching for `Mike Lim` will match `Lim Mike` as well.
- Sub-strings will be matched. For example, if you search for `Fred`, it will match `Frederick`.
- More than one patient result might be returned when searching by keywords, especially if multiple patients match your search criteria.
Example:
-
search-patient John
This searches for patients with names containing the keywordJohn.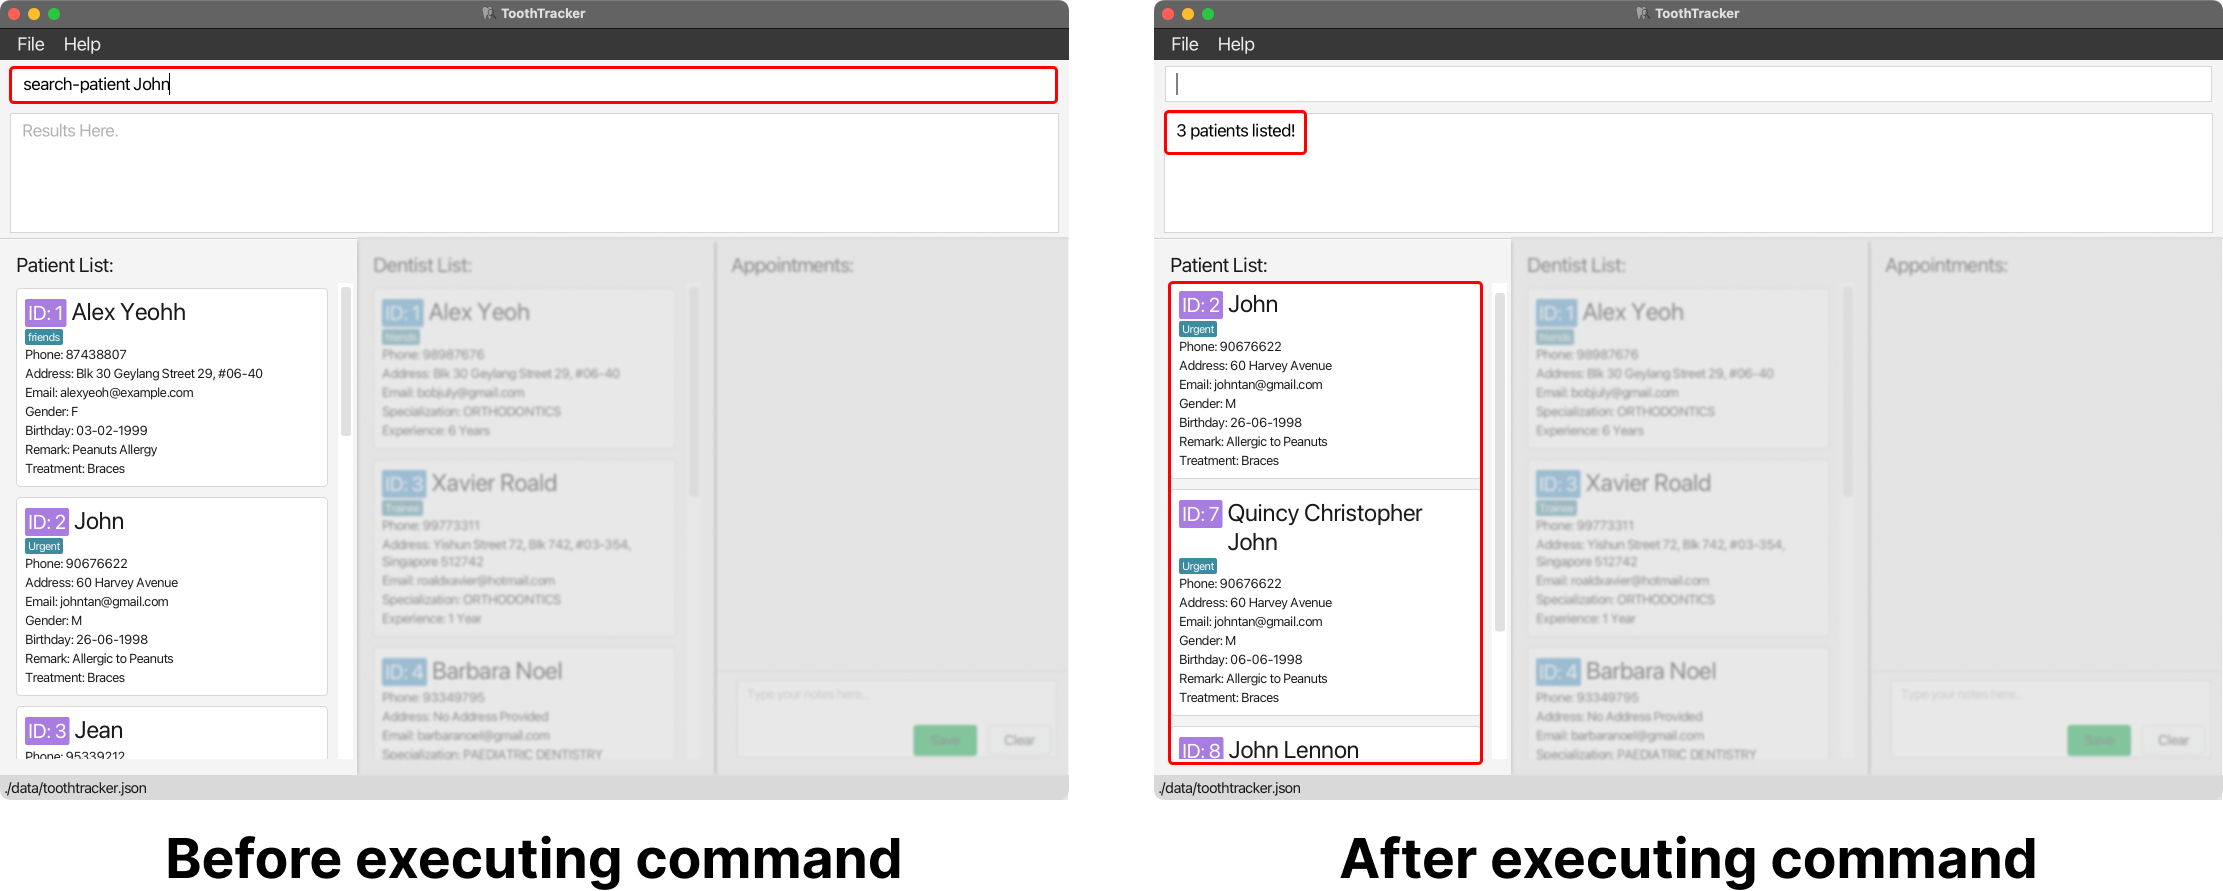
Filtering patients : filter-patient
Narrows down your search for patients based on a specified attribute. When this command is used, there might be more than one result that matches your search criteria. This is useful when:
- You want to find patients with specific attributes.
- You want to confirm the identity of a patient before using further commands.
Format: filter-patient a/ATTRIBUTE k/KEYWORDS
The
filter-patient command only accepts filtering using 1 attribute and 1 set of keywords. For example, filter-patient a/Treatment k/Cleaning k/Braces will not work.
list-patient to view
the attributes which will be displayed in the Patient card.
Alternatively, a message will be shown in the text box regarding the attributes that you can filter by if you entered an invalid attribute. We have set the attributes that can be filtered to be:
name, phone, address, email, gender, birthday, remark, tags and treatment.
Examples:
-
filter-patient a/phone k/82713092
This filters for patients with the phone number ‘82713092’.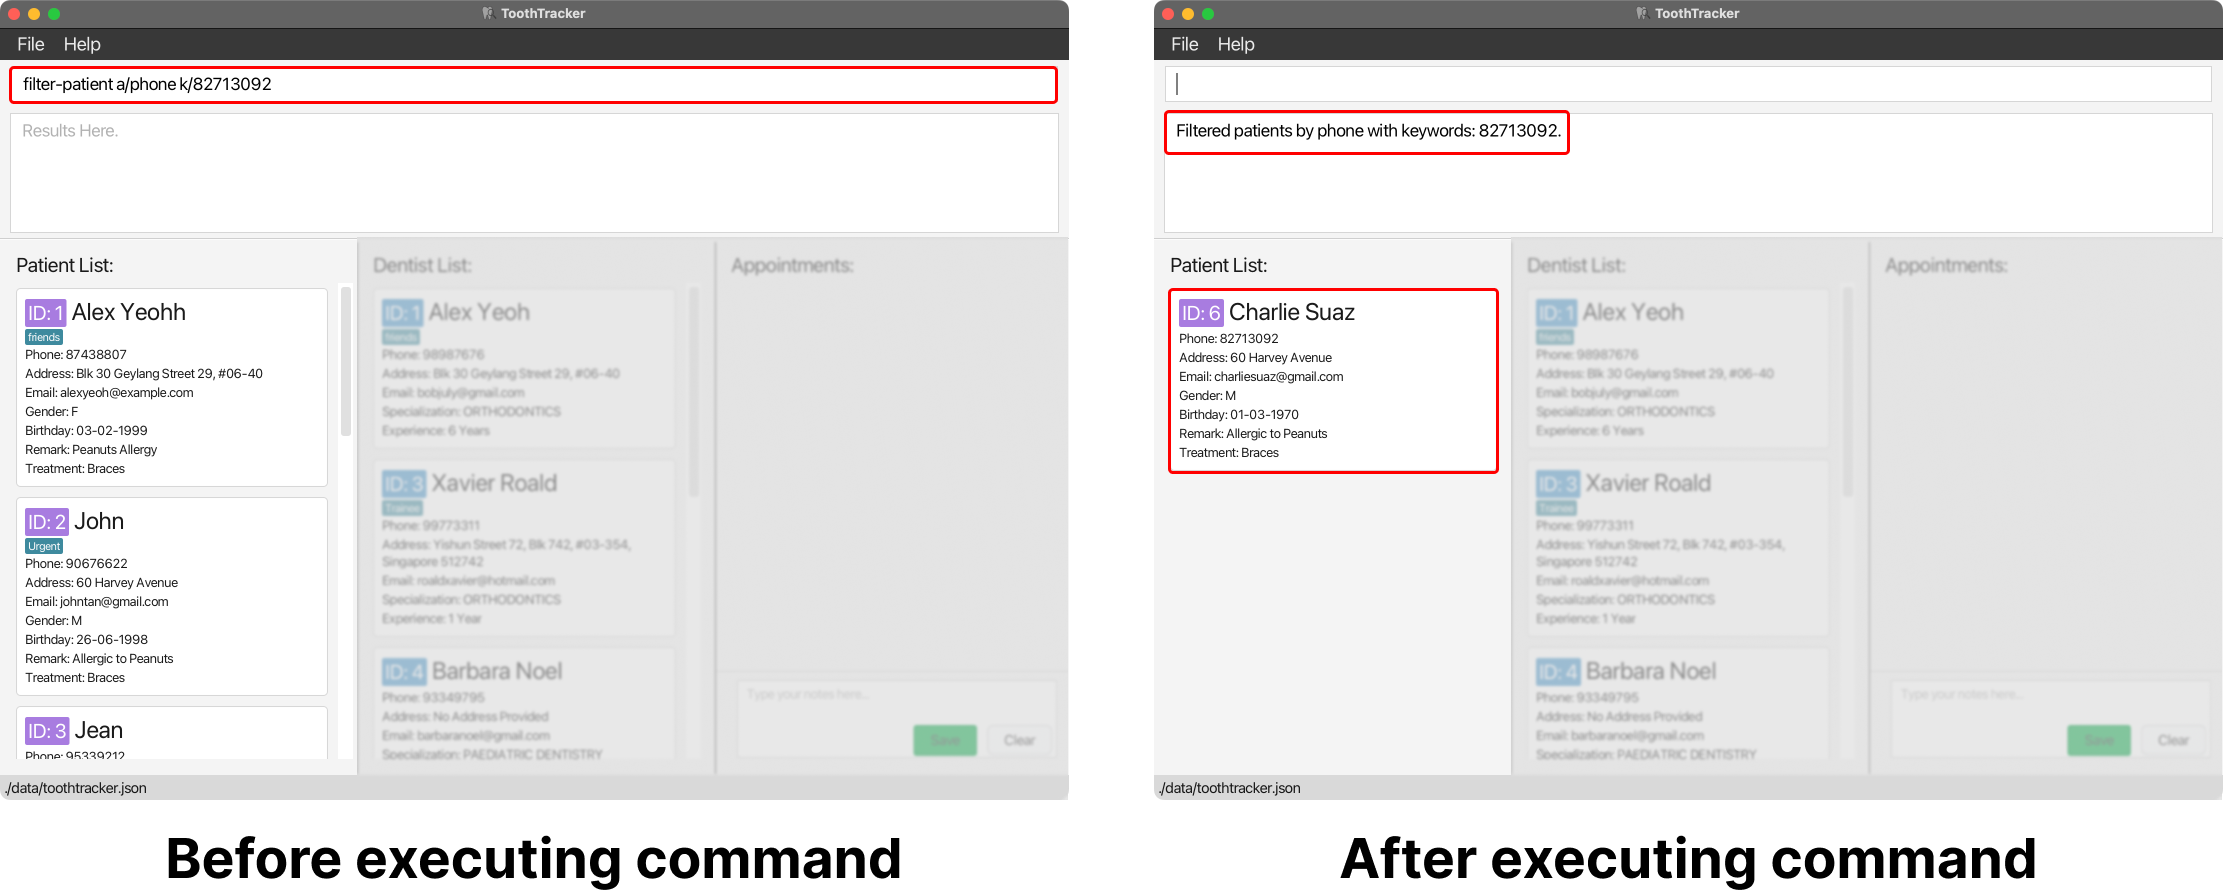
-
filter-patient a/treatment k/Braces
This filters for patients with the treatment ‘Braces’.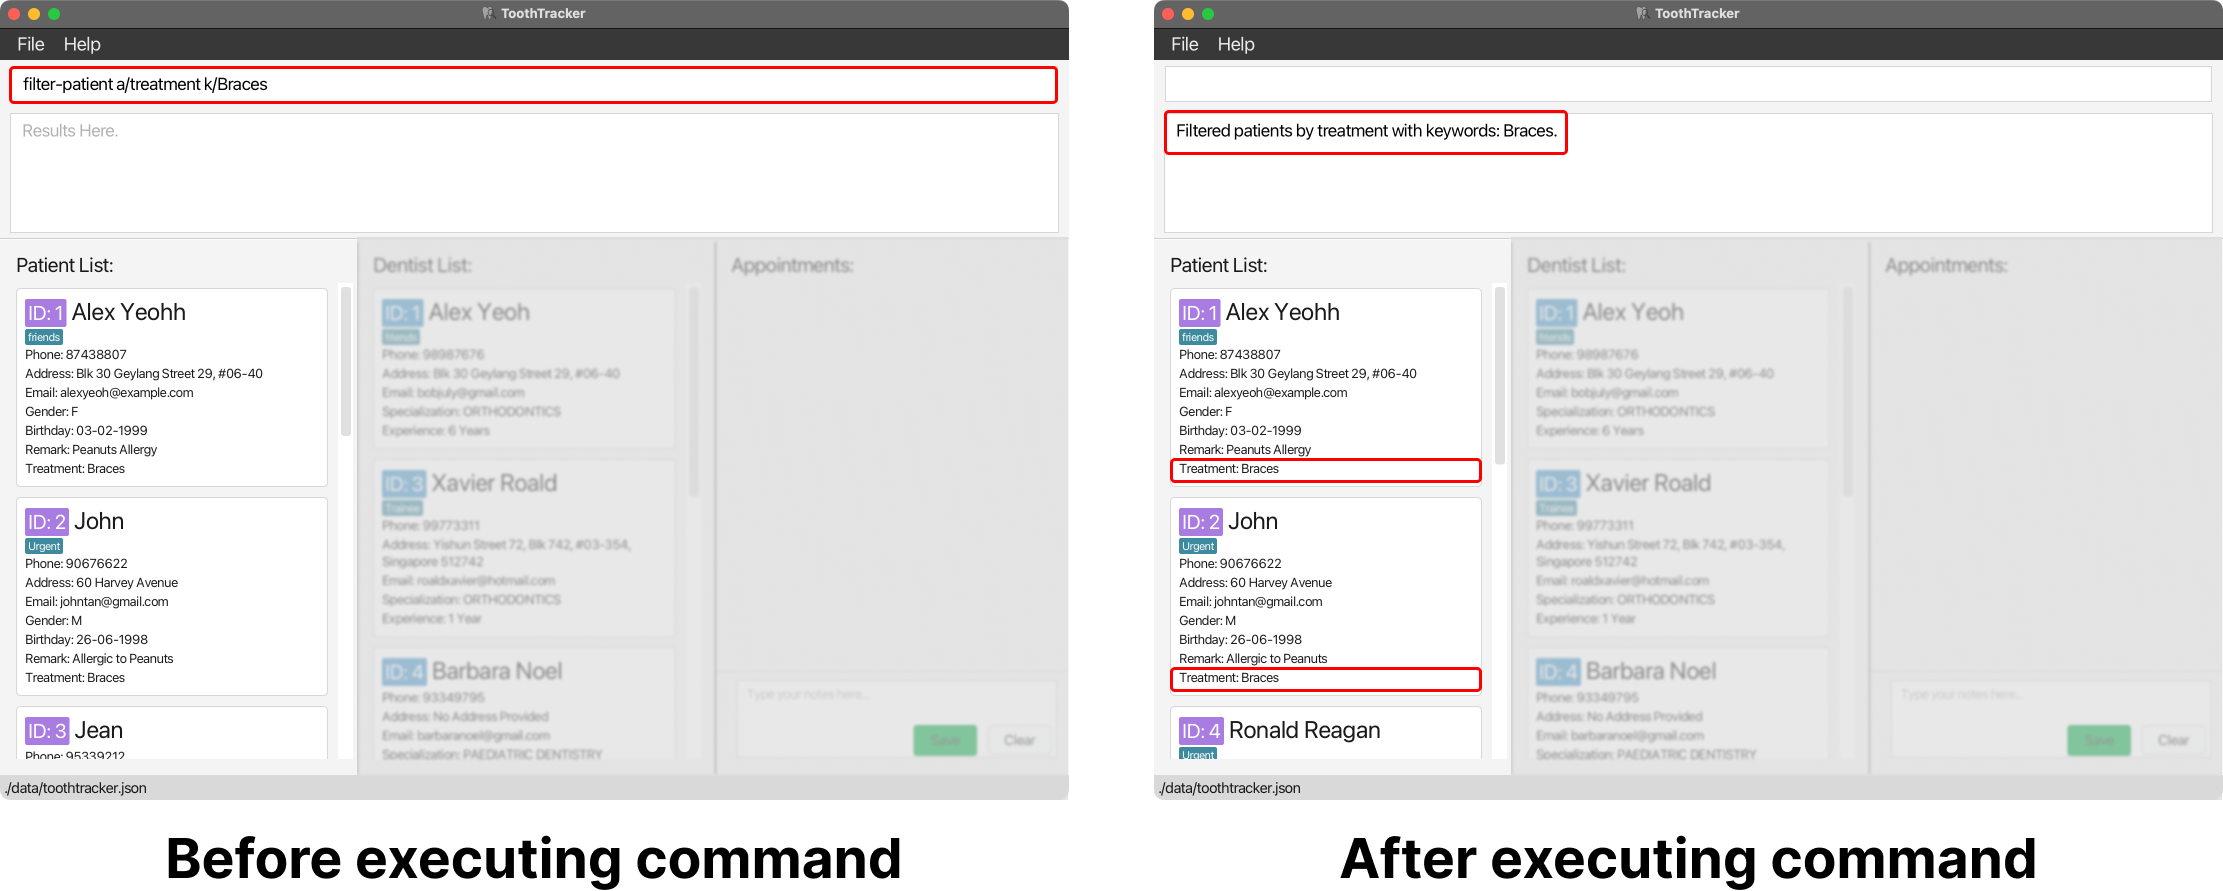
Editing a patient : edit-patient
Edits one or more attributes of the patient with the specified PATIENT_ID. This is useful when:
- The particulars of a patient need to be updated.
- Optional patient particulars were not provided previously.
- You accidentally entered incorrect information about a patient into ToothTracker.
Format: edit-patient PATIENT_ID [n/NAME] [p/PHONE] [b/BIRTHDATE] [g/GENDER] [r/REMARK] [tr/TREATMENT] [e/EMAIL] [h/ADDRESS] [t/TAG]
edit-patient command.
PATIENT_ID of a patient, you can simply enter the command list-patient.
When editing tags for a patient, ensure to include all existing tags to avoid their removal. For instance, if a patient has 2 tags, use the
edit-patient command with 2 tags (e.g., t/TAG1 t/TAG2).
Replace TAG1 and TAG2 with the desired tags. Note that tags cannot contain spaces. To remove all tags, use t/ in the edit-patient command.
The edited treatment must be a valid treatment in ToothTracker. For a list of valid treatments, you can use the command
list-treatment.
Examples:
-
edit-patient 1 p/91234567 e/johndoe@example.com r/Allergic to Peanuts
This edits the phone number, email, and remarks of the patient withPATIENT_ID1 to ‘91234567’, ‘johndoe@example.com’, and ‘Allergic to Peanuts’ respectively.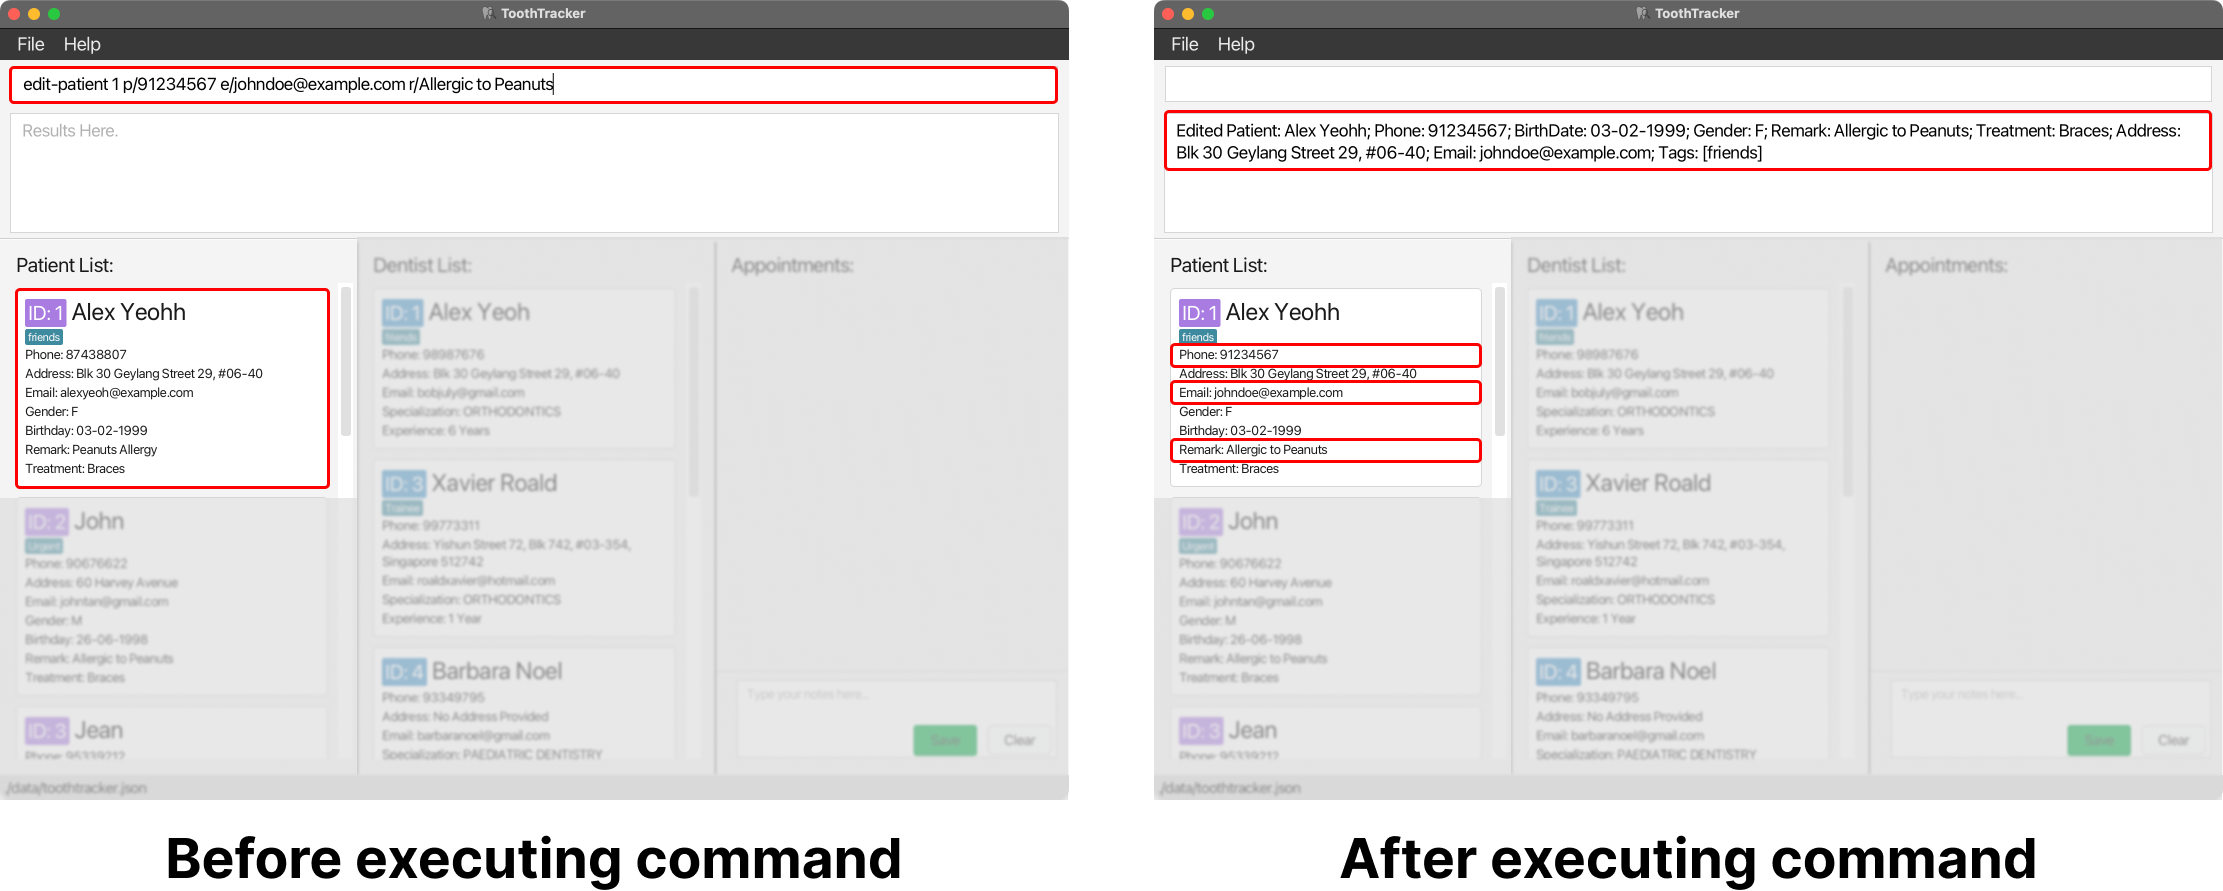
-
edit-patient 2 n/John Tan t/
This edits the name of the patient withPATIENT_ID2 to ‘John Tan’ and removes all tags associated with the patient.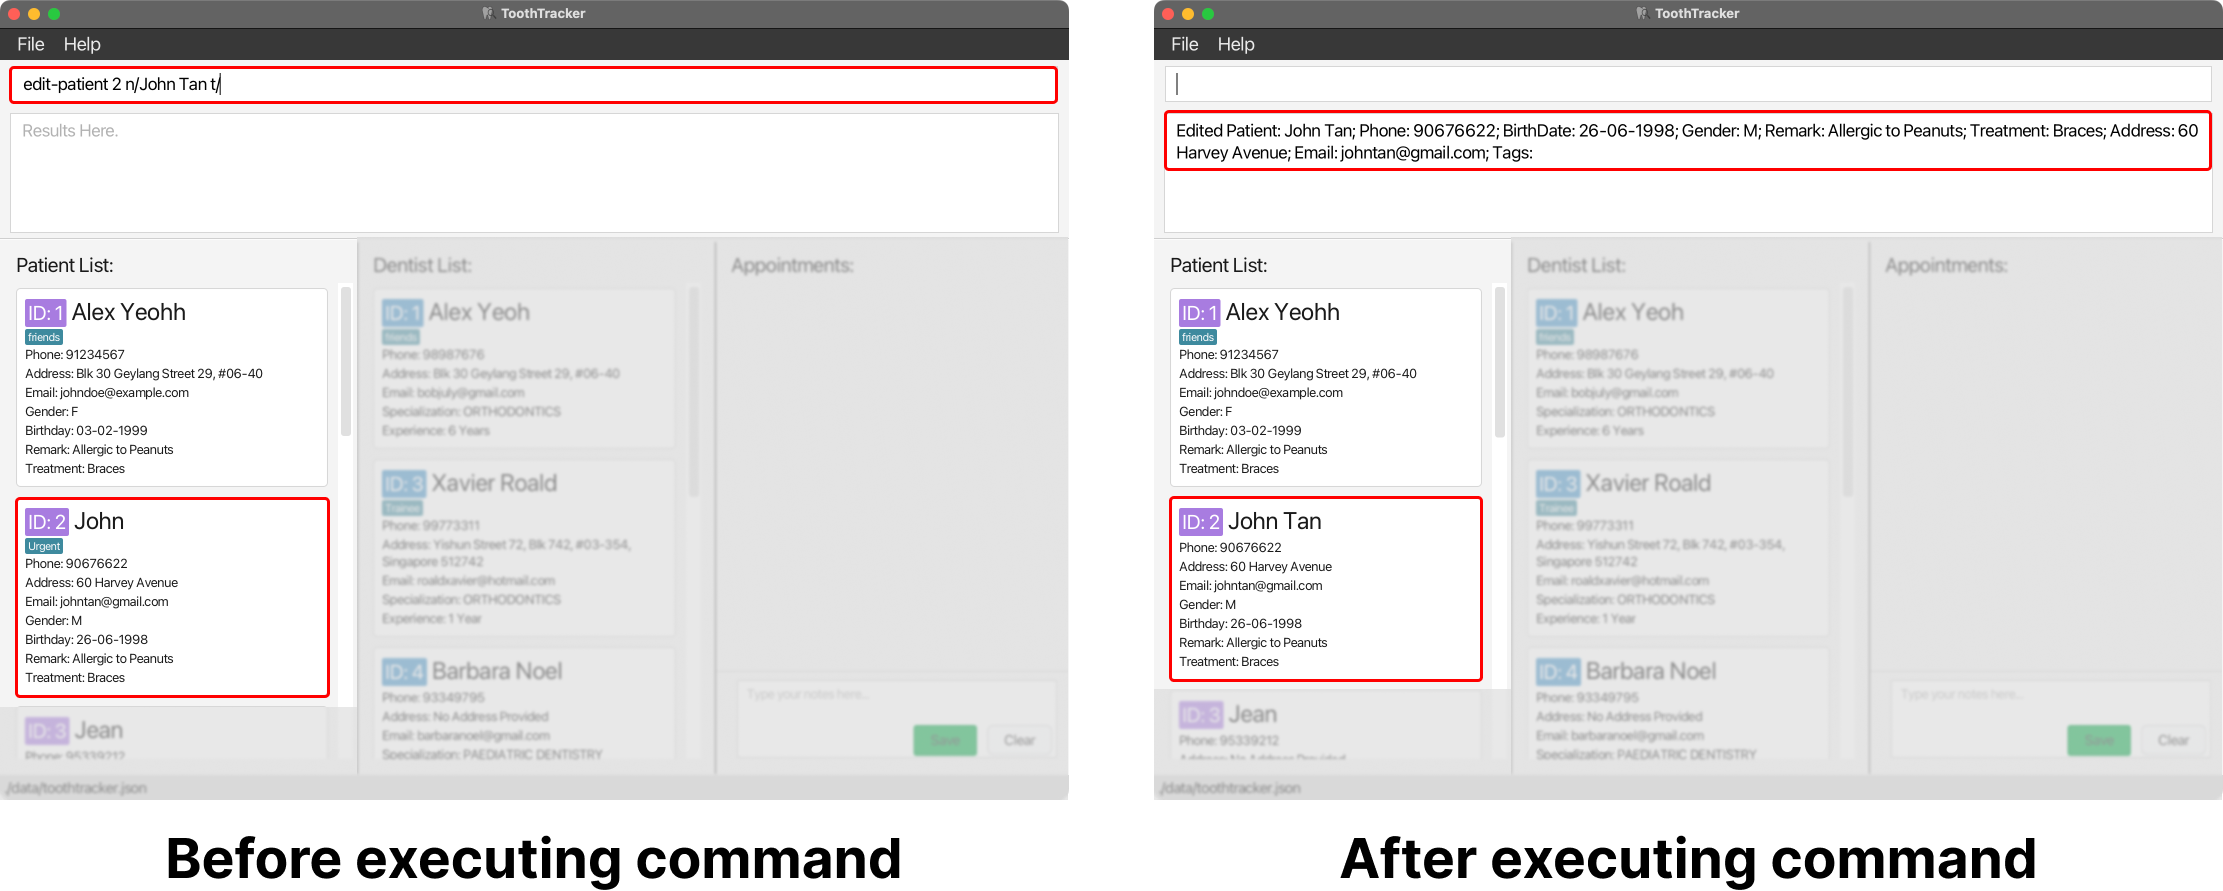
Appointment Features
Adding an appointment : add-appointment
Adds a dental appointment to ToothTracker. This is useful when:
- Scheduling future dental appointments for patients with specific dentists at designated times.
- Checking for clashes with existing appointments.
- Adding past appointments for record-keeping purposes.
Format: add-appointment dentist/DENTIST_ID patient/PATIENT_ID start/START_DATE_TIME tr/TREATMENT
![]() Notes about adding Appointments:
Notes about adding Appointments:
- ToothTracker will not allow the addition of appointments that clashes with existing appointments with the same dentist or patient.
- ToothTracker only allows the addition of appointments from the year 2000 and onwards.
- When adding an appointment, the list of appointments shown may get filtered, resulting in the new appointment not showing up in the appointment list.
Please use
list-appointmentif you want the new appointment to be displayed. - After adding an appointment, the details of the appointment cannot be changed regardless of the changes made to related attributes (e.g. treatment duration, dentist's name). Please delete the appointment and add a new appointment if you wish to update the changes.
Example:
-
add-appointment dentist/1 patient/1 start/2023-10-12 16:00 tr/Braces
This command adds an appointment with thePATIENT_ID1 and theDENTIST_ID1. The appointment starts on ‘12 October 2023, 4pm’. The treatment provided during the appointment is ‘Braces’. The duration of the appointment is automatically set based on the selected treatment in ToothTracker.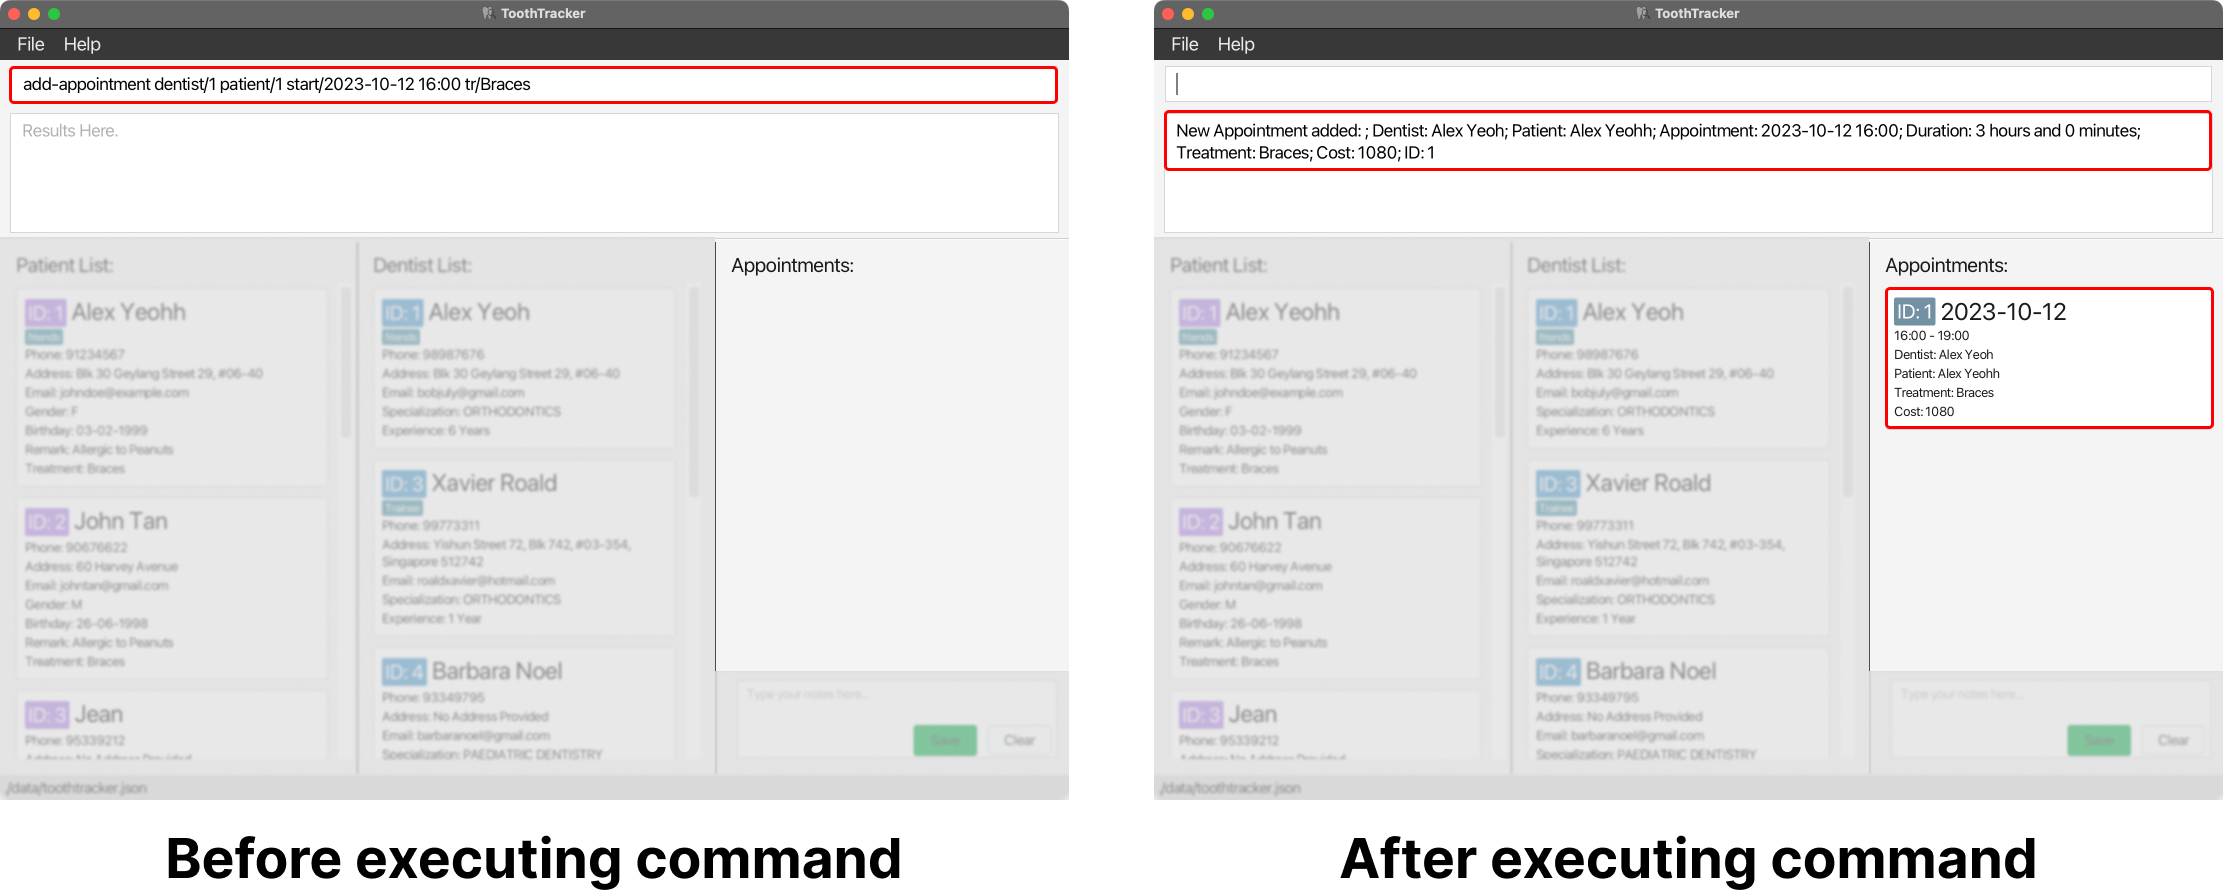
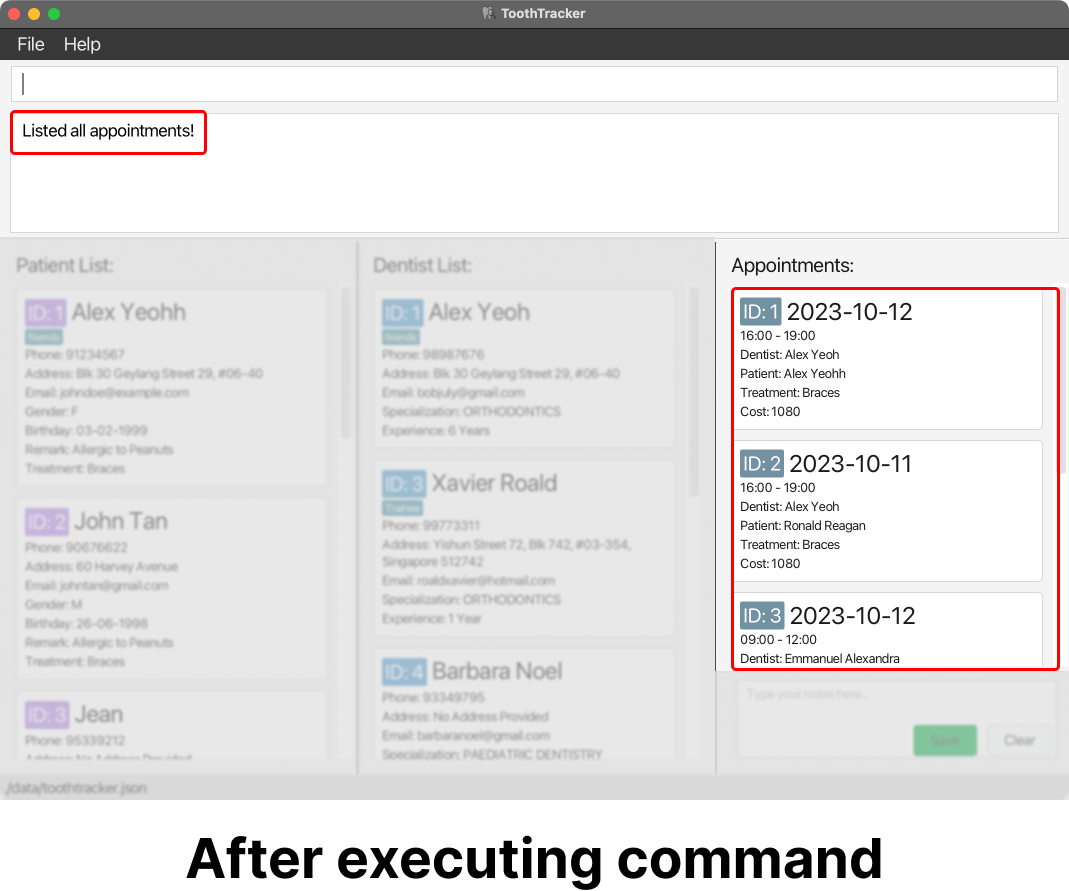
Listing all appointments : list-appointment
Shows a list of all appointments in ToothTracker. This is useful when:
- You want to retrieve the information of all appointments.
- You want to verify that an appointment has been successfully added to ToothTracker.
Format: list-appointment (No extra parameters required)
Deleting an appointment : delete-appointment
Deletes the appointment with the specified APPOINTMENT_ID from ToothTracker.
Format: delete-appointment APPOINTMENT_ID
APPOINTMENT_ID of an appointment, you can simply enter the command list-appointment.
Example:
-
delete-appointment 2
This deletes the appointment withAPPOINTMENT_ID2 from ToothTracker.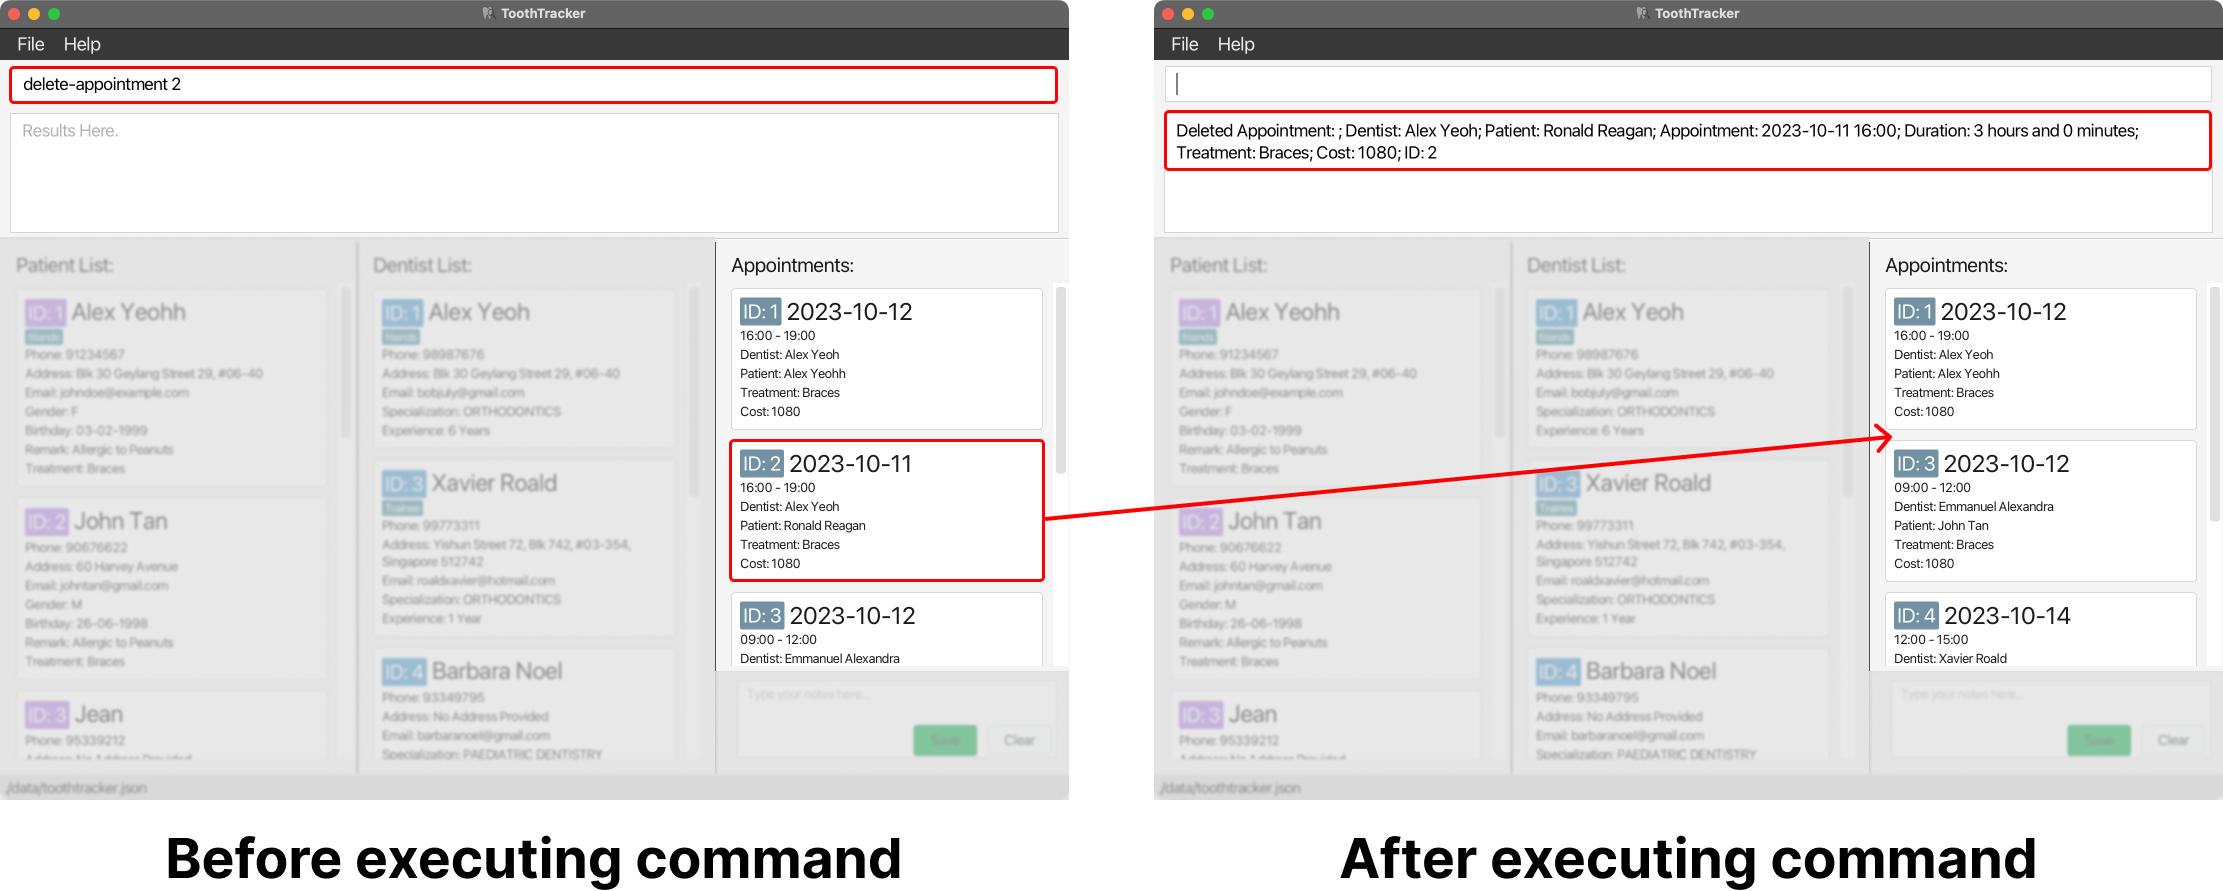
Filtering appointments by DENTIST_ID : filter-appointment dentist
Narrows down your search for appointments by filtering the appointment list to
show the list of appointments under the dentist with the specified DENTIST_ID.
This is useful when:
- You want to view the list of appointments under a specific dentist.
Format: filter-appointment dentist DENTIST_ID
DENTIST_ID refers to the ID shown in the displayed list of dentists. You may use
list-dentist to check out the DENTIST_ID first.
Example:
-
filter-appointment dentist 1
This shows you all the appointments under the dentist withDENTIST_ID1.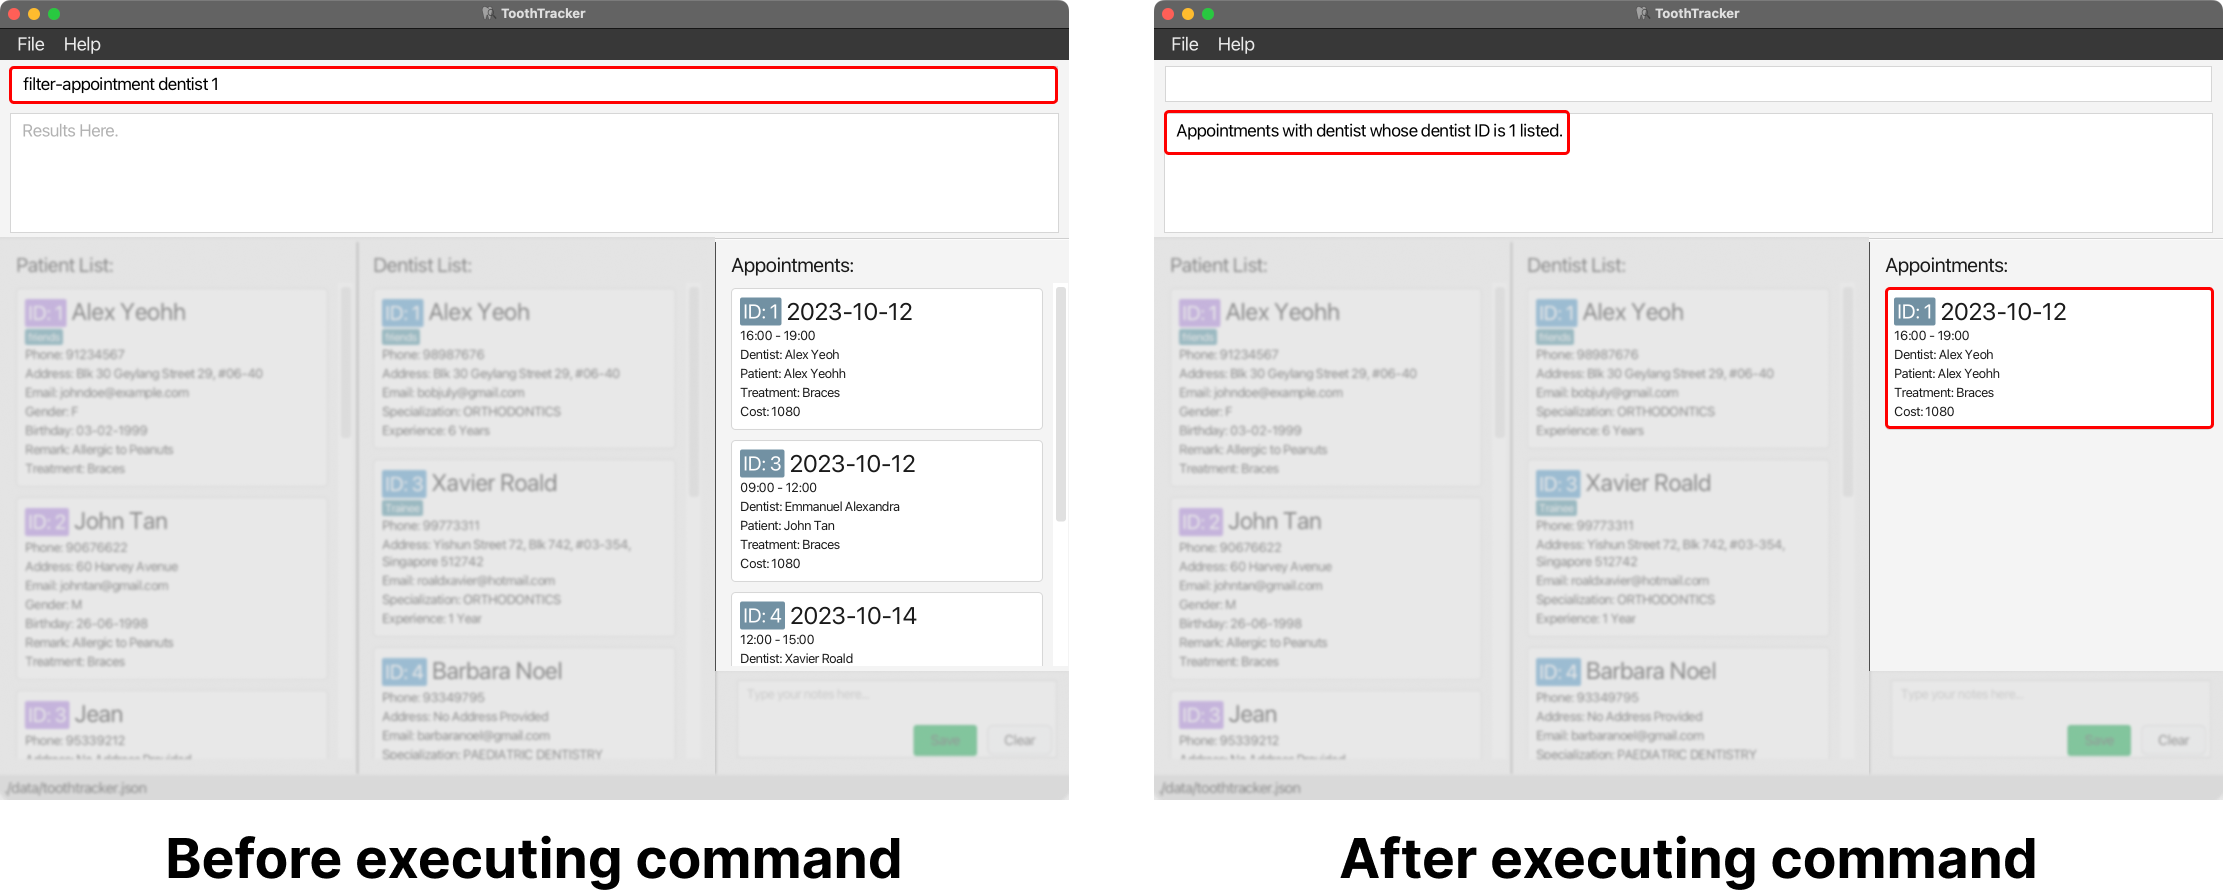
Filtering appointments by PATIENT_ID : filter-appointment patient
Narrows down your search for appointments by filtering the appointment list to
show the list of appointments under the patient with the specified PATIENT_ID.
This is useful when:
- You want to view the list of appointments under a specific patient.
Format: filter-appointment patient PATIENT_ID
PATIENT_ID refers to the index number shown in the displayed list of patients. You may use
list-patient to check the PATIENT_ID first.
Example:
-
filter-appointment patient 1
This shows you all the appointments under the patient with thePATIENT_ID1.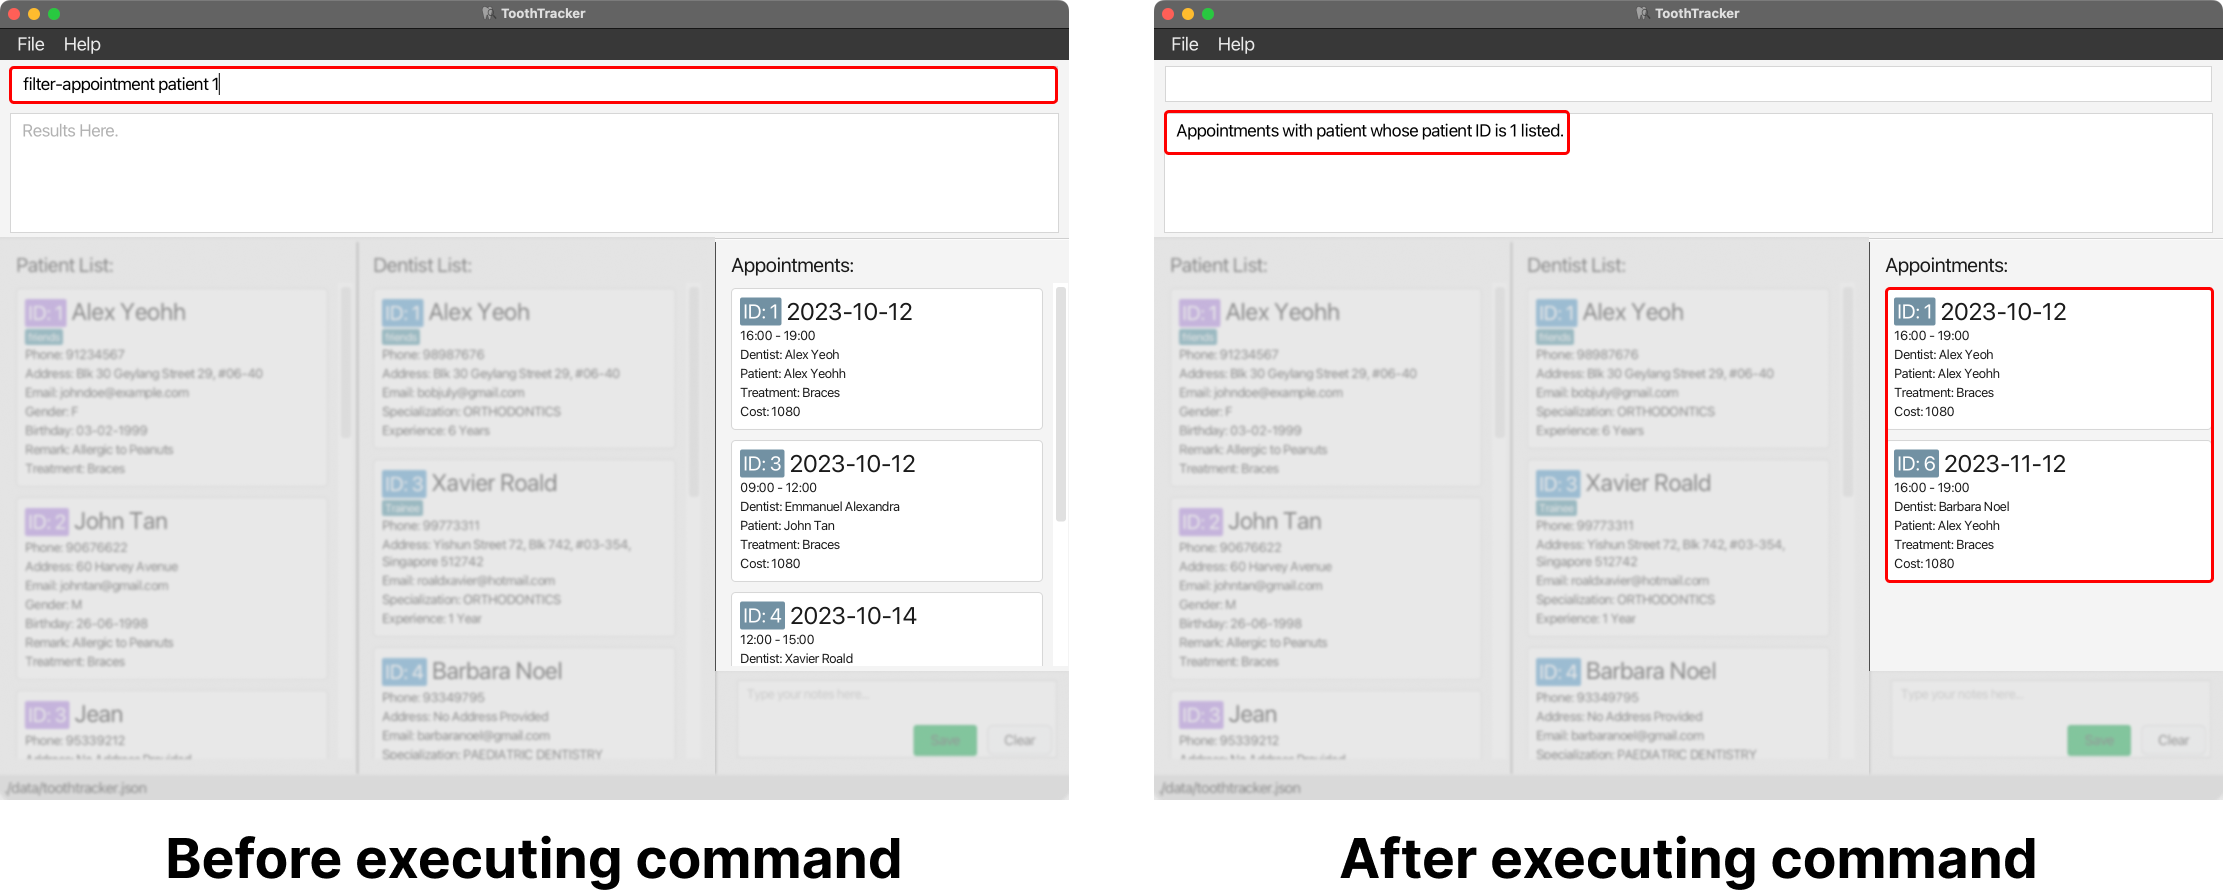
Treatment Features
Adding a treatment : add-treatment
Adds a dental treatment to the ToothTracker system. This command allows you to specify the treatment name, the cost of treatment, and how long the treatment would take.
Format: add-treatment tr/NAME cs/PRICE ti/DURATION
Each treatment must have a unique name. ToothTracker does not allow multiple treatments with identical names.
Example:
-
add-treatment tr/Tooth Extraction cs/1080 ti/01:30
This adds a ‘Tooth Extraction’ treatment to ToothTracker with a cost of ‘$1080 SGD’, and duration of ‘1 hour and 30 minutes’.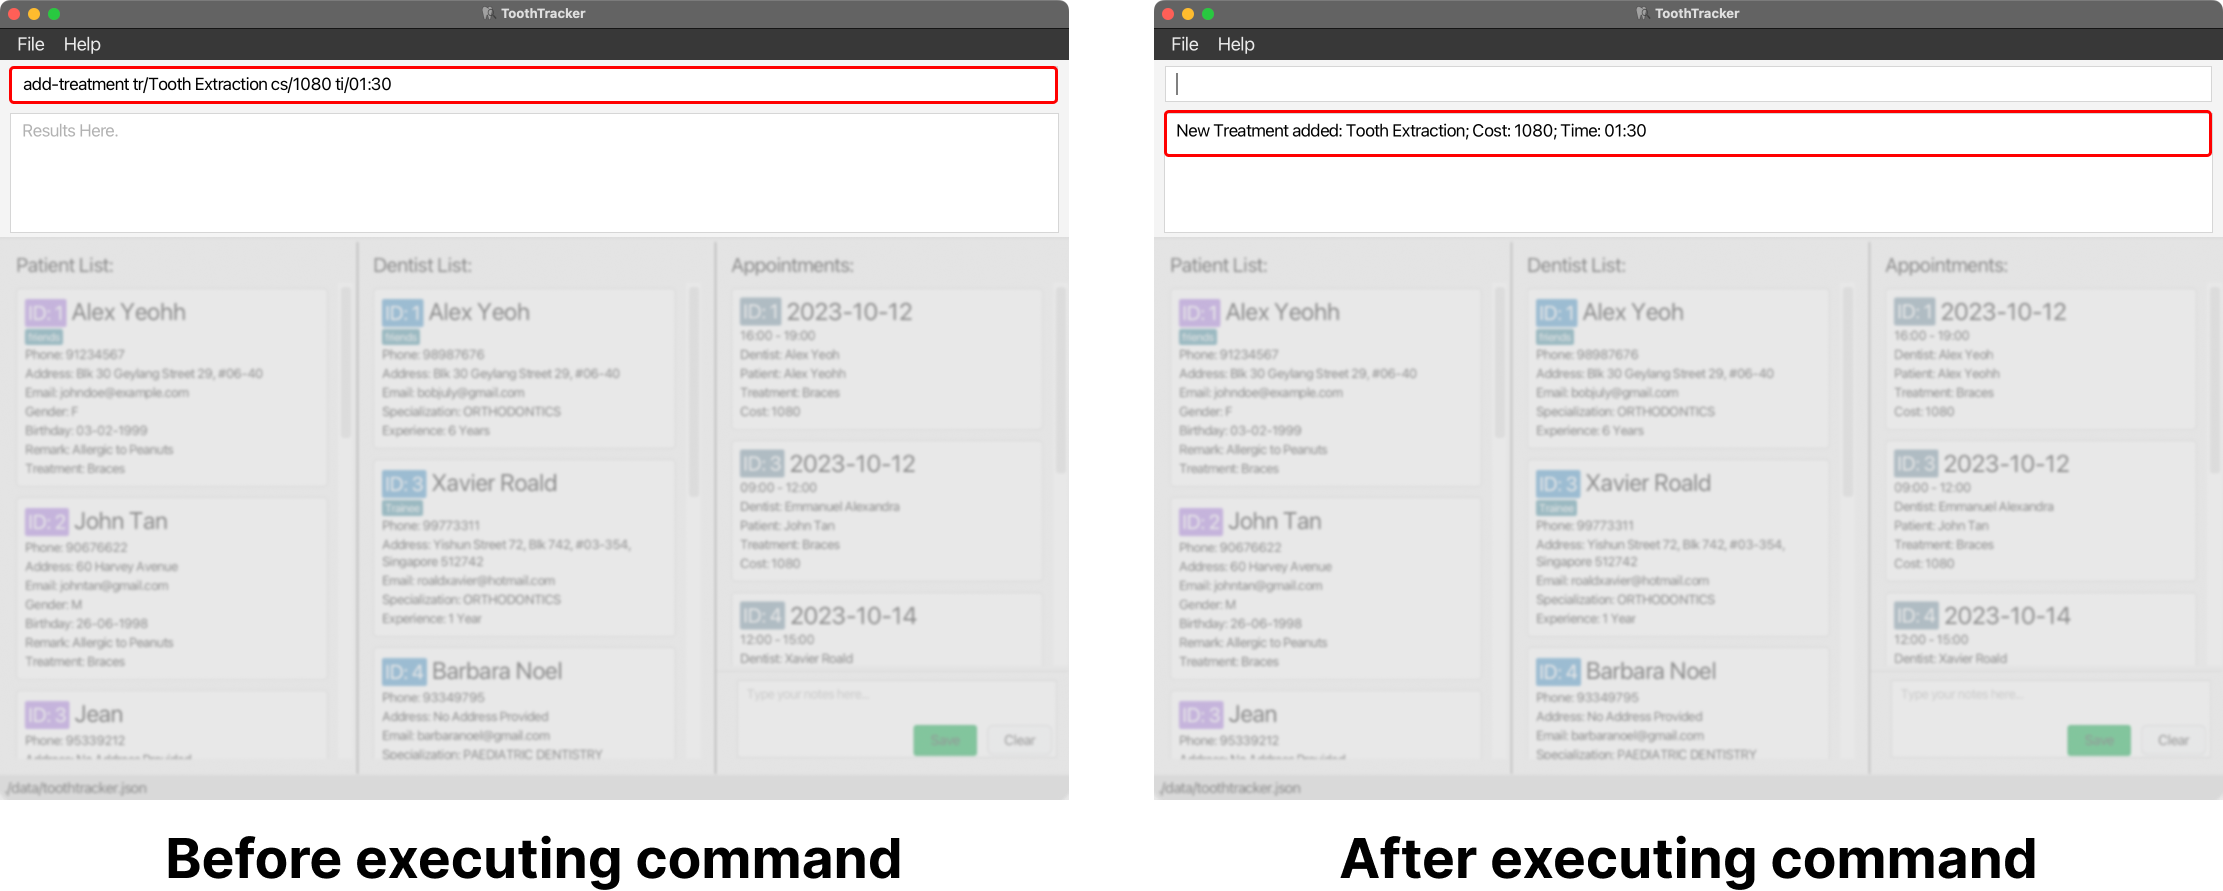
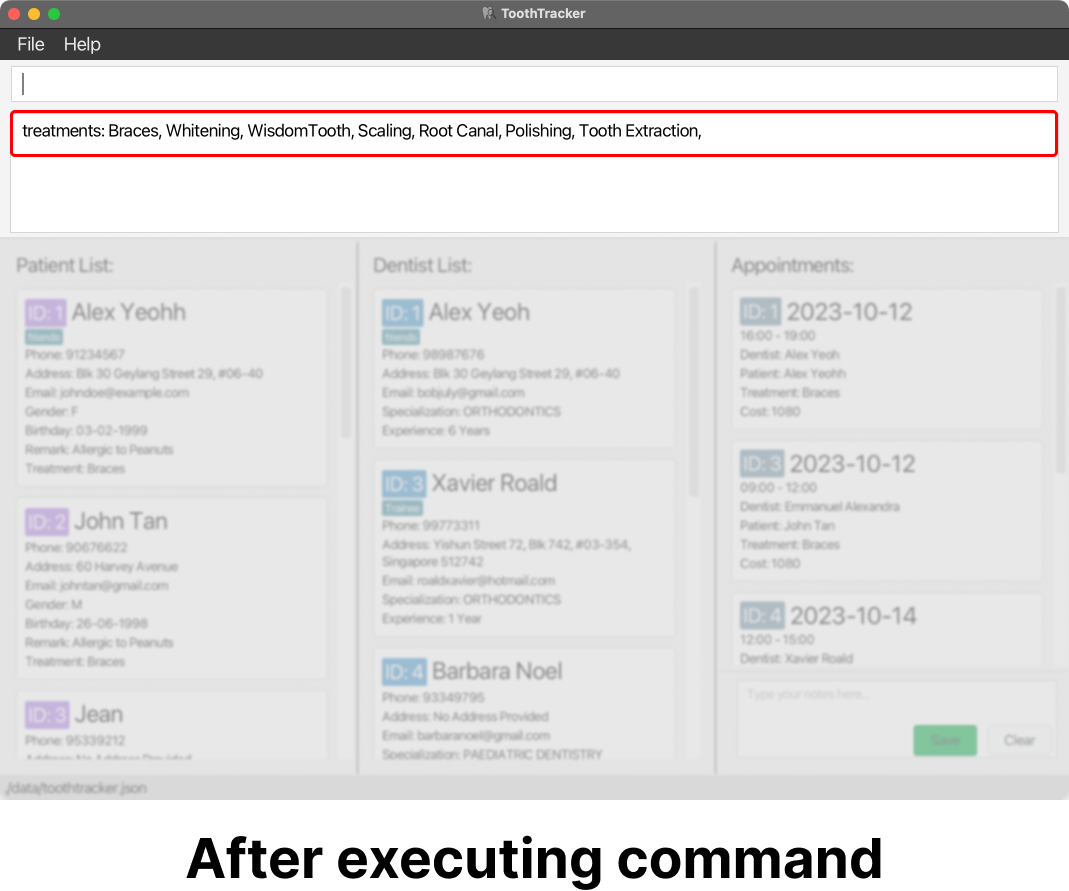
Listing all treatments : list-treatment
Shows a list of all treatments in ToothTracker. This is useful when:
- You want to view the currently available treatments stored in ToothTracker.
Format: list-treatment (No extra parameters required)
Deleting a treatment : delete-treatment
Deletes the treatment with the specified TREATMENT_NAME from ToothTracker.
Format: delete-treatment TREATMENT_NAME
TREATMENT_NAME must be an exact match (case-sensitive) with the name of the treatment to be deleted.
Example:
-
delete-treatment Braces
This deletes the treatmentBracesfrom ToothTracker.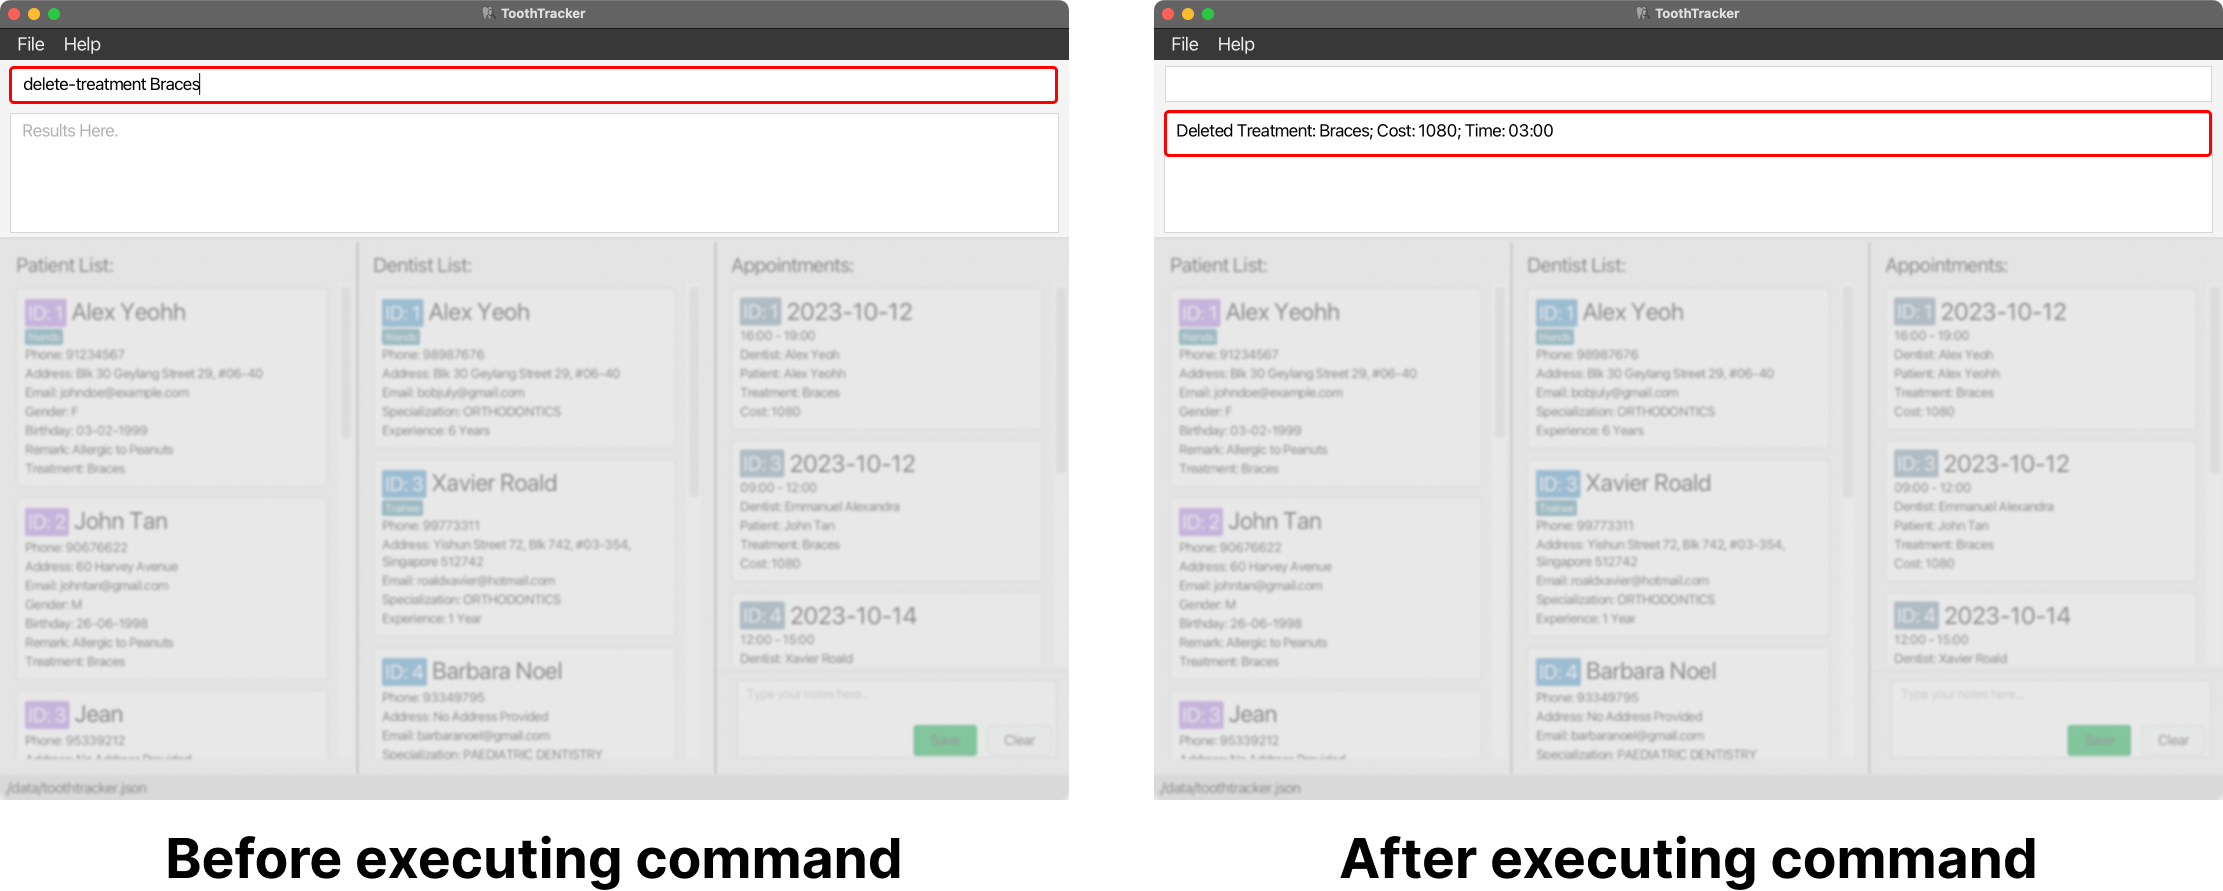
Calendar Feature
Viewing calendar : view-calendar
Shows a calendar filled with all scheduled appointments in ToothTracker. This is useful when:
- You want a visual summary of all appointments in your clinic.
- You need to plan ahead for upcoming weeks or months.
Format: view-calendar (No extra parameters required)
The appointments displayed in the calendar depends on the appointments listed in the main list. If the main appointment list is filtered, the appointments displayed in the calendar would be filtered too.
Please use
list-appointment before view-calendar if you want to view all appointments.
General Features
Viewing help : help
Shows a message explaining how to access the help page.
Format: help

Clearing all data : clear
Clears all data from ToothTracker. PROCEED WITH CAUTION!
Format: clear
Exiting the program : exit
Exits ToothTracker app.
Format: exit
Saving the data
ToothTracker data is saved in the hard disk automatically after any command that changes the data. There is no need to save manually.
Editing the data file
ToothTracker data is saved automatically as a JSON file [JAR file location]/data/toothtracker.json. Advanced users are
welcome to update data directly by editing that data file.
Troubleshooting
Checking your system’s Java version
Check that your system has the correct Java version (Java 11 and above) installed to run ToothTracker. Follow the steps below:
- For Windows Users:
- Press
Win + Sto open search. - Type in
Terminaland open the terminal. - Key in
java --versionand pressEnterto check your Java version.
- Press
- For macOS Users:
- Press
Cmd + Spaceto launch Spotlight. - Type in
Terminaland open the terminal. - Key in
java --versionand pressReturnto check your Java version.
- Press
- For Linux Users:
- Press
Ctrl + Alt + Tto open the Terminal. - Key in
java --versionand pressEnterto check your Java version.
- Press
The following image shows an example of what will show up on macOS. You can expect a similar result if you’re using another operating system.

The number in the red box highlights the Java version your system currently has. In the example, the system is running Java 11.0.19, which meets the requirement for ToothTracker.
If you hava an earlier version of Java installed, head over to Oracle’s Java download page to install the correct version of Java.
FAQ
Q: How do I transfer my data to another Computer?
A: Install the app in the other computer and overwrite the empty data file it creates with the file that contains
the data of your previous ToothTracker home folder.
Q: I don’t have Java 11, how do I install it on my computer?
A: You can find detailed installation instructions here
and install Java 11 according to your platform.
Q: Why do I get an error while trying to edit an existing dentist/patient?
A: The dentist/patient to be edited may not be shown in ToothTracker.
To display the to-be-edited dentist/patient, you may use these commands:
-
list-dentistorlist-patient -
search-dentistorsearch-patient
Thereafter, you may edit the particulars using edit-dentist or edit-patient with their DENTIST_ID or PATIENT_ID
respectively.
Q: Why are some appointments missing from the calendar view?
A: You might have used view-calendar after filtering the appointment list. To display all appointments,
you may use list-appointment before using view-calendar.
Known issues
Multi-screen Display
- Issue: When moving the application from a secondary screen to the primary screen, the GUI may open off-screen.
-
Remedy: Delete the
preferences.jsonfile before relaunching the application.
List Treatment Command
-
Issue: Extra comma displayed at the end when using the
list-treatmentcommand.
Incomplete Treatment Information
-
Issue: The
list-treatmentcommand only displays the names of treatments without additional information such as the cost of treatment and duration, which were fields requested during the initial addition of treatments into ToothTracker.
Phone Number Validation
-
Issue: Validation checks for phone numbers in
add-patientandadd-dentistcommands are currently based on 8 digits and do not verify if the phone number starts with an 8 or 9.
Filter Command Validation
-
Issue: The
filter-patientandfilter-dentistcommands only perform validation checks on the attribute to filter by and not the keywords. For example,filter-dentist a/phone k/myphonewill still execute the command.
Tag Error in Edit Commands
-
Issue: When using non-alphanumeric characters in tags on the
edit-dentistoredit-patientcommands, an “Unknown command” error is sometimes displayed.
Limited Tag Editing
- Issue: If a patient was initially added to ToothTracker with 3 tags, only 3 tags can be edited afterward—no more, no less. Additional tags cannot be added, and attempting to edit with a different number of tags results in an error.
-
Remedy: To modify tags, the number must exactly match the tags initially assigned during patient creation via
add-patient. If additional tags are required or if tags need removal, the patient or dentist must be deleted and added again. Resetting tags to empty usingedit-patient [PATIENT_ID] t/is possible, but subsequent tag editing must adhere to the original number of tags.
Editing Patient Without Tags or Editing Patient previously deleted:
-
Issue: Attempting to edit a patient record that originally had no tags and adding tags during the edit or editing a patient record that was previously deleted to have tags will result in a “Multiple values specified for the following single-valued field(s): t/” error.
When editing a patient record that initially had no tags, adding tags during the editing process triggers an error related to the
t/(tags) field. The system recognizes this as an attempt to assign multiple values to a field that is intended to be single-valued. - Remedy: To avoid this error, ensure that the patient record has at least one tag during the initial creation. If tags need to be added later, consider deleting the patient and adding them again with the desired tags.
Fields summary
| Field | Description | Examples |
|---|---|---|
| ti | Represents the total duration of the treatment in hours and minutes. |
ti/10:30 tr/09:59
|
| cs | Represents the total cost of the treatment in dollars. |
cs/3000 cs/500
|
| tr | Represents the name of the treatment
|
tr/Whitening tr/Braces
|
| start | Represents the start date time of a appointment in yyyy-mm-dd hh:mm
|
start/2023-01-01 09:05 start/2021-10-12 16:00
|
| patient | Represents the unique ID of the patient when adding a appointment
|
patient/1 patient/45
|
| dentist | Represents the unique ID of the dentist when adding a appointment
|
dentist/1 dentist/45
|
| y | Represents the years of experience of the dentist when adding a dentist
|
y/5 y/10
|
| s | Represents the specialization of the dentist when adding a dentist
|
s/Orthodontics s/DENTAL_PUBLIC_HEALTH
|
| r | Represents a optional remark when adding a patient
|
r/Peanut Allergy r/Soya Allergy
|
| g | Represents gender. |
g/M g/F
|
| b | Represents the birthday of a patient in dd-mm-yyyy
|
b/06-06-1998 b/12-11-2002
|
| t | Represents an optional tag for a patient or dentist
|
t/urgent t/NotUrgent
|
| e | Represents an optional email address for a patient or dentist
|
e/freddy@gmail.com e/john@youmail.com
|
| h | Represents an optional home address for a patient or dentist
|
h/123, Clementi Ave 3, #12-34 h/8 Farrer Road
|
| p | Represents a phone number |
p/97826376 p/92837263
|
| n | Represents a name |
n/John n/Tom
|
Command summary
Dentist Commands
| Action | Format | Example |
|---|---|---|
| Add Dentist | add-dentist n/NAME p/PHONE s/SPECIALIZATION y/YOE [e/EMAIL] [h/ADDRESS] [t/TAG]… |
add-dentist n/Bob p/12345678 e/bobjune@gmail.com y/6 s/braces |
| List Dentist | list-dentist |
list-dentist |
| Delete Dentist | delete-dentist DENTIST_ID |
delete-dentist 3 |
| Search Dentist by Dentist ID | search-dentist DENTIST_ID |
search-dentist 2 |
| Search Dentist by Keyword | search-dentist KEYWORD |
search-dentist Tom |
| Filter Dentist | filter-dentist a/ATTRIBUTE k/KEYWORDS |
filter-dentist a/phone k/90182211 |
| Edit Dentist | edit-dentist DENTIST_ID [n/NAME] [p/PHONE] [e/EMAIL] [a/ADDRESS] [s/SPECIALIZATION] [y/YOE] [t/TAG]… |
edit-dentist 1 p/98987676 e/bobjuly@gmail.com |
Patient Commands
| Action | Format | Example |
|---|---|---|
| Add Patient | add-patient n/NAME p/PHONE b/BIRTHDATE g/GENDER [r/REMARK] [tr/TREATMENT] [e/EMAIL] [h/ADDRESS] [t/TAG]… |
add-patient n/John p/90676622 b/06-06-1998 g/M r/Allergic to Peanuts tr/Braces e/johntan@gmail.com h/60 Harvey Avenue t/Urgent |
| List Patient | list-patient |
list-patient |
| Delete Patient | delete-patient PATIENT_ID |
delete-patient 3 |
| Search Patient by Patient ID | search-patient PATIENT_ID |
search-patient 3 |
| Search Patient by Keyword | search-patient KEYWORD |
search-patient John |
| Filter Patient | filter-patient a/ATTRIBUTE k/KEYWORDS |
filter-patient a/phone k/98776211 |
| Editing Patient | edit-patient PATIENT_ID [n/NAME] [p/PHONE] [b/BIRTHDATE] [g/GENDER] [r/REMARK] [tr/TREATMENT] [e/EMAIL] [h/ADDRESS] [t/TAG]… |
edit-patient 1 p/91234567 e/johndoe@example.com r/Allergic to Peanuts |
Appointment Commands
| Action | Format | Example |
|---|---|---|
| Add Appointment | add-appointment dentist/DENTIST_ID patient/PATIENT_ID start/START_TIME tr/TREATMENT |
add-appointment dentist/1 patient/1 start/2023-10-12 16:00 tr/Braces |
| List Appointment | list-appointment |
list-appointment |
| Delete Appointment | delete-appointment APPOINTMENT_ID |
delete-appointment 3 |
| Filter Appointment by Dentist ID | filter-appointment dentist DENTIST_ID |
filter-appointment dentist 1 |
| Filter Appointment by Patient ID | filter-appointment patient PATIENT_ID |
filter-appointment patient 1 |
Treatment Commands
| Action | Format | Example |
|---|---|---|
| Add Treatment | add-treatment tr/NAME cs/PRICE ti/DURATION |
add-treatment tr/Tooth Extraction cs/150 ti/01:00 |
| List Treatment | list-treatment |
list-treatment |
| Delete Treatment | delete-treatment NAME |
delete-treatment Braces |
Calendar Commands
| Action | Format | Example |
|---|---|---|
| View calendar | view-calendar |
view-calendar |
General Commands
| Action | Format | Example |
|---|---|---|
| Help | help |
help |
| Clear all data | clear |
clear |
| Exit ToothTracker | exit |
exit |
Acknowledgements
- Java dependencies:
- JavaFX for GUI
- Jackson for JSON-related operations
- JUnit5 for testing
- CalendarFX for CalendarView
- User Guide drew inspiration from:
- Developer Guide drew inspiration from:
- Code Acknowledgements: